- English
- Čeština
- Italiano
- Deutsch
- Polski
- Français
- Home
- Resolución de problemas
- Resolución de problemas
- Selftest failed (XL multi-tool)
Selftest failed (XL multi-tool)
- Resolución de problemas de la calidad de impresión
- Códigos QR de error
- Resolución de problemas
- Recalentamiento A64 #10207 (SL1/SL1S)
- Comprobación de la temperatura ambiente (MK3 / MK3S)
- Temperatura ambiente demasiado fría #10703 (SL1/SL1S)
- Temperatura ambiente demasiado alta #10702 (SL1/SL1S)
- Ha ocurrido un error inesperado #10701 (SL1)
- No se puede ejecutar esta acción #10506 (SL1/SL1S)
- BBF Allocation Failed #17531 (XL)
- Fallo Asignación BBF #13531 (MK4) #21531 (MK3.9) #23531 (MK3.5)
- Inicialización de BBF fallida #17532 (XL)
- Fallo Inicialización BBF #13532 (MK4) #21532 (MK3.9) #23532 (MK3.5)
- Error maxtemp base #13205 (MK4) #21205 (MK3.9) #23205 (MK3.5)
- Error mintemp base #13207 (MK4) #21207 (MK3.9) #23207 (MK3.5)
- Error precalentamiento base #13201 (MK4) #21201 (MK3.9) #23201 (MK3.5)
- Deriva térmica Base #13203 (MK4) #21203 (MK3.9) #23203 (MK3.5)
- Fusible Fundido (MINI)
- Fusible Fundido (MK2S- MK2.5- MK2.5S)
- Fusible fundido (MK3/MK3S/MK3S+)
- Fusible fundido (MK4/S, MK3.9/S)
- Blue Screen of Death - Pantalla Azul de la Muerte (BSOD)
- Problema en la placa Boost #10320 (SL1S)
- Impresora bloqueada (SL1/SL1S)
- El proyecto de calibración no es válido #10543 (SL1/SL1S)
- No se puede copiar el proyecto #10704 (SL1/SL1S)
- Canal de actualización no disponible #10514 (SL1)
- No se puede leer el proyecto #10539 (SL1/SL1S)
- No se puede eliminar el proyecto #0545 (SL1/SL1S)
- Hotend atascado (MK4)
- Hotend atascado (XL)
- Boquilla/Hotend atascado (MINI/MINI+)
- Boquilla/Hotend atascado (MK3.5/S, MK3S+, MK2.5S)
- Connect Registration Failed
- Connect Registration Failed #12401 (MINI)
- Connect Registration Failed #17401 (XL)
- Connect Registration Failed #21401 (MK3.9)
- Connect Registration Failed #23401 (MK3.5)
- Connect Registration Failed #26401 (MK4S) #13401 (MK4)
- Directorio no está vacío #10546 (SL1/SL1S)
- Panel LED UV desconectado #10321 (SL1/SL1S)
- Fallo en la comprobación de la pantalla #10120 (SL1/SL1S)
- Error Dwarf #17502 (XL)
- Error Dwarf #17503 (XL)
- EEPROM I2C Receive Busy #17316 (XL)
- EEPROM I2C Receive Busy #13316 (MK4) #21316 (MK3.9) #23316 (MK3.5)
- Emergency stop #12510 (MINI)
- Emergency stop #17510 (XL)
- Parada de emergencia #13510 (MK4) #21510 (MK3.9) #23510 (MK3.5)
- Error ESP #17504 (XL)
- Error ESP #17505 (XL)
- ESP error #17506 (XL)
- Error ESP #13504 (MK4) #21504 (MK3.9) #23504 (MK3.5)
- Error ESP #13505 (MK4) #21505 (MK3.9) #23505 (MK3.5)
- Error ESP #13506 (MK4) #21506 (MK3.9) #23506 (MK3.5)
- ESP not connected #17533 (XL)
- Posible recalentamiento #10714 (SL1/SL1S)
- La memoria Flash externa SPI W25X20CL/xFLASH no responde - error
- Residuos en el extrusor
- EXTRUDER ERROR #17536 (XL)
- Extruder Maxtemp error #17206 (XL)
- Error Mintemp Extrusor #17208 (XL)
- Ruidos en el extrusor
- Error precalentamiento extrusor #17202 (XL)
- Temp extrusor no coincide #17210 (XL)
- Deriva térmica extrusor #17204 (XL)
- La extrusión se detuvo a mitad de la impresión (por recalentamiento)
- Ajustes de Fábrica (MINI)
- Restablecimiento a opciones de fábrica (MK2S/MK2.5S/MK3S)
- Restablecimiento de fábrica (MK4/S, MK3.9/S, MK3.5, XL)
- Factory Reset (MMU)
- Ajustes de Fábrica (MMU2S pre firmware 1.0.6)
- Ajustes de Fábrica (SL1/SL1S)
- Fallo al leer el archivo de configuración #10505 (SL1)
- Fallo en la calibración Z (MK3S/MK2.5S)
- Fallo ventilador #10106 (SL1/SL1S)
- Advertencia de ventilador #10713 (SL1/SL1S)
- El filamento no se ha descargado (MINI/MINI+)
- El filamento no se carga
- El filamento no carga (MK4/S, MK3.9/S)
- El filamento no carga (XL)
- Sensor de filamento (MK4, MK3.9, XL)
- ¡El archivo ya existe! #10520 (SL1)
- Archivo no encontrado #10518 (SL1/SL1S)
- Error del sistema de archivos #12613 (MINI/MINI+)
- Error del sistema de archivos #13613 (MK4) #21613 (MK3.9) #23613 (MK3.5)
- Configuración y resolución de problemas de FINDA
- FINDA: Filamento atascado #04102 (MMU)
- ¡Firmware en la flash interna dañado! #12608 (MINI)
- Firmware missing #17612 (XL)
- Actualización de Firmware Necesaria #13701 (MK4) #21701 (MK3.9) #23701 (MK3.5)
- Problemas de actualización de firmware (MK2.5S/MK3S+/MMU2S/MMU3)
- La primera capa no se pega (SL1/SL1S)
- Error de borrado de flash #12605 (MINI/MINI+)
- Flash erase error #17605 (XL)
- Error de borrado de flash #13605 (MK4) #21605 (MK3.9) #23605 (MK3.5)
- FW in internal flash corrupted #17608 (XL)
- FW en flash interno dañado #13608 (MK4) #21608 (MK3.9) #23608 (MK3.5)
- Fallo en la verificación del hash #12607 (MINI/MINI+)
- Fallo en la verificación del hash #17607 (XL)
- Fallo en la verificación del hash #13607 (MK4) #21607 (MK3.9)
- La base calefactable no se está calentando correctamente
- Sobrecorriente Puerto Base calefactable #13309 (MK4) #21309 (MK3.9) #23309 (MK3.5)
- Heatbed temp not matching #17209 (XL)
- Error Maxtemp Heatbreak #17212 (XL)
- Error MAXTEMP Heatbreak #13212 (MK4) #21212 (MK3.9)
- Error Mintemp Heatbreak #17211 (XL)
- Error MINTEMP Heatbreak #13211 (MK4) #21211 (MK3.9)
- Error de Homing #12301 (MINI)
- Error Homing X #12304 (MINI/MINI+)
- Homing error X #17304 (XL)
- Error Homing X #13304 (MK4) #21304 (MK3.9) #23304 (MK3.5)
- Error Homing Y #12305 (MINI/MINI+)
- Homing error Y #17305 (XL)
- Error de Posicionamiento del Eje Y #13305 (MK4) #21305 (MK3.9) #23305 (MK3.5)
- Error Homing Z #17301 (XL)
- Homing Error Z #23301 (MK3.5)
- Error Homing Z #13301 (MK4) Z #21301 (MK3.9)
- El ventilador del fusor no está girando
- Hotend Heater Overcurrent #17322
- Hotend maxtemp error #23206 (MK3.5)
- Hotend mintemp error #23208 (MK3.5)
- Error mintemp hotend #13208 (MK4) #21208 (MK3.9)
- Hotend preheat error #23202 (MK3.5)
- Error precalentamiento hotend #13202 (MK4) #21202 (MK3.9)
- Hotend temp not matching #13210 (MK3.9/MK4)
- Hotend temp not matching #23210 (MK3.5)
- Hotend thermal runaway #23204 (MK3.5)
- Deriva térmica Hotend #13204 (MK4) #21204 (MK3.9)
- I2C Receive failed #17315 (XL)
- I2C Receive failed #13315 (MK4) #21315 (MK3.9) #23315 (MK3.5)
- I2C Receive Timeout #17317 (XL)
- I2C Receive Timeout #13317 (MK4) #21317 (MK3.9) #23317 (MK3.5)
- I2C Receive undefined #17318 (XL)
- I2C Receive undefined #13318 (MK4) #21318 (MK3.9) #23318 (MK3.5)
- I2C Send Busy #17312 (XL)
- I2C Send Busy #13312 (MK4) #21312 (MK3.9) #23312 (MK3.5)
- I2C Send failed #17311 (XL)
- I2C Send failed #13311 (MK4) #21311 (MK3.9) #23311 (MK3.5)
- I2C Send Timeout #17313 (XL)
- I2C Send Timeout #13313 (MK4) #21313 (MK3.9) #23313 (MK3.5)
- I2C Send Undefined #17314 (XL)
- I2C Send Undefined #13314 (MK4) #21314 (MK3.9) #23314 (MK3.5)
- ¡Impostor! Firma falsa #17606 (XL)
- Modelo de impresora incorrecto #10705 (SL1/SL1S)
- Memoria interna llena #10516 (SL1/SL1S)
- Clave API no válida #10405 (SL1/SL1S)
- Tamaño de FW no válido en USB #12603 (MINI/MINI+)
- Tamaño de FW no válido en USB #13603 (MK4) #21603 (MK3.9) #23603 (MK3.5)
- Invalid FW size on USB flash drive #17603 (XL)
- Calibrado del sensor del filamento IR (MMU3, MMU2S)
- Resolución de problemas del sensor de filamento IR (MINI/MINI+)
- Resolución de problemas del sensor de filamento IR (MK2.5S, MK3S)
- La pantalla LCD no funciona
- Error de Memoria LED #17529 (XL)
- Error de memoria LED #13529 (MK4) #21529 (MK3.9) #23529 (MK3.5)
- El Ajuste en vivo Z no se guarda
- Load to extruder failed #04108 (MMU)
- Mala Configuración Célula de carga #17527 (XL)
- Mala Configuración Célula de carga #13527 (MK4) #21527 (MK3.9)
- Fallo medición célula de carga #17526 (XL)
- Fallo Medición Célula de carga #13526 (MK4) #21526 (MK3.9)
- Célula de carga no calibrada #17523 (XL)
- Célula de carga No Calibrada #13523 (MK4) #21523 (MK3.9)
- Error tara célula de carga #17524 (XL)
- Error Tara Célula de Carga #13524 (MK4) #21524 (MK3.9)
- Fallo tara célula de carga #17525 (XL)
- Fallo Tara Célula de carga #13525 (MK4) #21525 (MK3.9)
- Timeout célula de carga #17528 (XL)
- Timeout Célula de carga #13528 (MK4) #21528 (MK3.9)
- Loadcell troubleshooting
- Registro de datos por línea serial (MMU2S)
- Fuertes ruidos causados por la impresora (SL1/SL1S)
- Prueba del sensor M.I.N.D.A./SuperPINDA (MINI/MINI+)
- Timeout Solicitud Marlin #17530 (XL)
- Timeout Solicitud Marlin #13530 (MK4)) #21530 (MK3.9) #23530 (MK3.5)
- Aviso máscara inservible #10709 (SL1/SL1S)
- Error Maxtemp en la base #12205 (MINI)
- Error Maxtemp en el fusor #12206 (MINI)
- MCU Maxtemp Error #17213 (XL)
- Error mintemp en la base #12207 (MINI)
- Error Mintemp en el fusor #12208 (MINI)
- Sensor PINDA desalineado (MK2/S)
- Faltan piezas (SL1/SL1S)
- La MK3S sigue solicitando el cambio de filamento
- Subtensión MCU MMU #04307 (MMU)
- MMU Overcurrent #26310 (MK4S) #13310 (MK4) #21310 (MK3.9) #23310 (MK3.5)
- Tensor MMU2S no puede moverse libremente
- Significado de los LED MMU2S
- El selector MMU2S no se mueve
- Error cama modular #17250 (XL)
- Error cama modular #17251 (XL)
- Error cama modular #17252 (XL)
- Error cama modular #17253 (XL)
- Error cama modular #17254 (XL)
- Error cama modular #17255 (XL)
- Error cama modular #17256 (XL)
- Error cama modular #17257 (XL)
- Modular bed error #17302 (XL)
- Modular bed error #17303 (XL)
- Error Cama Modular #17319 (XL)
- Error Cama Modular #17320 (XL)
- Error cama modular #17501 (XL)
- Uso del multímetro
- No hay archivos en USB #12604 (MINI/MINI+)
- Falta archivo que reimprimir #10508 (SL1)
- No FW en flash interno #12612 (MINI/MINI+)
- No FW en flash interno #13612 (MK4) #21612 (MK3.9)
- No hay FW en USB #13604 (MK4) #21604 (MK3.9) #23604 (MK3.5)
- No FW on USB flash drive #17604 (XL)
- No hay conexión a la red #10402 (SL1/SL1S)
- No hay suficientes capas #10540 (SL1/SL1S)
- No hay suficiente resina #10706 (SL1/SL1S)
- Nozzle Cleaning Failed (MK4, MK3.9)
- Limpieza de la Boquilla Fallida. (XL)
- Boquilla estrellada en la base calefactable
- Nozzle Heater Overcurrent #23308 (MK3.5)
- Sobrecorriente Calentador Boquilla #13308 (MK4) #21308 (MK3.9)
- Advertencia de pieza recortada #10710 (SL1/SL1S)
- No se pudo abrir el proyecto #10504 (SL1/SL1S)
- Sin memoria #17507 (XL)
- Sin memoria #13507 (MK4) #21507 (MK3.9) #23507 (MK3.5)
- Comprobación de la sonda P.I.N.D.A./SuperPINDA
- Parámetros fuera de rango #10707 (SL1/SL1S)
- Pin not reached #17107 (XL)
- Buffer PNG Lleno #17508 (XL)
- Buffer PNG Lleno #13508 (MK4) #21508 (MK3.9) #23508 (MK3.5)
- Error precalentamiento base #12201 (MINI)
- Error de precalentamiento cabezal impresión #12202 (MINI)
- Error de precarga #10503 (SL1/SL1S)
- Faltan ejemplos de impresión #10523 (SL1/SL1S)
- El ventilador de impresión no está girando
- La impresora no se enciende o sigue apagándose
- El análisis del proyecto falló #10542 (SL1/SL1S)
- El proyecto está dañado #10541 (SL1/SL1S)
- Resolución de problemas de PrusaLink
- Puppy error #17511 (XL)
- Puppy error #17512 (XL)
- Puppy error #17513 (XL)
- Puppy error #17514 (XL)
- Puppy error #17515 (XL)
- Error Puppy #17516 (XL)
- Puppy error #17517 (XL)
- Puppy error #17518 (XL)
- Error Puppy #17519 (XL)
- Puppy error #17520 (XL)
- Puppy error #17521 (XL)
- Puppy error #17522 (XL)
- Error de API remota #10407 (SL1/SL1S)
- Nivel de resina bajo # 10712 (SL1/SL1S)
- La medición de resina falló #10124 (SL1/SL1S)
- Error sensor de resina #10307 (SL1/SL1S)
- Resina muy alta #10109 (SL1/SL1S)
- Resina muy baja #10108 (SL1/SL1S)
- Sample G-codes
- Guardar archivo de registro (SL1/SL1S)
- Tarjeta SD no funciona
- Tarjetas SD y unidades USB
- Selftest failed (XL multi-tool)
- Selftest procedure checks
- First, belts!
- Fan test
- Y and X axes test
- Z alignment calibration
- Dock Position calibration
- Loadcell test
- Nozzle diameter confirmation
- Z axis test
- Nozzle heater test
- Filament sensor
- Tool offset calibration
- Bed heater test
- Phase stepping calibration
- Fallo Selftest (XL)
- Fallo en la verificación de la firma #12606 (MINI/MINI+)
- Fallo en la verificación de la firma #13606 (MK4) #21606 (MK3.9) #23606 (MK3.5)
- Error SL1 Mecanismo inclinación
- Monstruo de espagueti
- Cómo cuadrar tu MINI
- Explicación LED de estado (MK4/XL)
- Status LED explained (MMU3)
- Stuck filament detection #26101 (MK4S) #13101 (MK4) #21101 (MK3.9) #17108 (XL)
- Tangled filament
- Temp no cuadra base calefactable #12209 (MINI/MINI+)
- Temp no cuadra cabezal de impresión #12210 (MINI/MINI+)
- Temperatura fuera de rango #10208 (SL1/SL1S)
- Deriva térmica en la base #12203 (MINI)
- Deriva térmica en el fusor #12204 (MINI)
- Corto driver TMC #04304 (MMU)
- Corto driver TMC #04314 (MMU)
- Corto driver TMC #04324 (MMU)
- Tool offset out of bounds #17104 (XL)
- Error cambiador #17101 (XL)
- Toolchanger problem (XL multi-tool)
- Fallo en movimiento de la torre #10118 (SL1/SL1S)
- No autorizado #10406 (SL1/SL1S)
- Under-extrusion (Nextruder printers)
- Error inesperado #10501 (SL1/SL1S)
- Error inesperado MC #10306 (SL1/SL1S)
- Modelo de impresora desconocido #10323 (SL1/SL1S)
- Versión BBF no compatible #12614 (MINI/MINI+)
- Versión BBF no compatible #13614 (MK4) #21614 (MK3.9) #23614 (MK3.5)
- Unsupported Buddy FW #17611 (XL)
- Unsupported firmware BBF file #17614 (XL)
- Unsupported printer model #17610 (XL)
- Tipo de impresora no compatible #12610 (MINI/MINI+)
- Tipo de impresora no compatible #13610 (MK4) #21610 (MK3.9) #23610 (MK3.5)
- Versión de impresora no compatible #12611 (MINI/MINI+)
- Versión de impresora no compatible #13611 (MK4) #21611 (MK3.9) #23611 (MK3.5)
- USB Device Overcurrent #17307 (XL)
- Sobrecorriente Dispositivo USB #13307 (MK4) #21307 (MK3.9) #23307 (MK3.5)
- Dispositivo USB no detectado #10528 (SL1/SL1S)
- USB flash drive not connected #17602 (XL)
- USB flash error #17613 (XL)
- USB no conectado #12602 (MINI/MINI+)
- USB no conectado #13602 (MK4) #21602 (MK3.9) #23602 (MK3.5)
- USB Port Overcurrent #17306 (XL)
- Sobrecorriente Puerto USB #13306 (MK4) #21306 (MK3.9) #23306 (MK3.5)
- Fallo lectura temperatura LED UV #10209 (SL1/SL1S)
- Error de voltaje del led UV #10309 (SL1)
- Vibración al imprimir (MK3S+/MK2.5S)
- Modelo de impresora incorrecto #10544 (SL1/SL1S)
- Revisión incorrecta del controlador de movimiento #10301 (SL1)
- XY position invalid #17106 (XL)
- XY probe unstable #17105 (XL)
- Mensajes de Error de Impresión
On the Original Prusa XL, the selftest checks for issues in the assembly of the printer, its wiring, and the electronic components. It is the first part of the Calibration Wizard, which is prompted automatically when you turn on the printer for the first time or after a Fallo Selftest (XL). After the initial calibration is completed, the selftest can be initiated in LCD Menu - Control - Calibrations & Tests.
Selftest procedure checks
- Fan test
- Y axis test
- X axis test
- Z alignment calibration
- Dock position calibration
- Loadcell test
- Nozzle diameter confirmation
- Z axis test
- Nozzle heaters test
- Filament sensor calibration
- Tool offset calibration
- Bed heater test
- Phase stepping calibration
Progress and results of each step are displayed on the LCD screen. After the selftest, you can check the results at any time in the printer menu at LCD Menu -> Control -> Calibrations & Tests. If the step fails, it will show a red "x" near it.
First, belts!
The belts will affect most of the selftest procedures on your Original Prusa XL. Because of that, carefully read the prepared guide about Ajuste de la tensión de la correa (XL) in case you have any issues with your selftest related to the axes, dock position calibration, or tool offset calibration.
Fan test
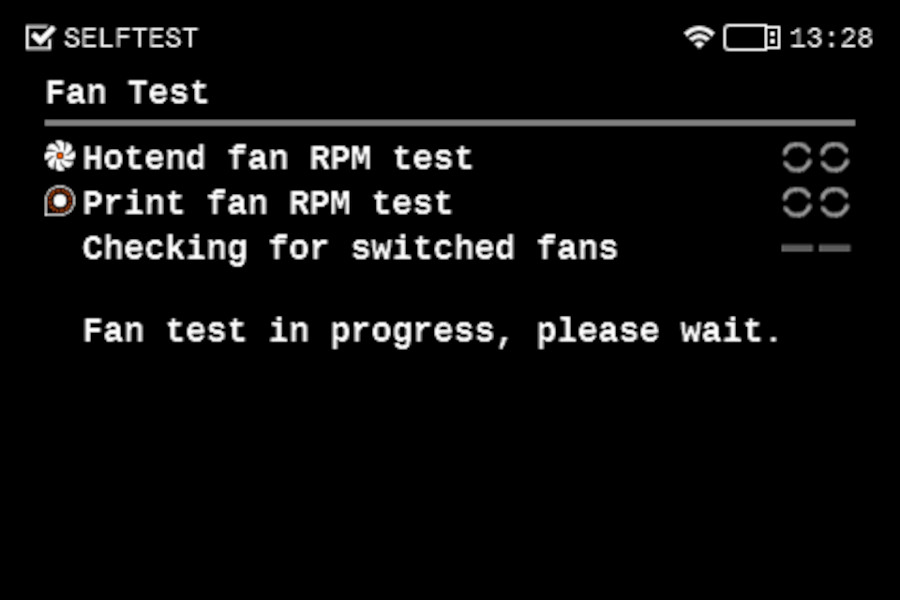
The fans selftest checks if they are properly connected, if nothing is blocking their way, and if their connections are not switched on the dwarf board. For that, the firmware measures the fans` RPM, and they need to be between these values:
- Print fan: 5300 - 6799 RPM
- Hotend fan: 6800 - 8700 RPM
If one of the tests fails, you will see a red "x" near the failed part.
- Make sure that both of your fans are connected to the Dwarf board in their respective places.
- Check for any blockage that could prevent either of the fans from spinning.
- Try removing the fan shroud and make the test again. If it passes without the shroud, install the fan shroud back and continue the test. There is no need to remake the test with the shroud.
 |
Y and X axes test
The printer can determine if the components are moving correctly along each axis.
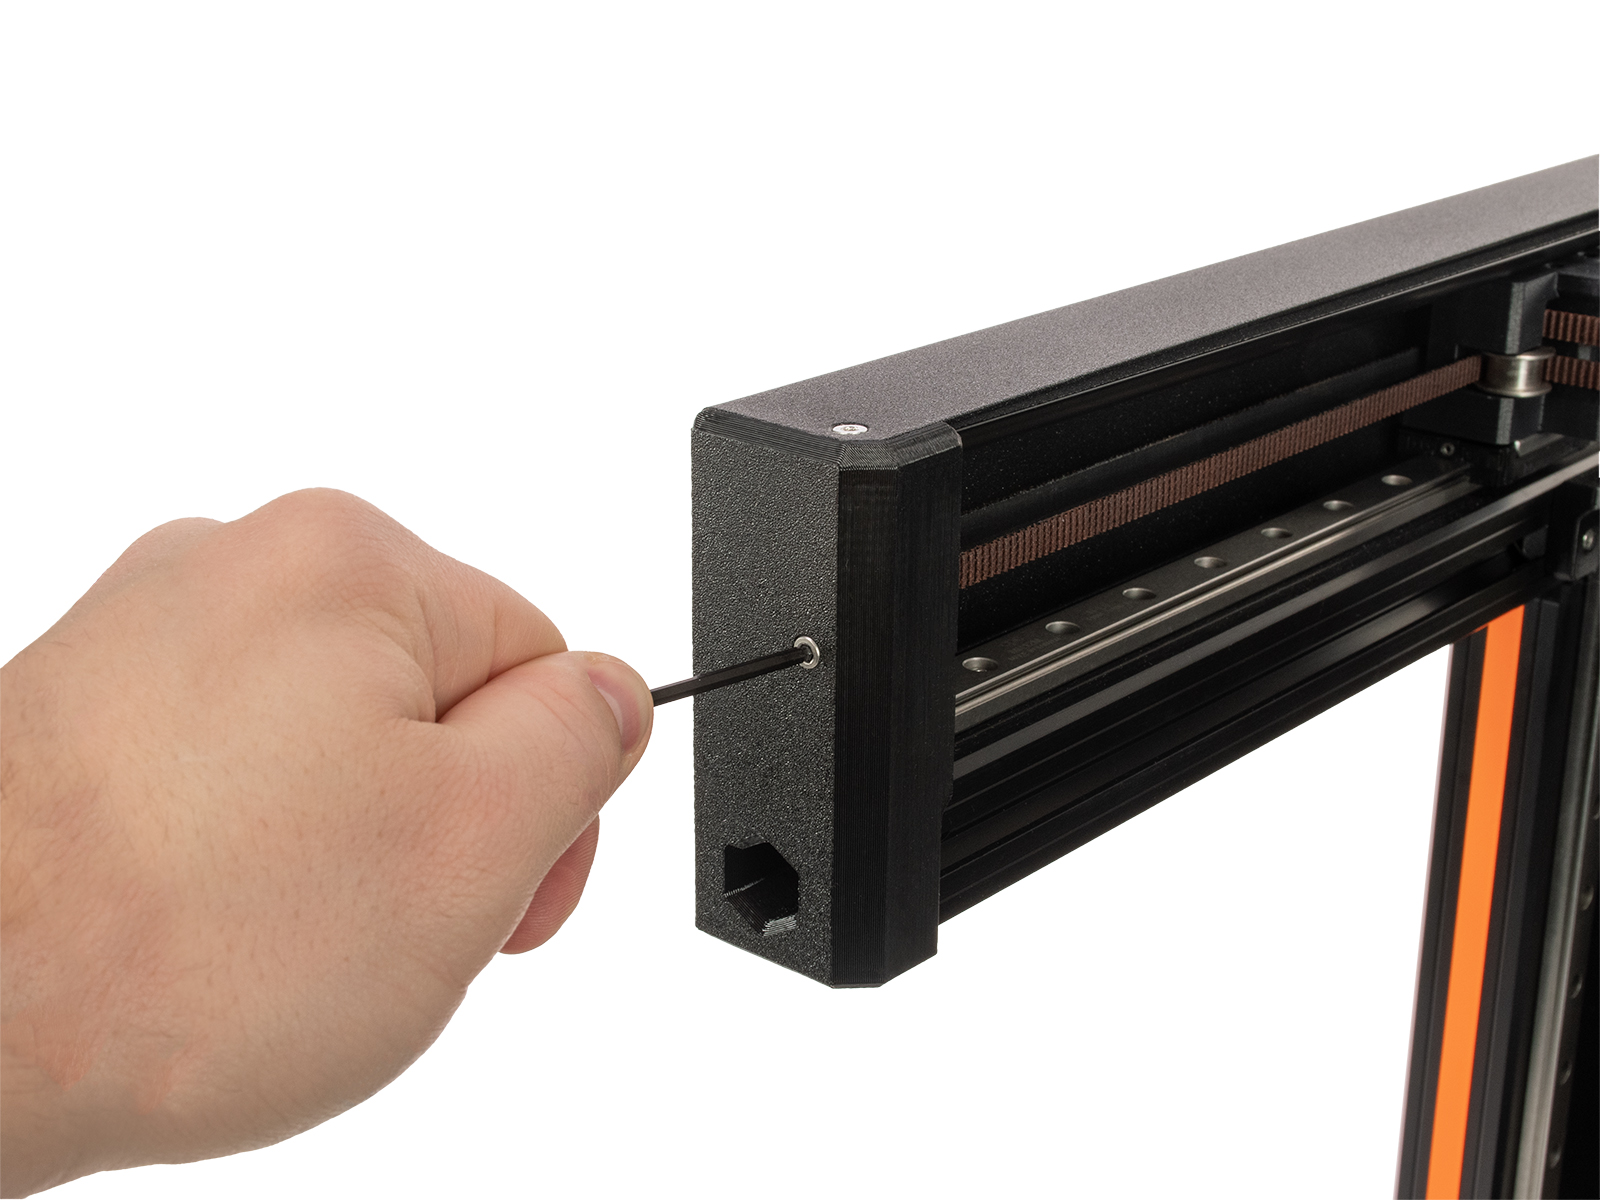
If the X and/or Y axes do not pass the test, move the tool changer by hand in different directions, and check for resistance.
If the axes make a metal-on-metal sound, check if any of the balls from the rail fell. If you are not sure, take a video where the noise is clear, and send it to our Atención al cliente.
Z alignment calibration
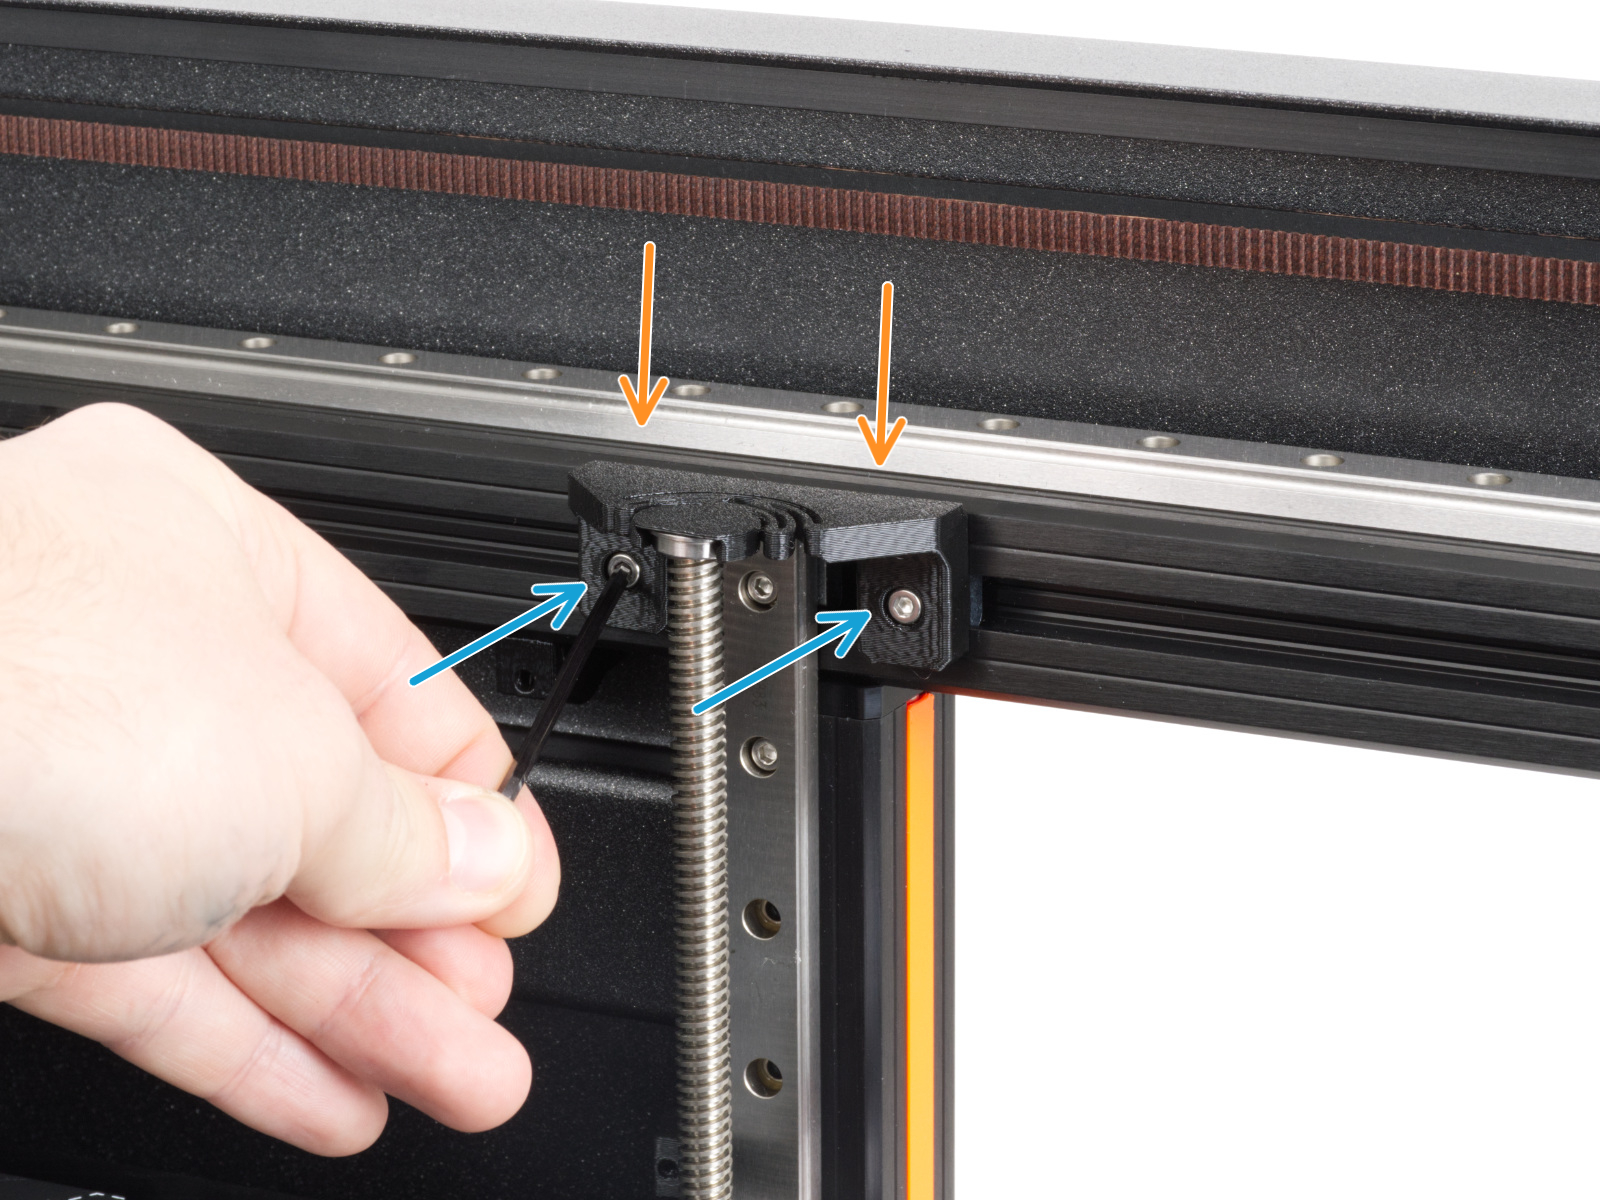
This step will align the heatbed by moving the Z axis up and down. If there is an issue with this test, try checking the trapezoid nuts, the heatbed alignment, and if the Z-axis lead screws are not bent or wobbly.
If the issue persists, try slightly loosening the screws on the z-axis bearing housing. Do not remove them, but make sure that the screws are not tightened.
Dock Position calibration
This part of the selftest determines the dock position for picking and parking tools. It is recommended to open the step-by-step guide for easier understanding. If the light on the print head is yellow, don't hesitate to contact our Atención al cliente.
If the error Dock position out of bounds #17103 (XL) [Traducción en desarrollo] shows, follow the troubleshooting steps.
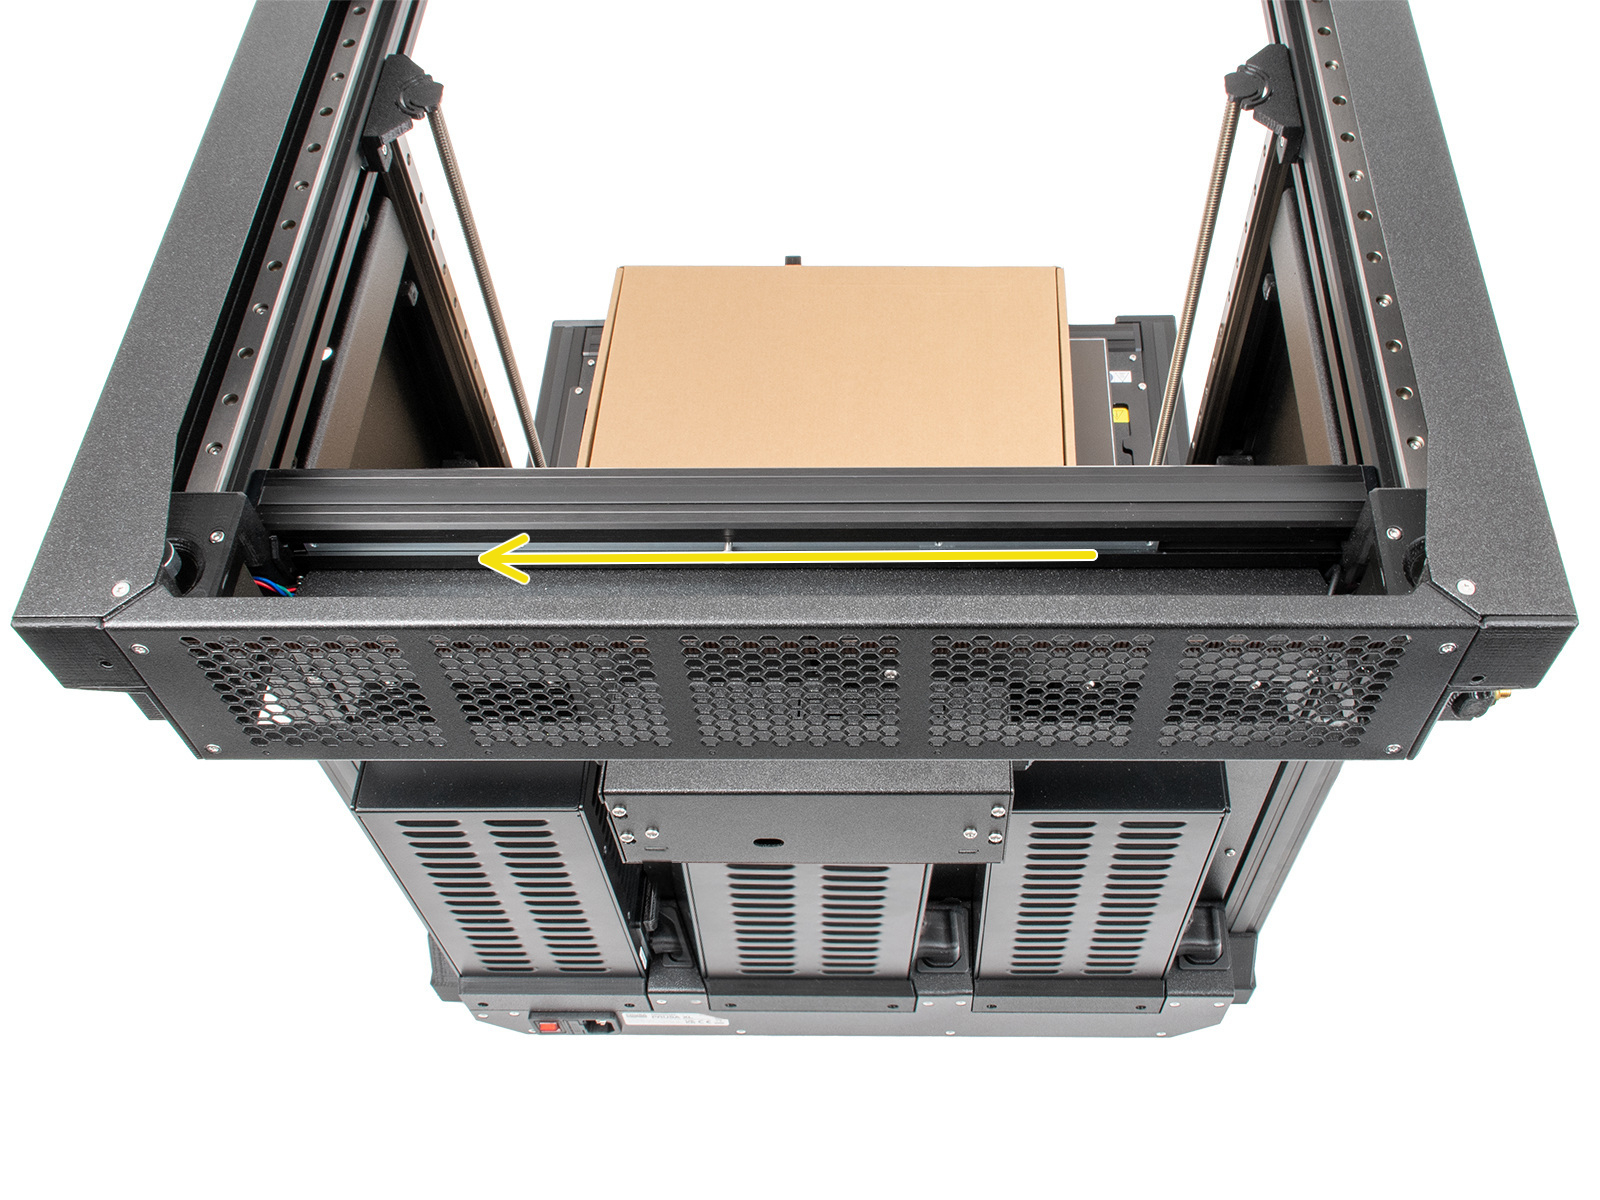
If the calibration ends with a red "x", it means that the tool could not successfully find the dock. Make sure that the cable bundle on the tool head is not bent or impairing its movement. Check the dock position: if it is not wiggling, if the metal part of the dock is perpendicular to the extrusions, and if they are fully seated in the extrusions with no gaps, and that the metal profile that holds the extruders is all the way to the left. If you see any of those things, try loosening the dock and tightening it again.
 |
Loadcell test
A functioning loadcell is fundamental for the Original Prusa XL to detect that the nozzle is close enough to the steel sheet for printing, and to avoid damage that would be caused by the nozzle digging into the steel sheet.
- Make sure that the loadcell is correctly connected to the Dwarf board.
- Make sure that the surface the printer is on is as stable as possible. Any form of vibration propagated to the surface under the printer, or a not fully stable surface under the printer might cause a false reading on the loadcell, causing it to fail the selftest. This includes other printers printing near the XL during the selftest.
Nozzle diameter confirmation
The initial Original Prusa XL units were shipped with the 0.6 mm nozzles but then started being shipped with the 0.4 mm nozzles. Check which one is yours based on this guide and confirm it in the menu.
Z axis test
This part of the selftest checks the full length of the Z-axis. Note that this test uses the Loadcell, so if you have any issues with the Loadcell calibration it will also not pass. If no problems are observed in the Loadcell, check if anything is blocking the heatbed from moving across its full track or if something is touching the extruder.
Nozzle heater test
This test will heat all the heaters to see if they are working. If any of the heaters show an error, try swapping the heater cable with one of the other tool heads. See if the error will be transferred to the other toolhead, or if it will remain in the same one. Then, do the same procedure with the thermistor. If in both cases the issue remains in the same tool head, the issue should be on the board. If the problem is transferred to the new tool head then the cable that was transferred needs to be replaced. Make a documentation of the problem, and send it to our Atención al cliente.
Filament sensor
The Original Prusa XL is equipped with two filament sensors: the first one is located on the side, close to the input of the PTFE tube where you feed the filament. The second one is located in the extruder. Both filament sensors are necessary for the correct filament retraction: when the sensor on the side detects that the filament has run out, the filament will be retracted in time.
Usually, any issues in the sensor are caused by having the springs that trigger the sensor being stuck with dirt and filament strings. In case this happens, clean the side filament sensor or the tool head filament sensor.
If that does not help, make sure that the tool head filament sensor is connected to the Dwarf board, and that the side filament sensor is well connected to the sandwich board.
Tool offset calibration
The multi-tool format of the XL makes this calibration necessary to ensure that, when there is a tool change, the new tool will correctly continue the print. If one of the tools deviates too far from the expected range compared to the first tool head, an error will appear and the calibration will be interrupted. It is important to note that all tools are adjusted based on the first tool. So if there is an issue with the second to fifth tool, it might be due to a problem with the first tool calibration.
If any filament is loaded, unload it before starting this calibration.
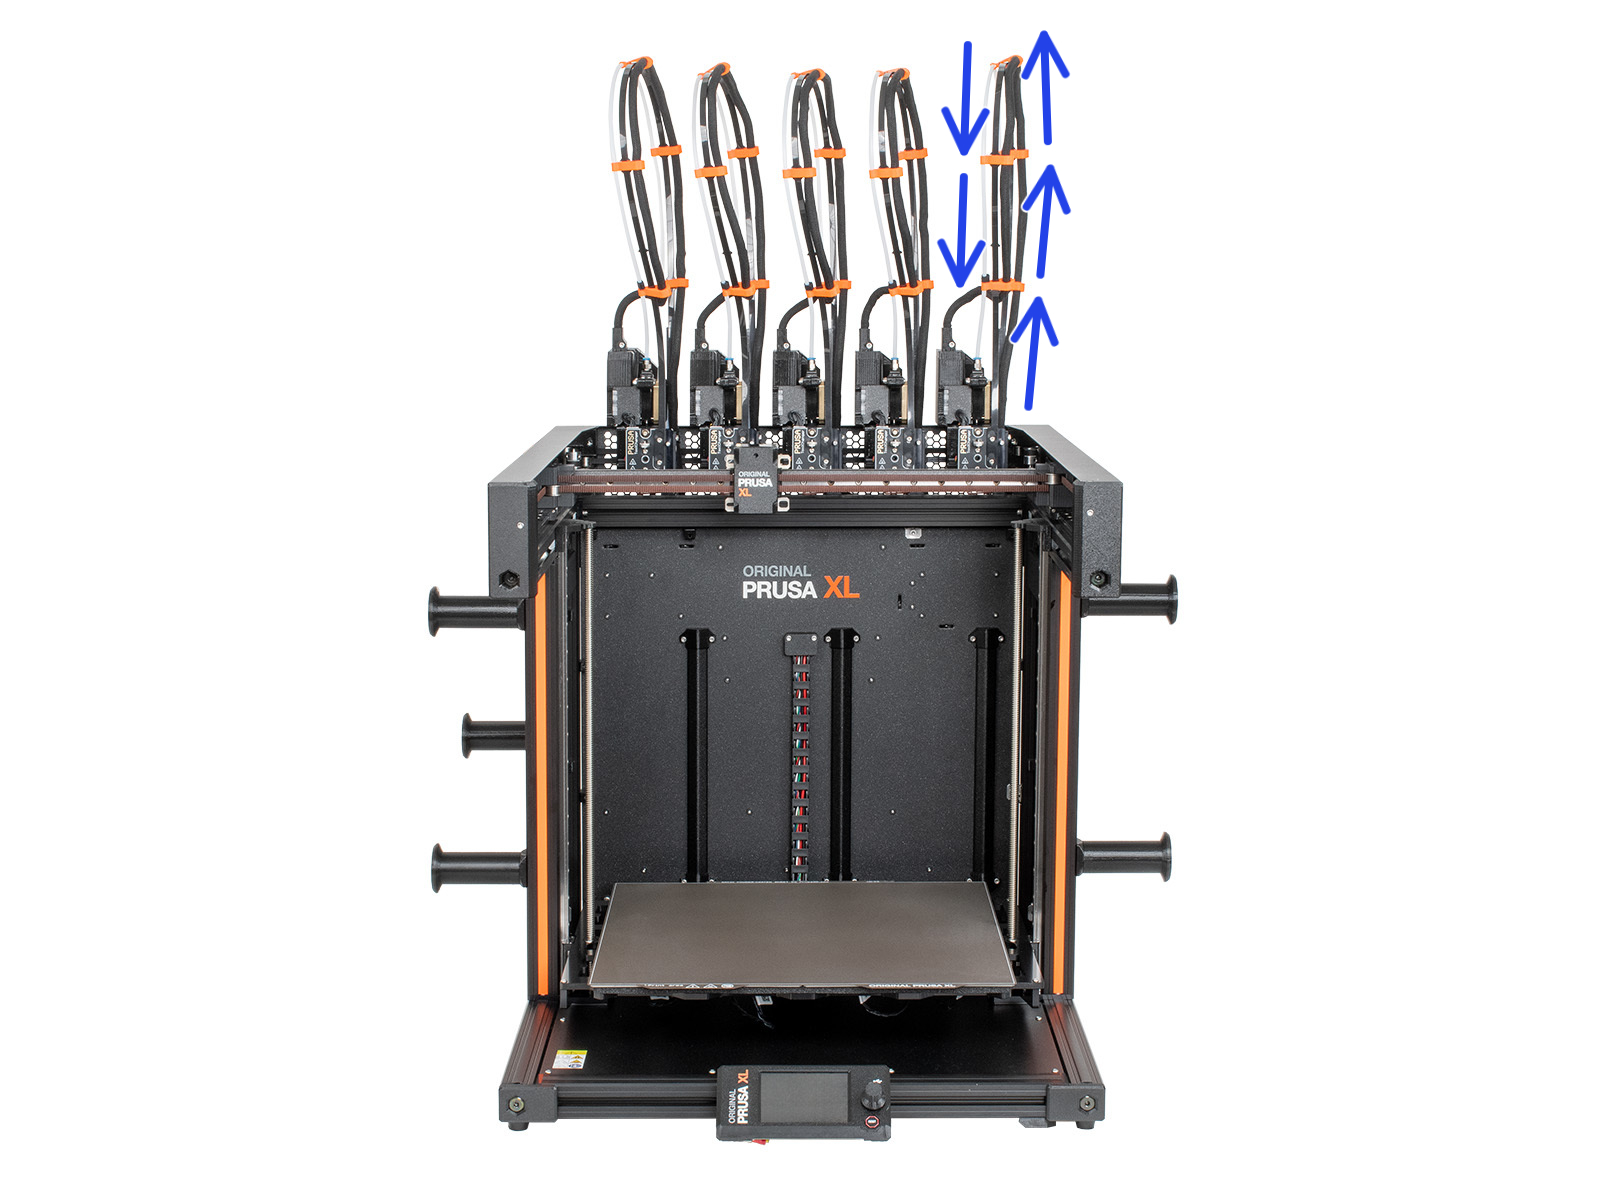
If the calibration fails, first check the movement of the tool head after it is picked. The flexible plate that holds up the cable bundles and the PTFE needs to be in a straight line so that the cables are not bent or falling to the sides.
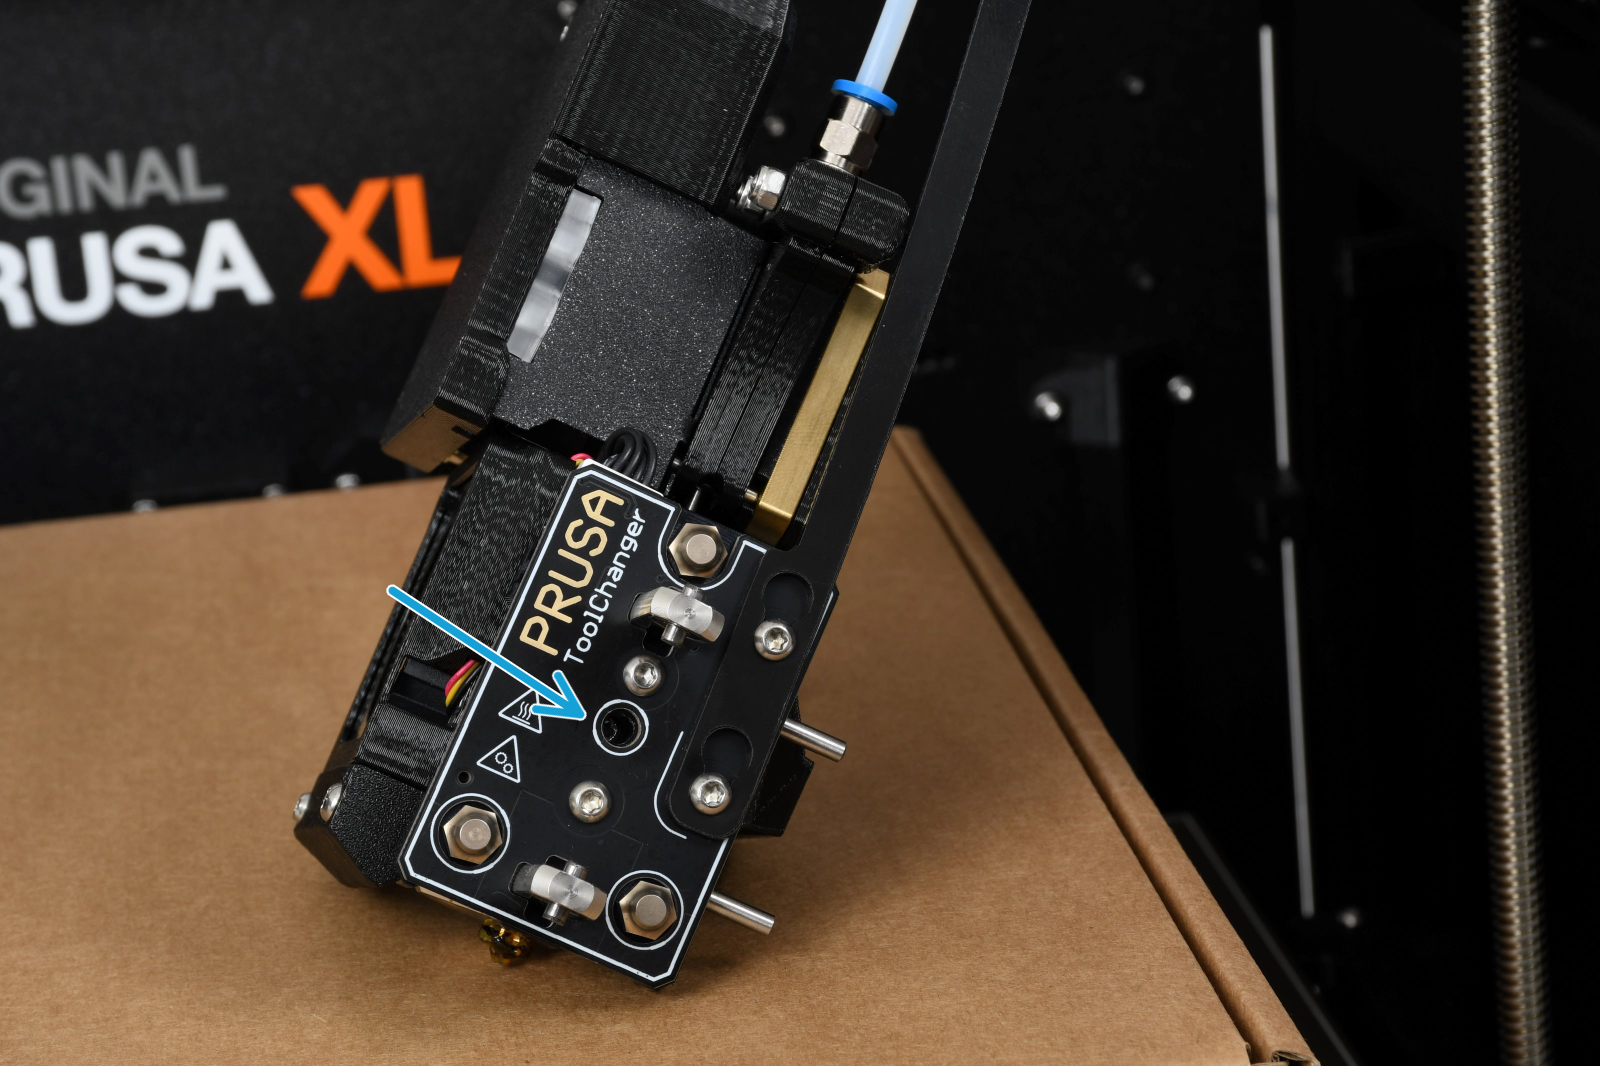
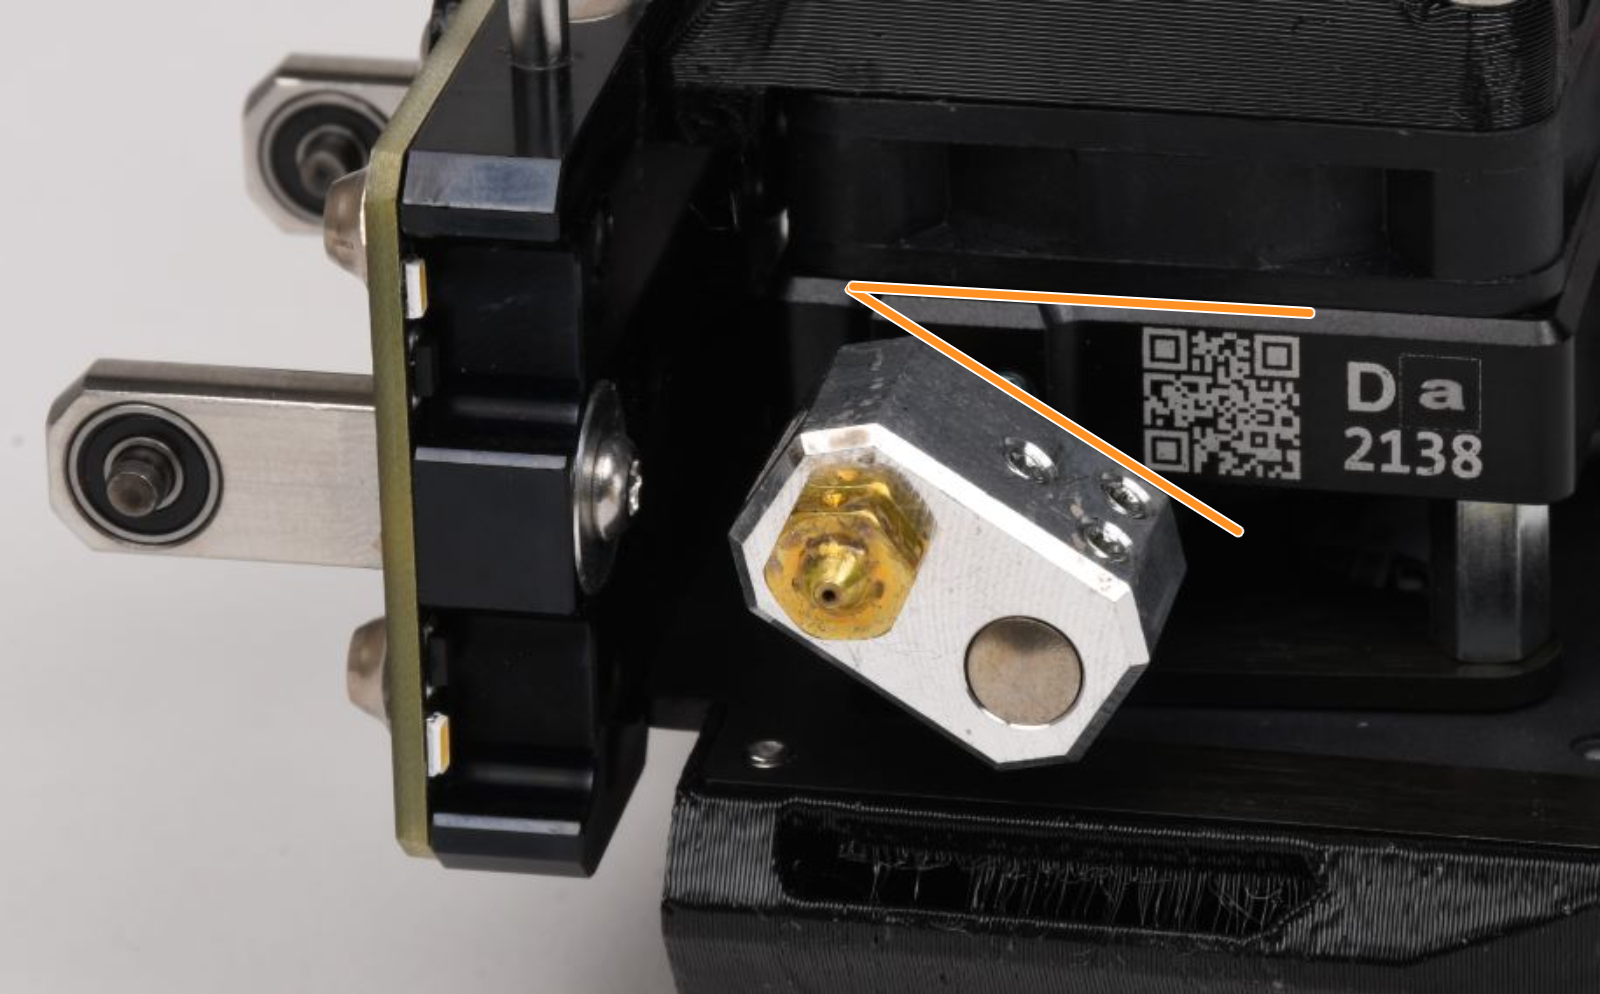
Then, check the nozzle. If the nozzle is too low it will hit the plastic part of the calibration pin. For testing, you can loosen the grub screw that holds the nozzle and push it up. After making sure it is all the way to the top, tighten the screw again. If you use an adapter, check the gap between the nozzle and the heater block. Also, check the heaterblock angle.
 |  |
If you are doing this calibration after having used the printer, make sure that the outside of the nozzle is clean. To clean it, go in the printer menu to Control -. Pick/Park Tool -> Pick Tool #. Then, go in the menu to Control - Temperature - Nozze, and set the temperature for the one used in your last print. After it is heated, use a brass brush to clean the outside of the nozzle.
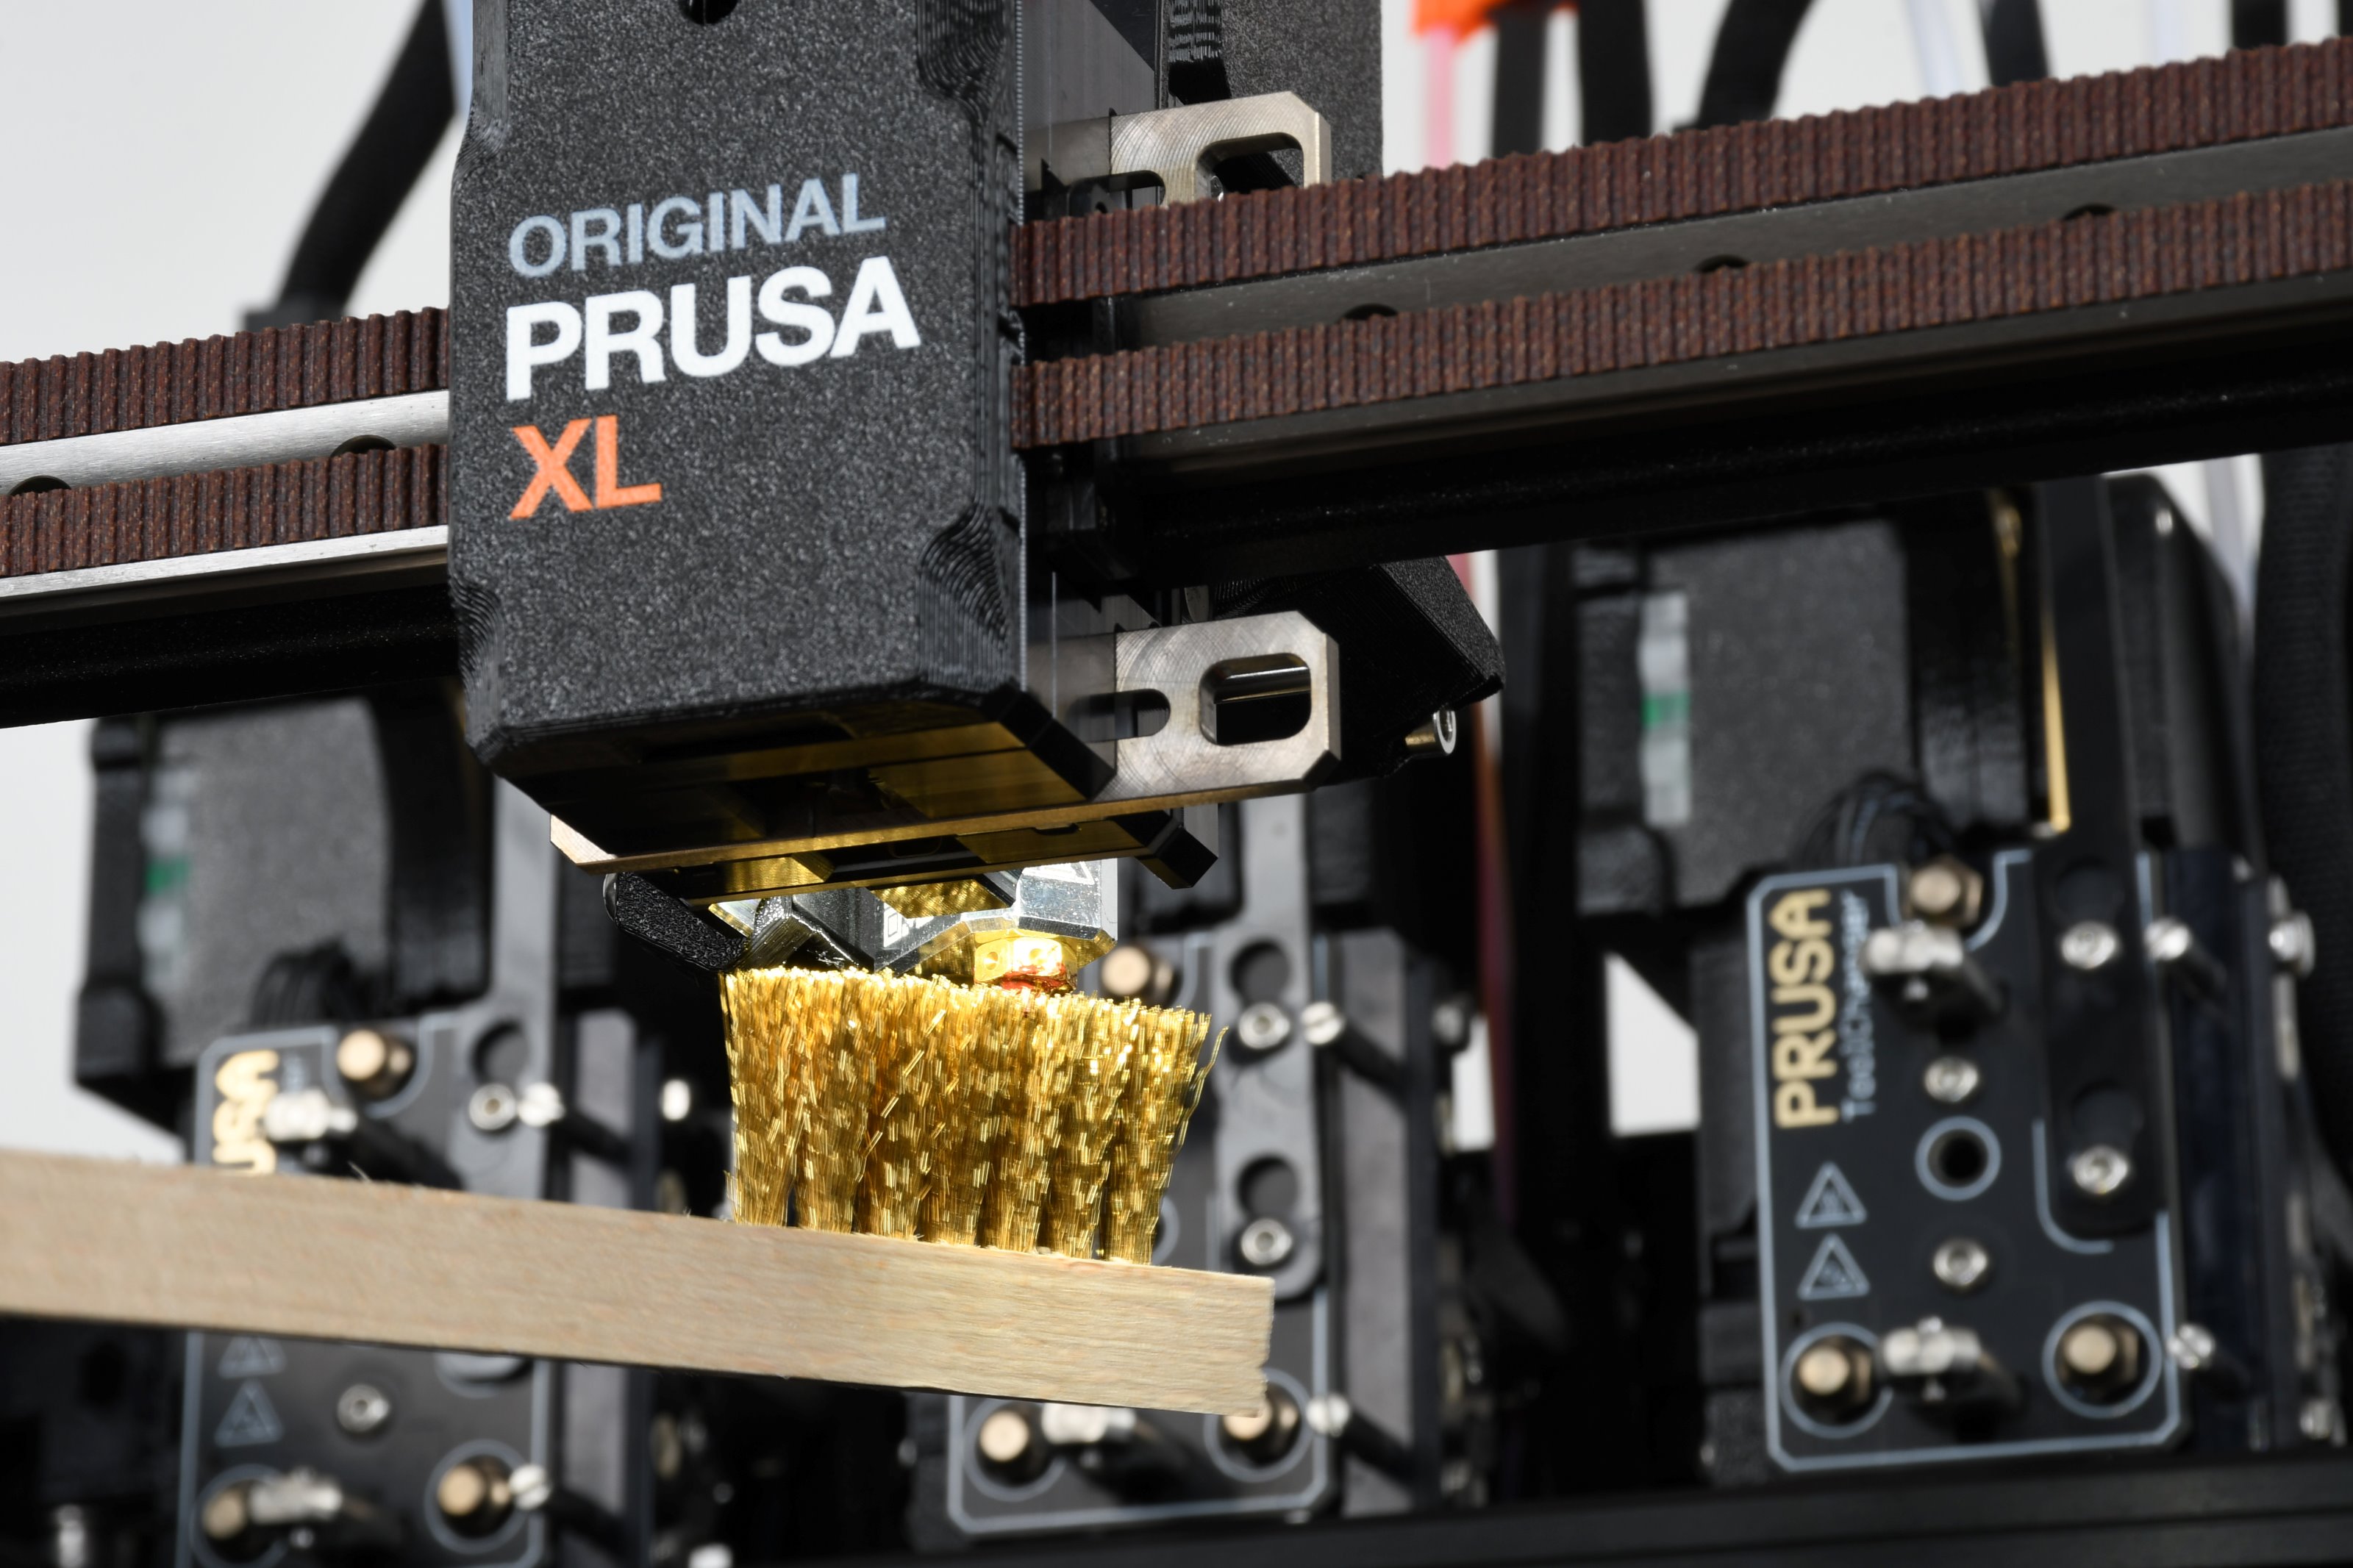
If even after doing all of the steps above the tool offset still fails, try doing a hard factory reset. This will require you to go through the entire selftest process again. You can also remove the plastic from the calibration pin to test if the calibration will pass.
Bed heater test
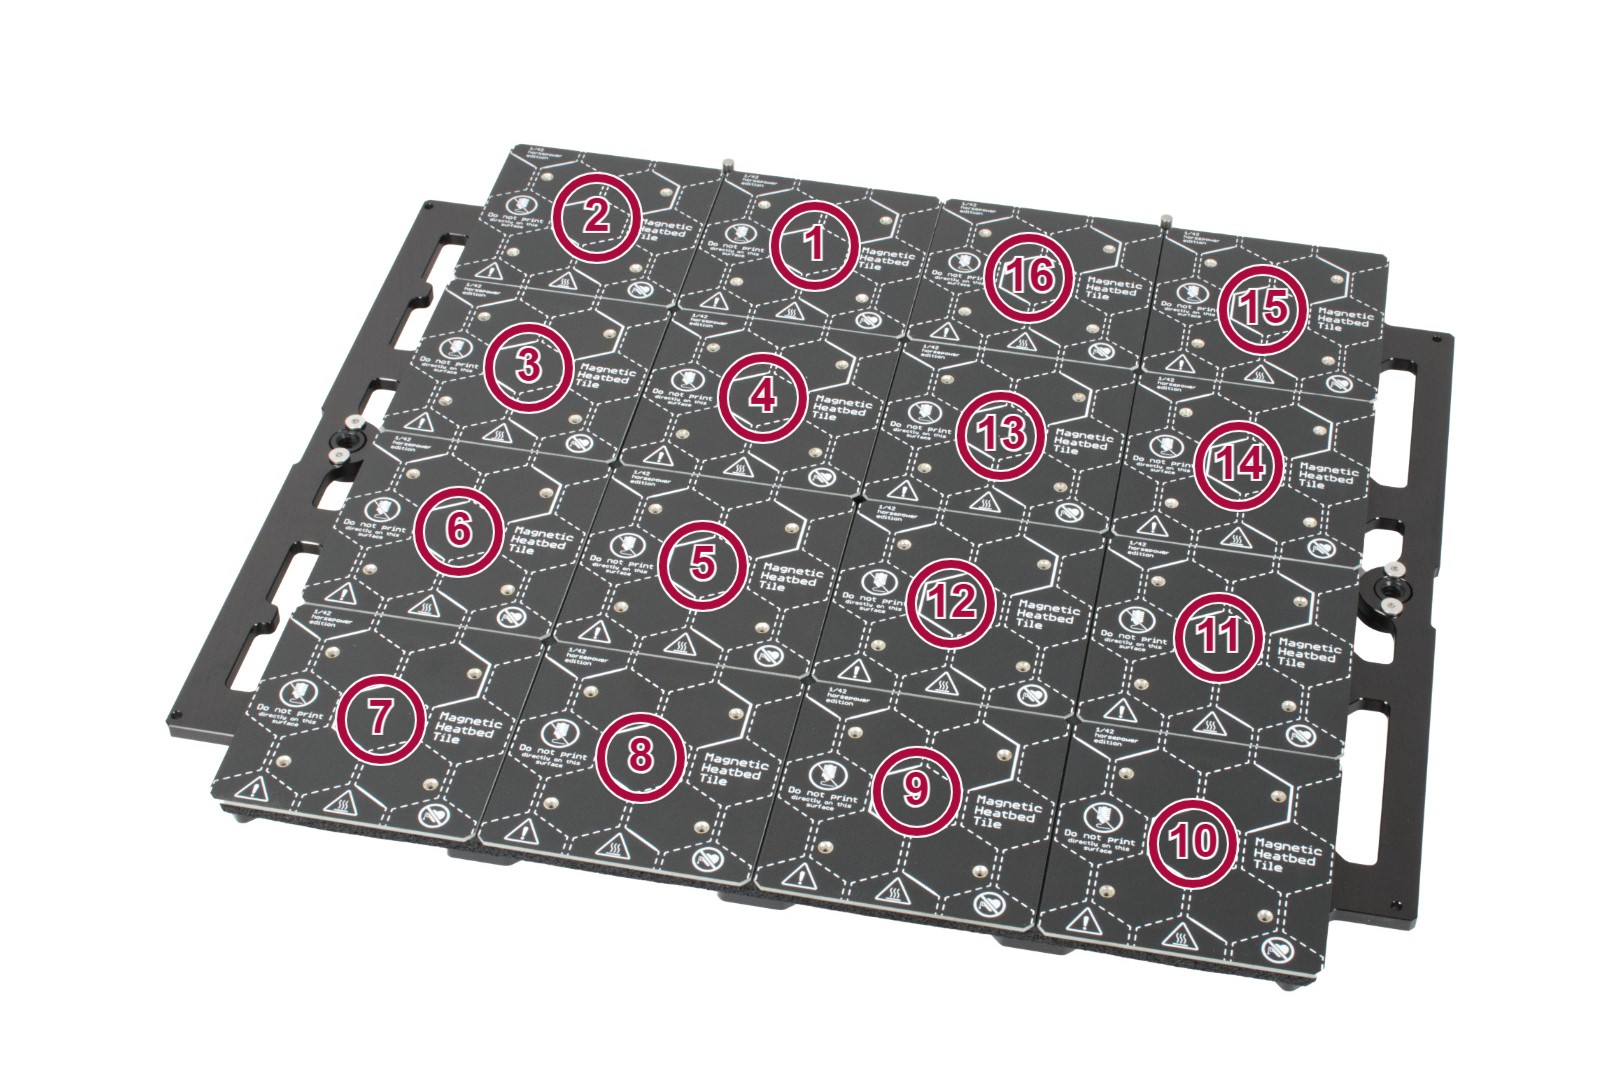
This part of the Selftest will test the heatbed heating. If you have an issue during this calibration, first make sure that the steel sheet is on the heatbed, or is added to the heatbed after it reaches around 50 ºC. Then check the cables under the heatbed. Make sure none of them are crimped, especially near the connectors. Gently tug the cables and see if they come off.
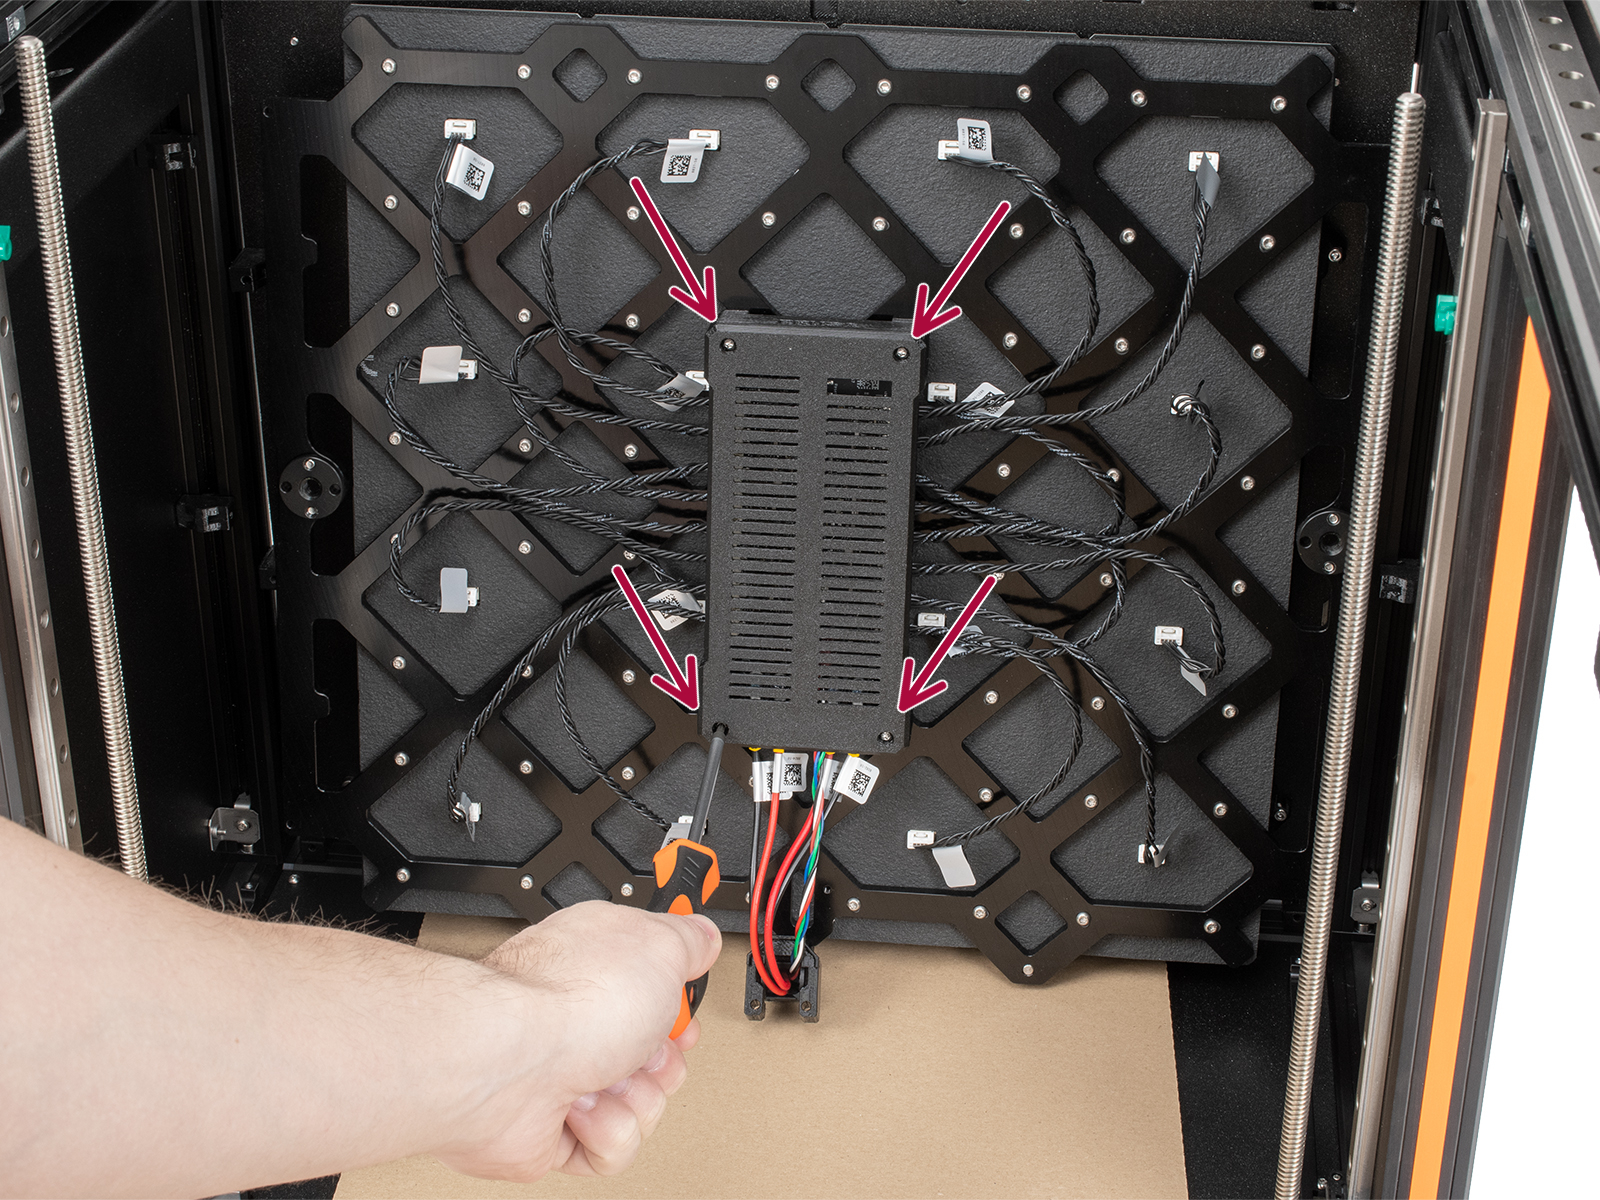
If the screen shows an error related to a specific tile, first identify the tile using the image above. Then, check the connectors on both sides of the cable. Open the bed controller case by unscrewing the four screws shown below, and see if there are any burn marks around the connectors.
Phase stepping calibration
The last part of the tests is the phase stepping. For this, make sure that you are not touching the printer and that no other printers are running on the same surface as the XL. You can read more about it here: Phase Stepping (XL) [Traducción en desarrollo].
Comentarios
¿Todavía tienes preguntas?
Si tienes alguna pregunta sobre algo que no se ha tratado aquí, comprueba nuestros recursos adicionales.
Y si eso no lo soluciona, puedes enviar una petición a [email protected] o mediante el botón que hay más abajo.