日本語
Login
3Dプリンター
マテリアル
部品 & アクセサリー
ソフトウェア
3Dモデル
応用事例
コミュニティ
ヘルプ
アカデミー
ブログ
会社概要
サポート
Original Prusa MK4S
プリンターメンテナンス
How to replace a hotend assembly (MK4S / MK3.9S) | 組み立てを始める
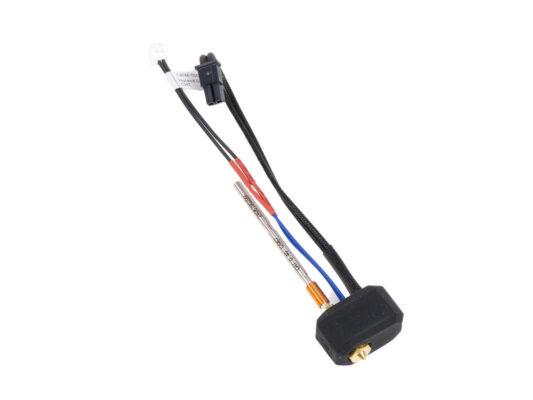
1. 組み立てを始める
Step 1 of 16 (Chapter 6 of 8)
フルスクリーンモード
内容
コメント
難易度
とても簡単
利用可能な言語
組み立てを始める
内容
プリンターメンテナンス
フィラメントガイドアドオン (MK4S/MK4)
Loveボードの交換方法 (MK4S/MK4/MK3.9S/MK3.9)
銀のPSUから黒いPSUへの交換方法
How to replace a Heatbed Thermistor (MK4/S, MK3.9/S, MK3.5/S)
How to replace the Prusa Nozzle (MK4S/MK3.9S)
How to replace a hotend assembly (MK4S / MK3.9S) [進行中の翻訳]
組み立てを始める
Introduction
Preparing the printer
Protecting the heatbed
ホットエンドケーブルへのアクセス
ホットエンドケーブルの取り外し
Removing the hotend
ホットエンドアッセンブリ 部品の準備
Inserting the hotend
Nozzle insertion check
ホットエンドケーブルのガイド
Connecting the hotend
Arranging the cables
ノズル径の設定
Final check
That's it!
How to install the Nextruder V6 Nozzle Adapter (MK4S/MK3.9S)
How to replace a print fan (MK4S / MK3.9S)
コメント
ログイン
してコメントを投稿する
コメントなし