JA
  • English
  • Čeština
  • Español
  • Italiano
  • Deutsch
  • Polski
  • Français
Login

11. ファーストフライト

11. ファーストフライト

11. ファーストフライト
Relevant for:
Last updated 6 days ago
11. ファーストフライト
 Difficulty
Moderate
 Steps
17
 Available languages
ENCSPLDEESITFR
フィラメントの準備
フィラメントの準備
フィラメントの準備
フィラメントの準備
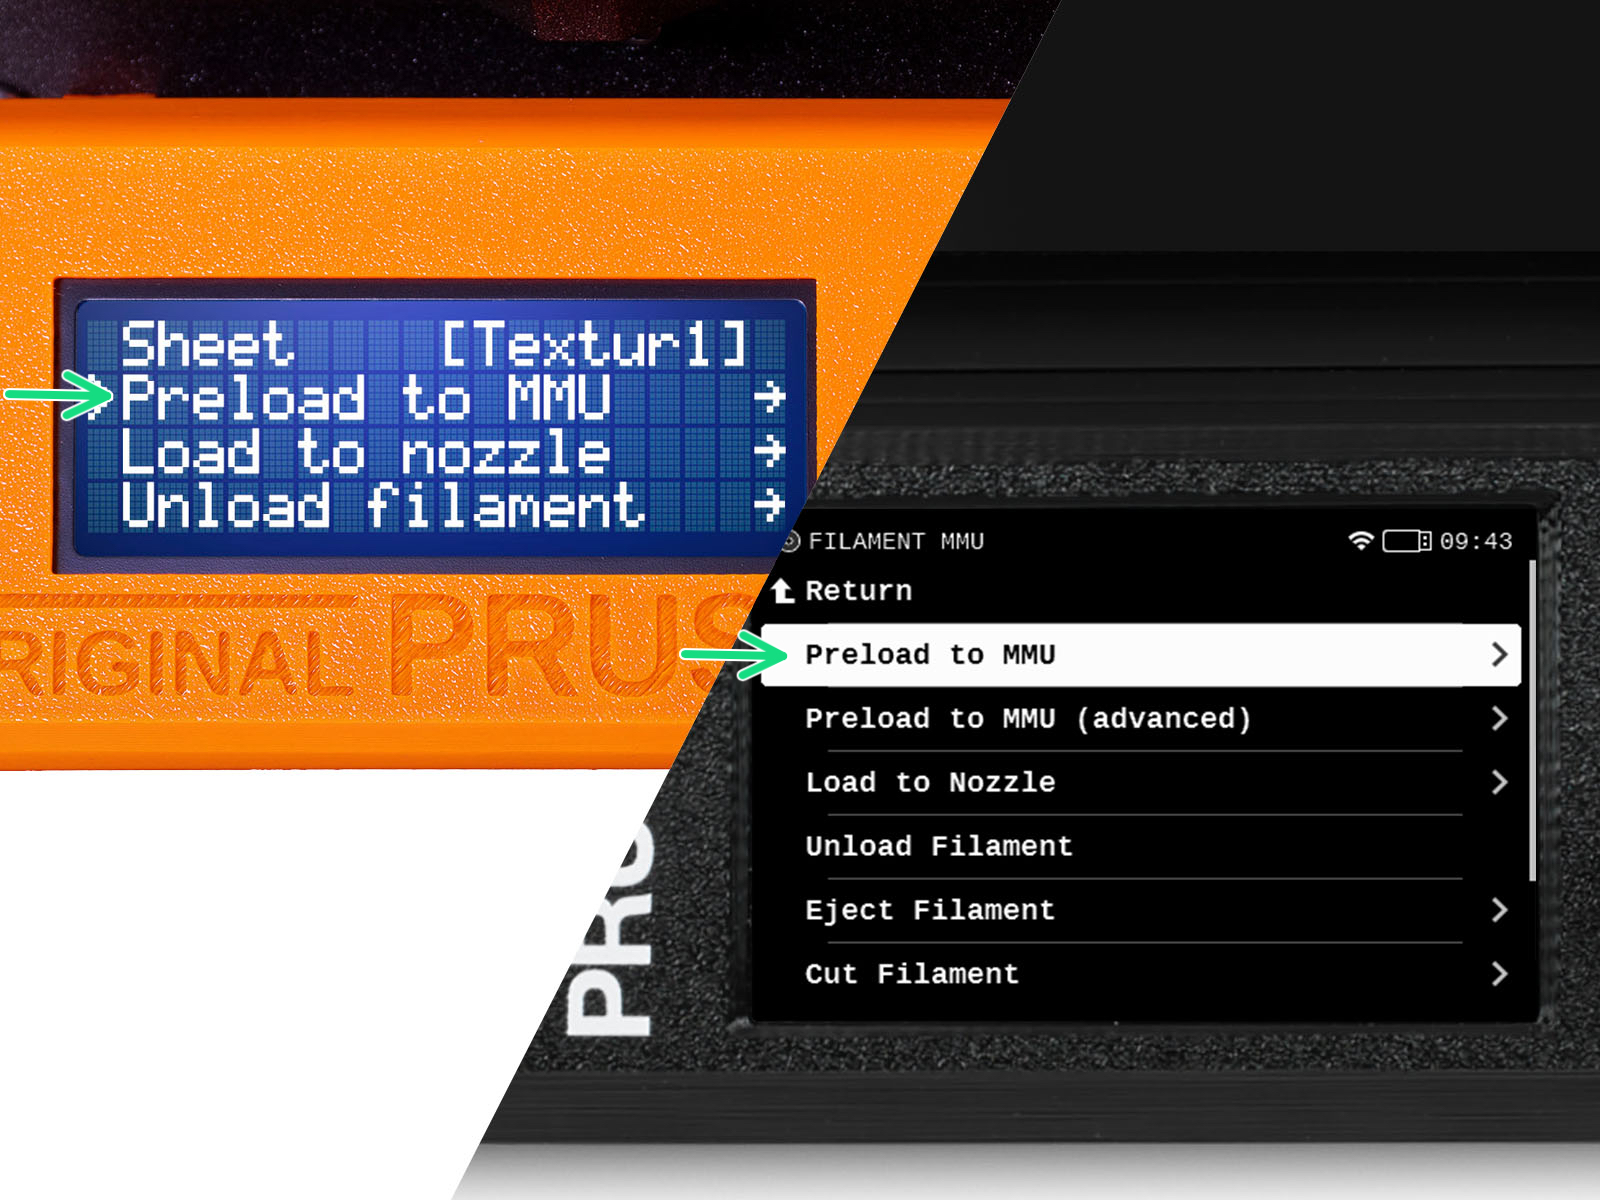
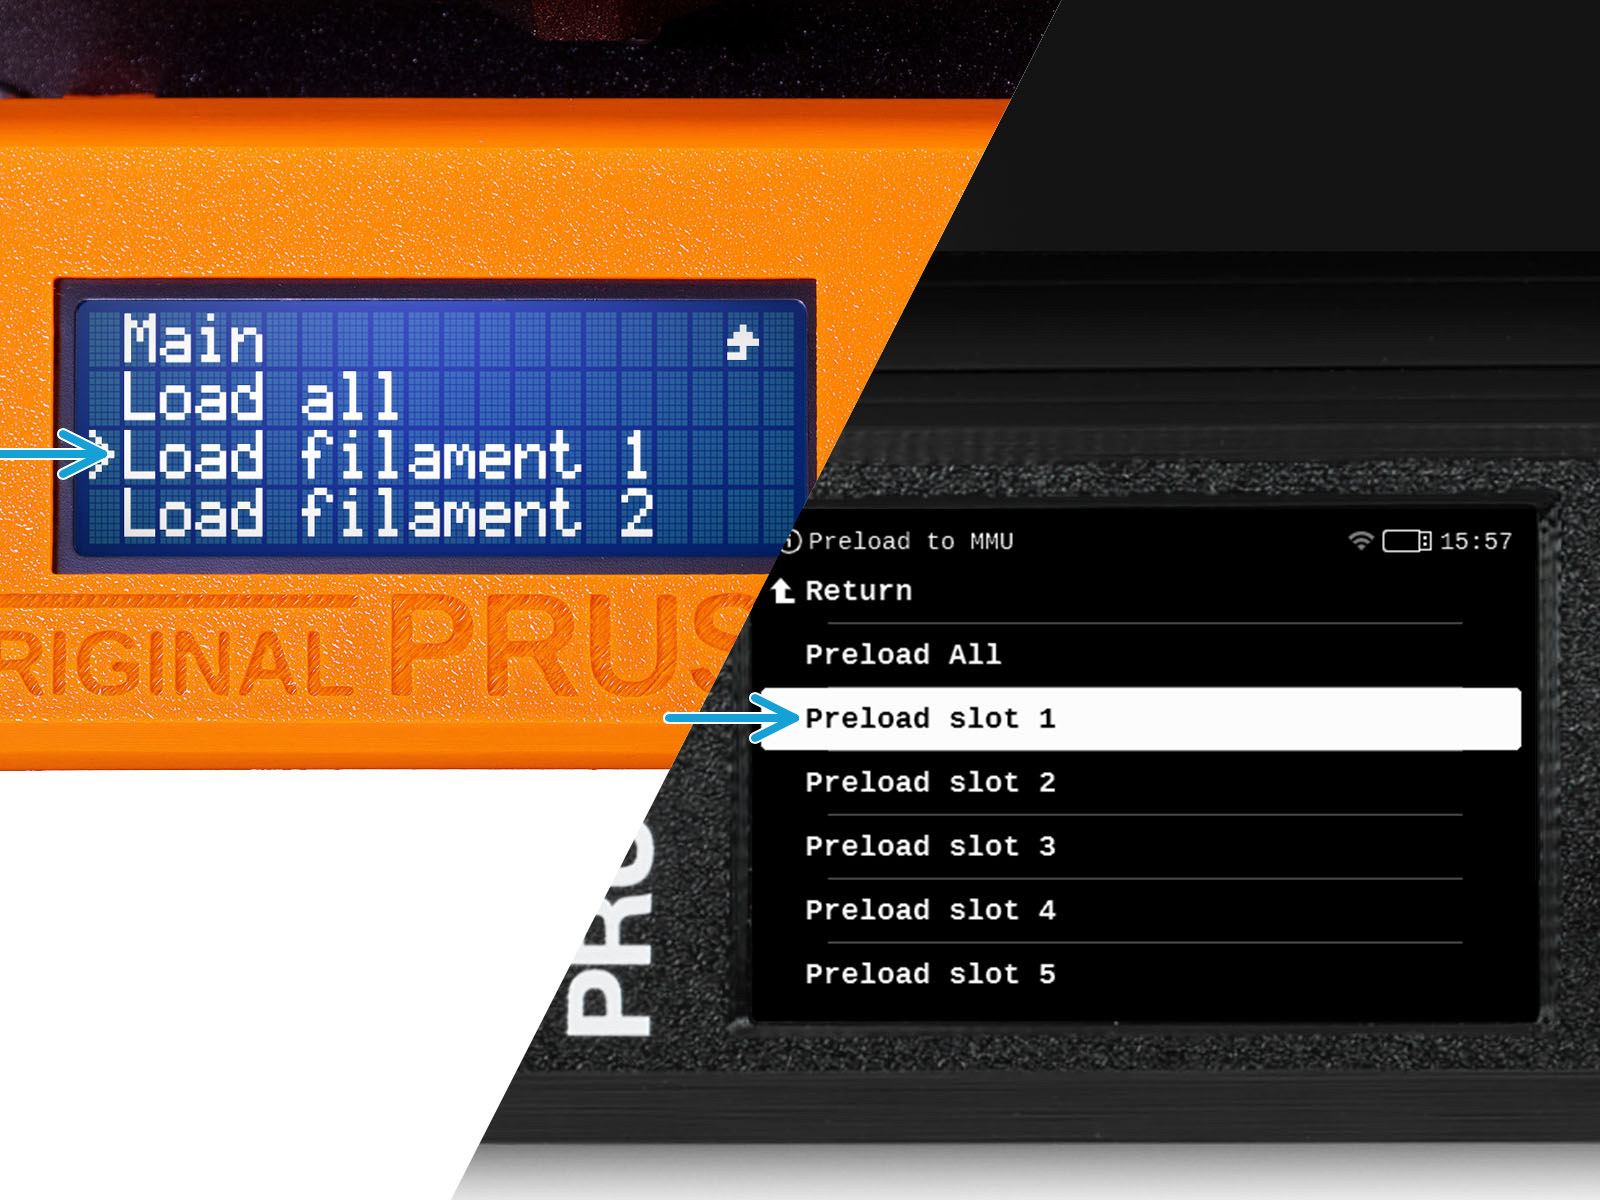
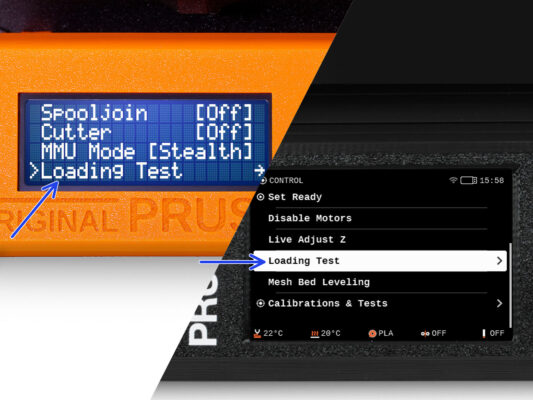
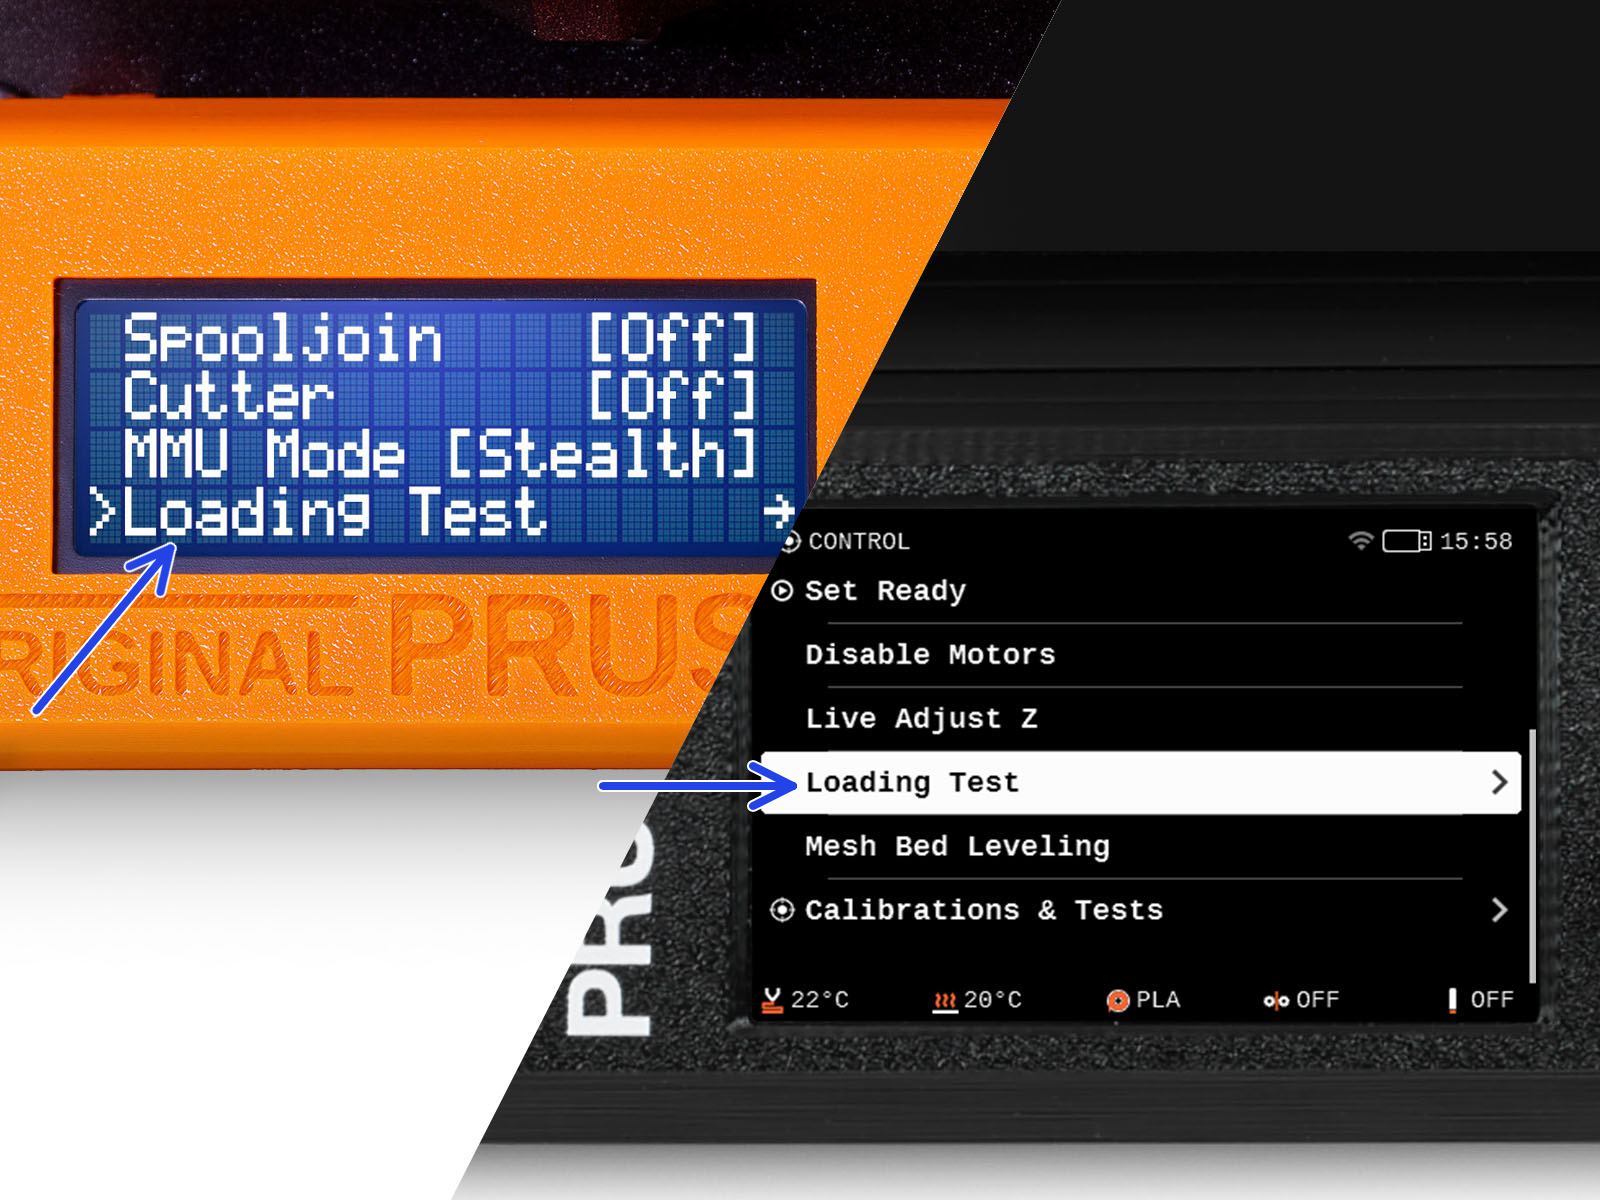
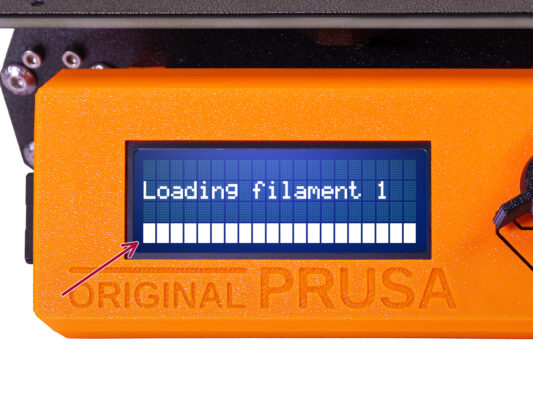
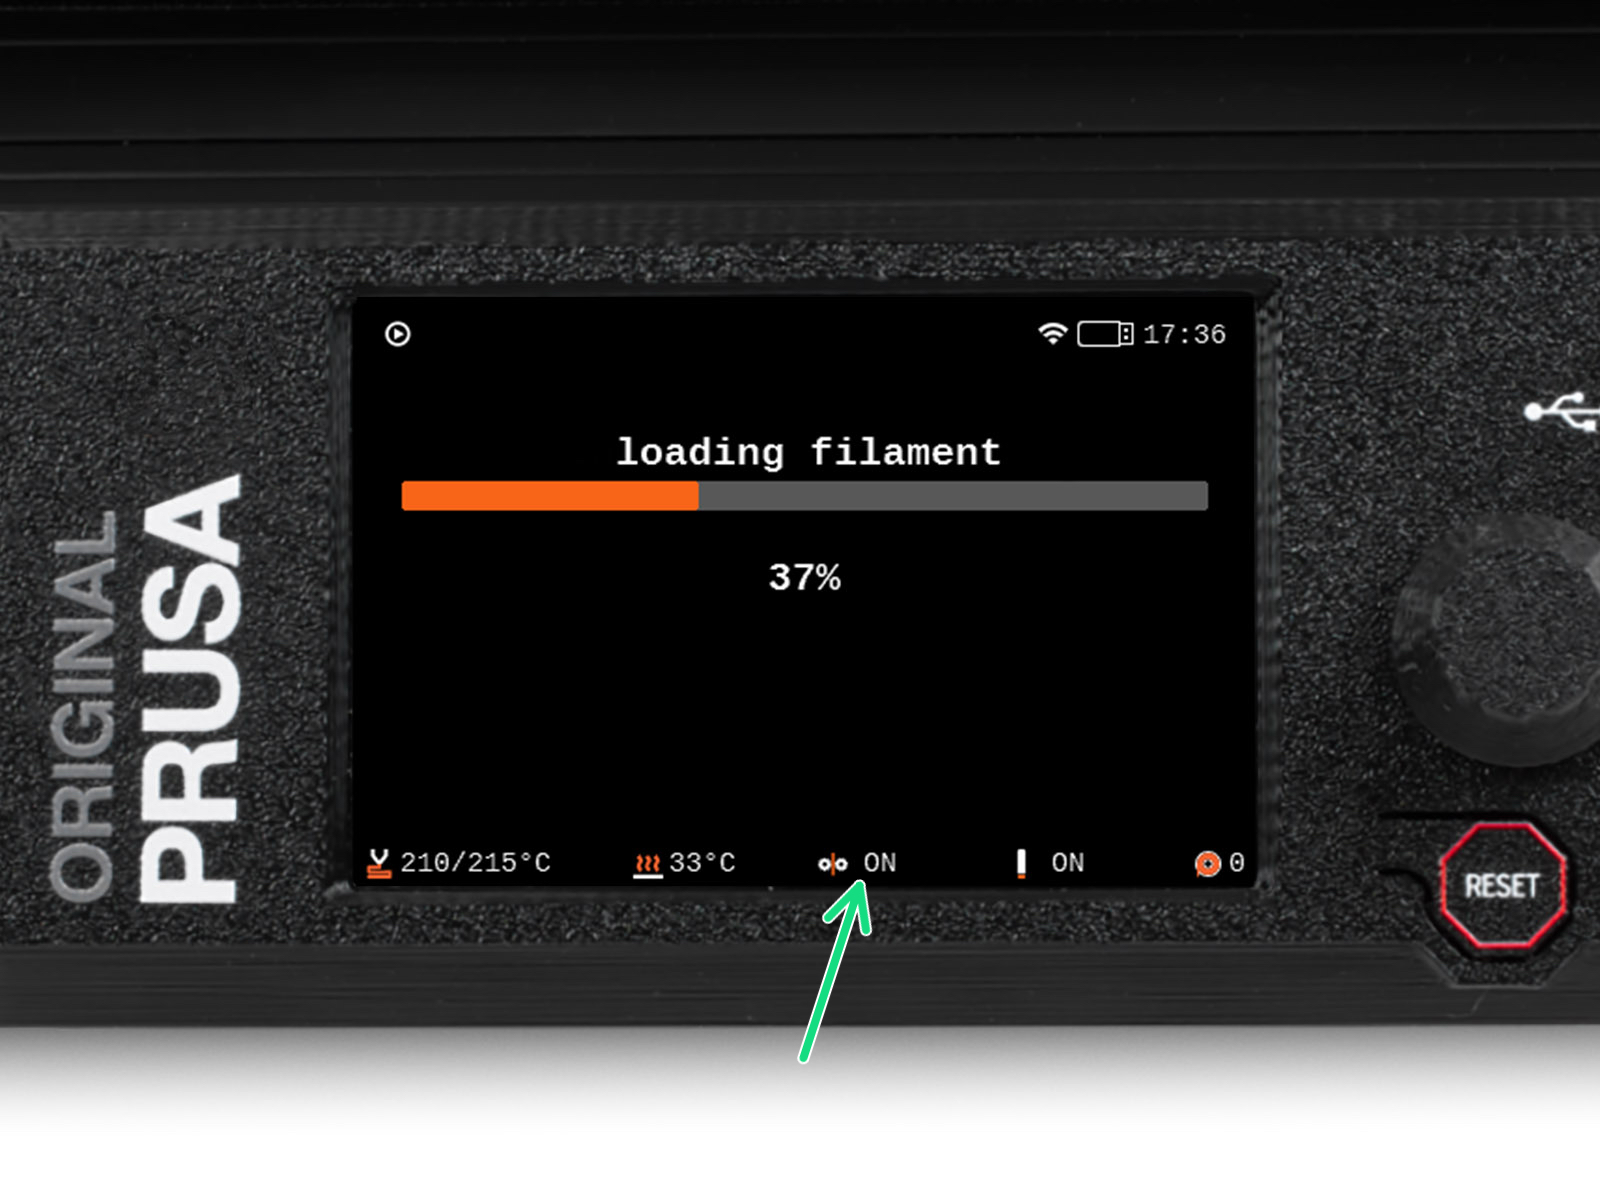
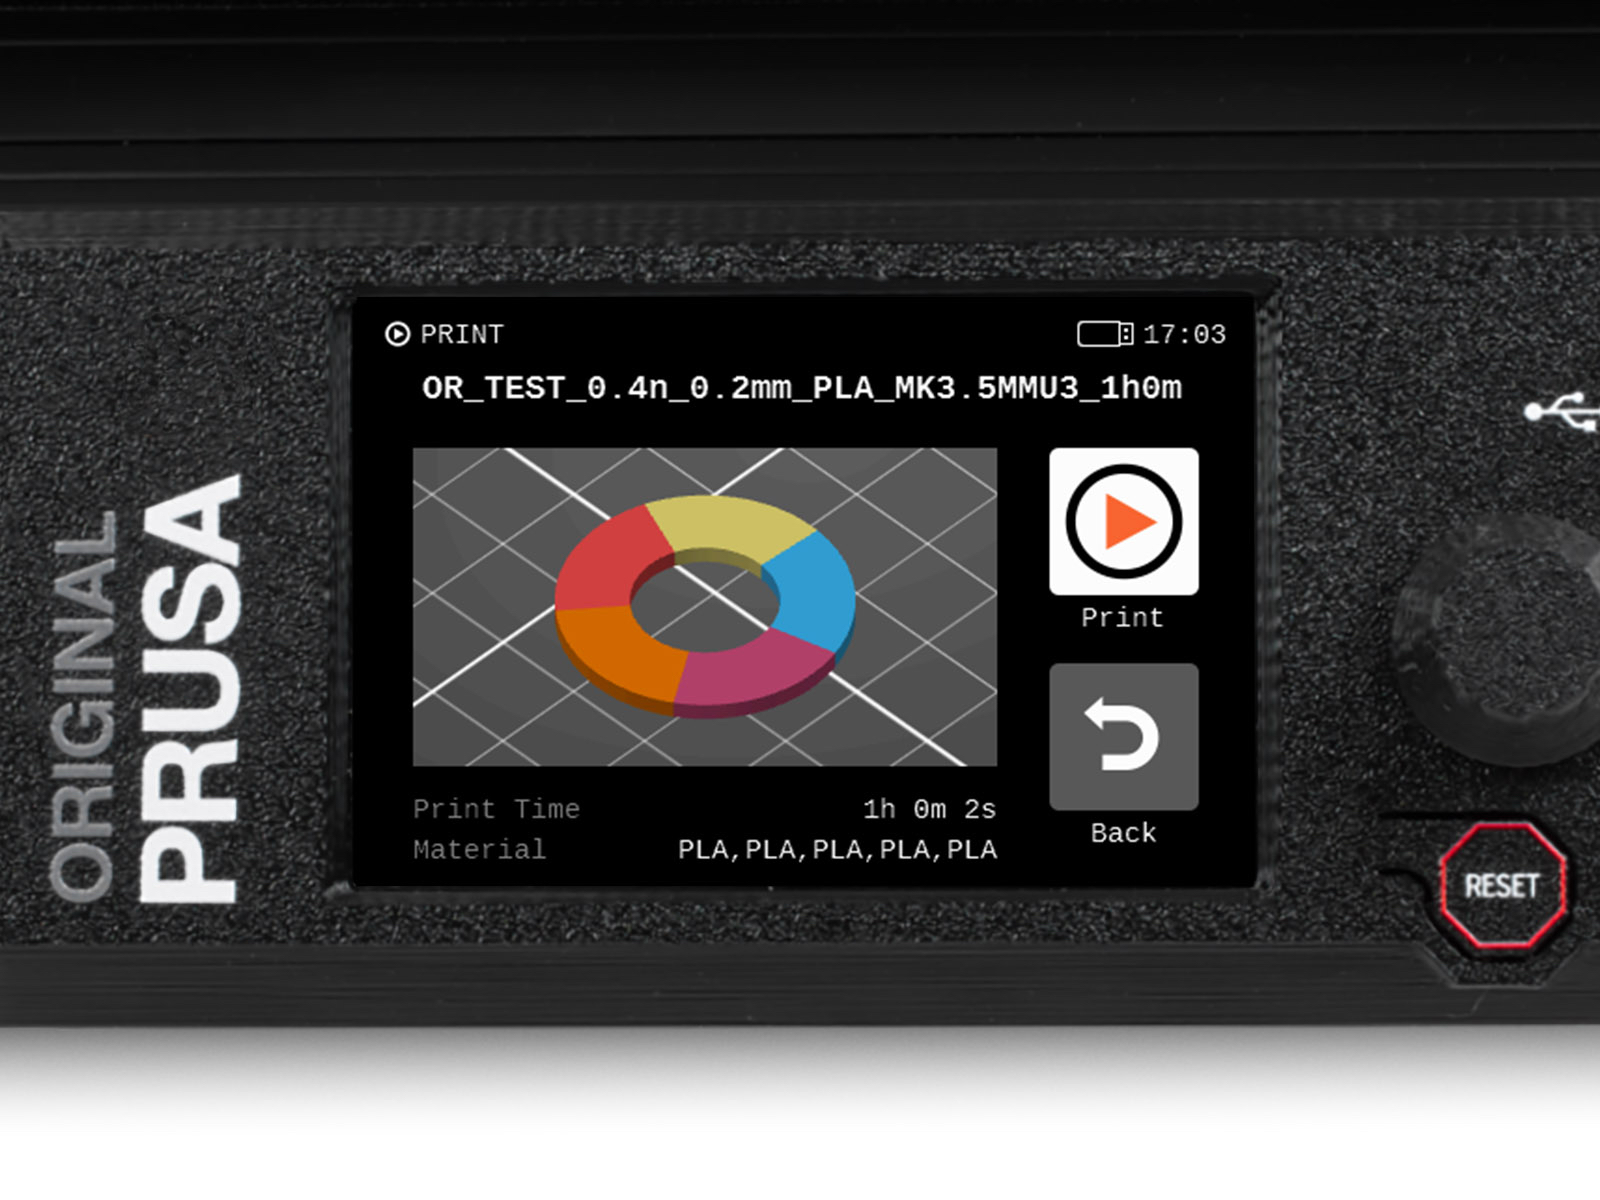
これで、フィラメントをロードしてテストオブジェクトをプリントする作業に移ることができます!その前に;
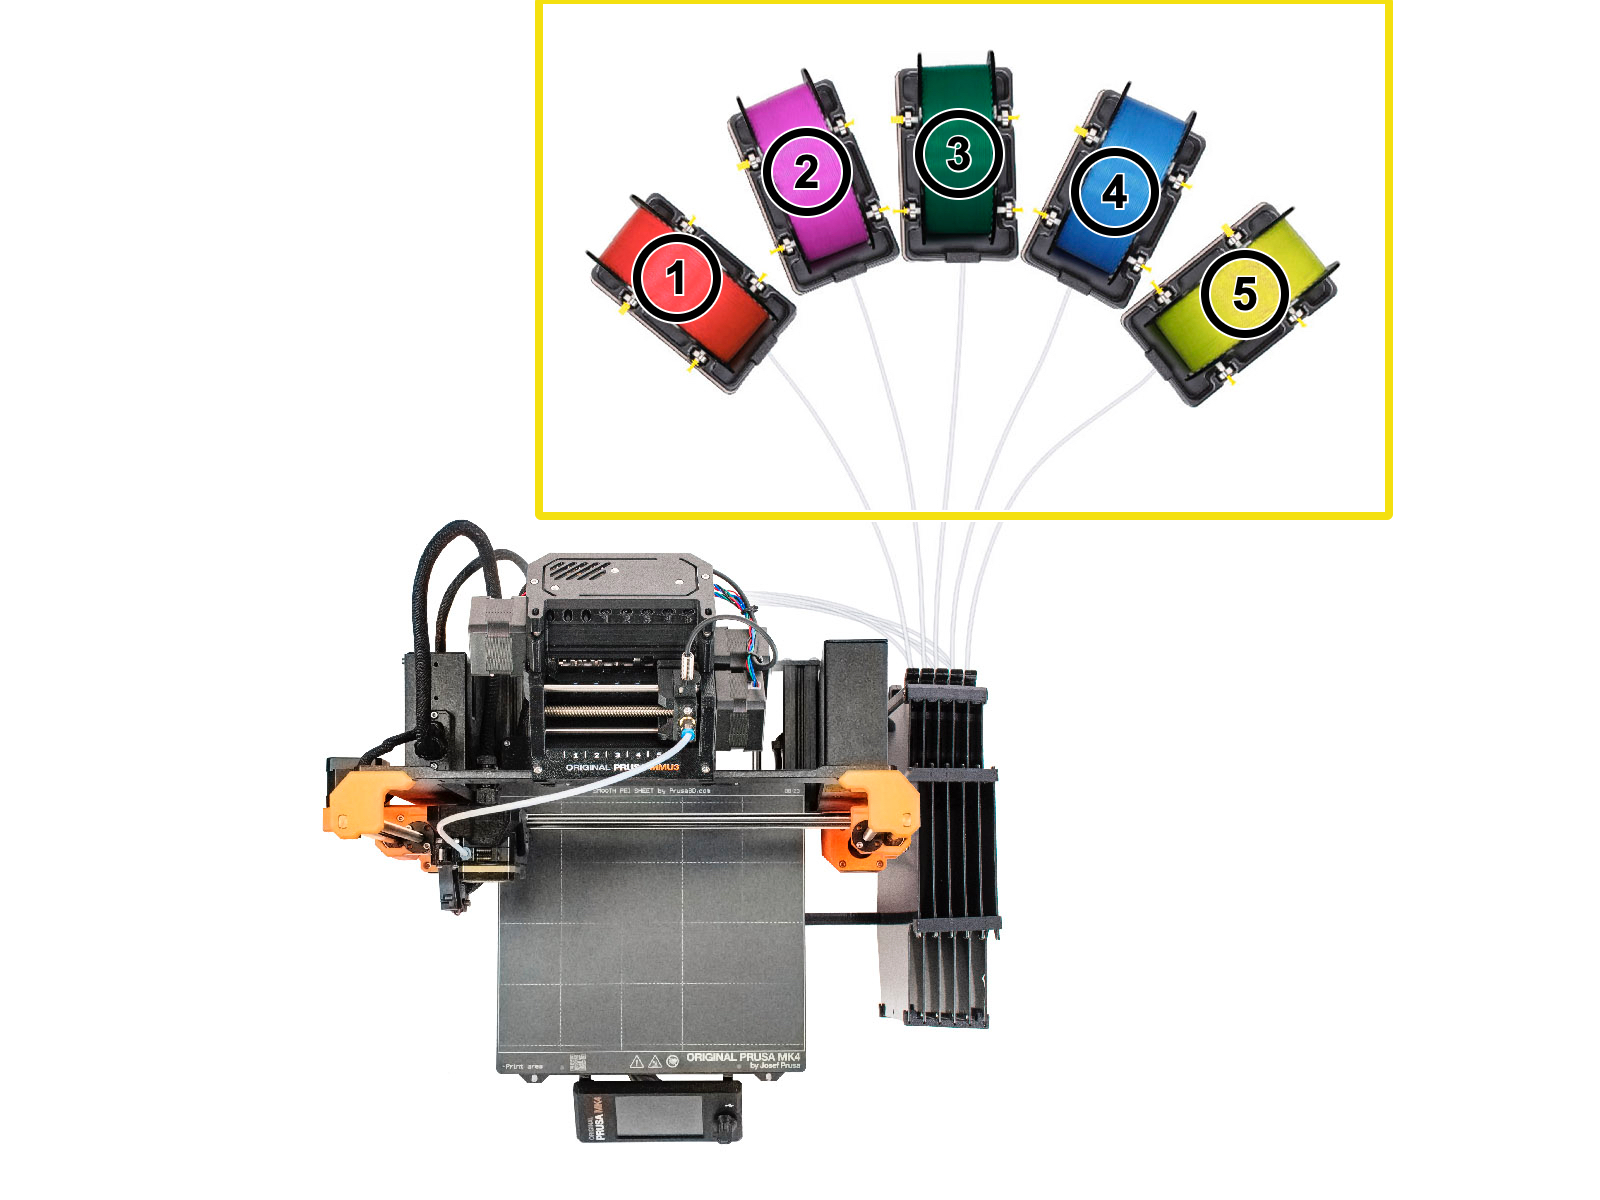
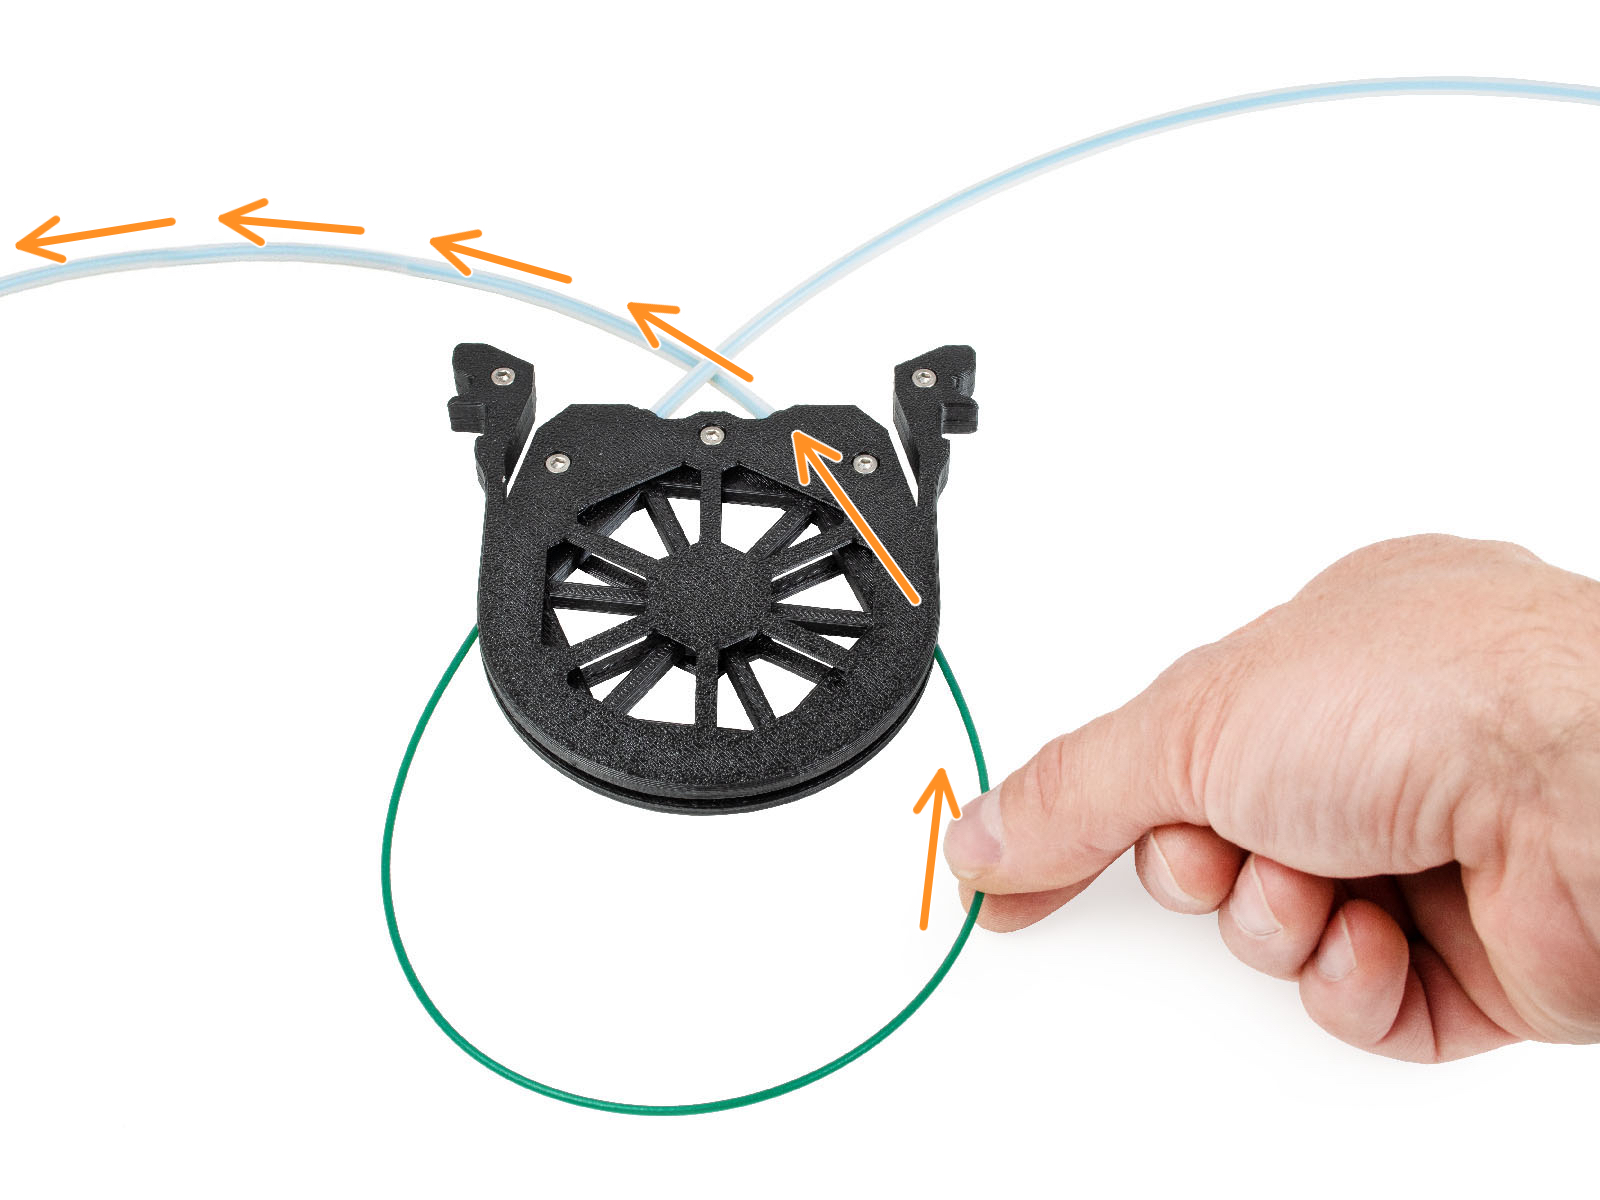
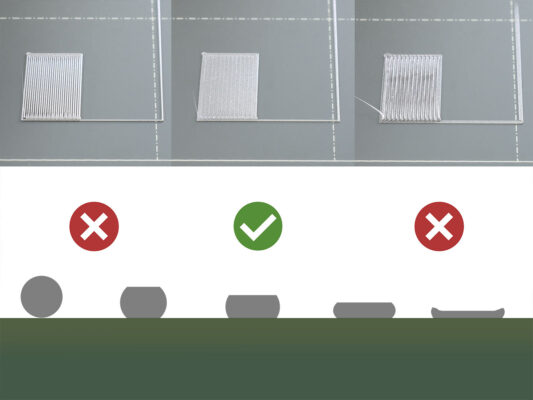
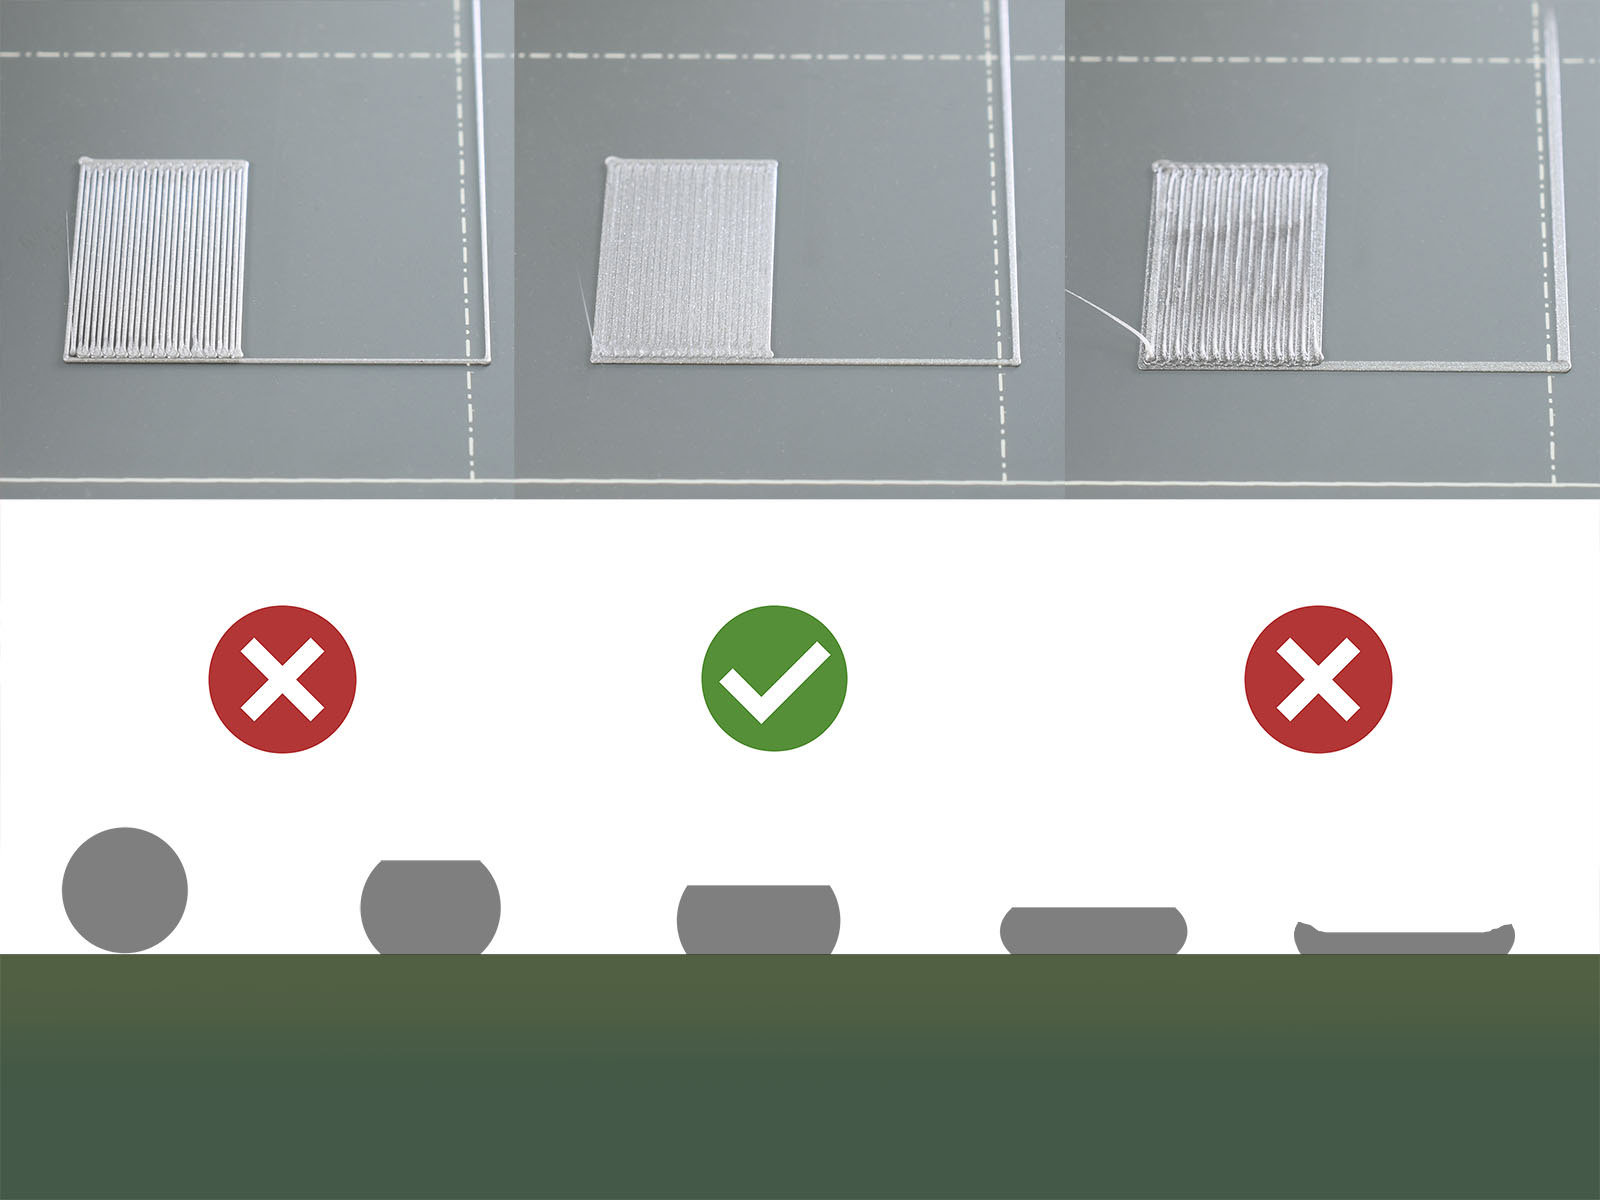
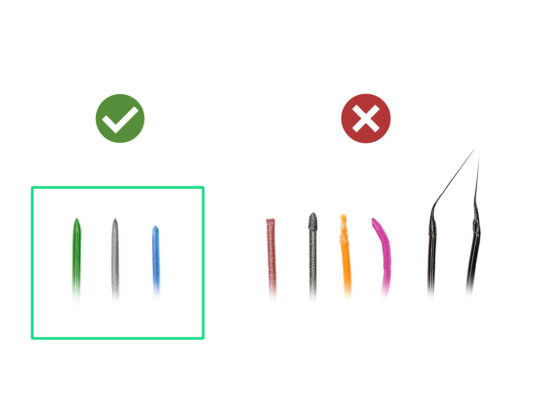
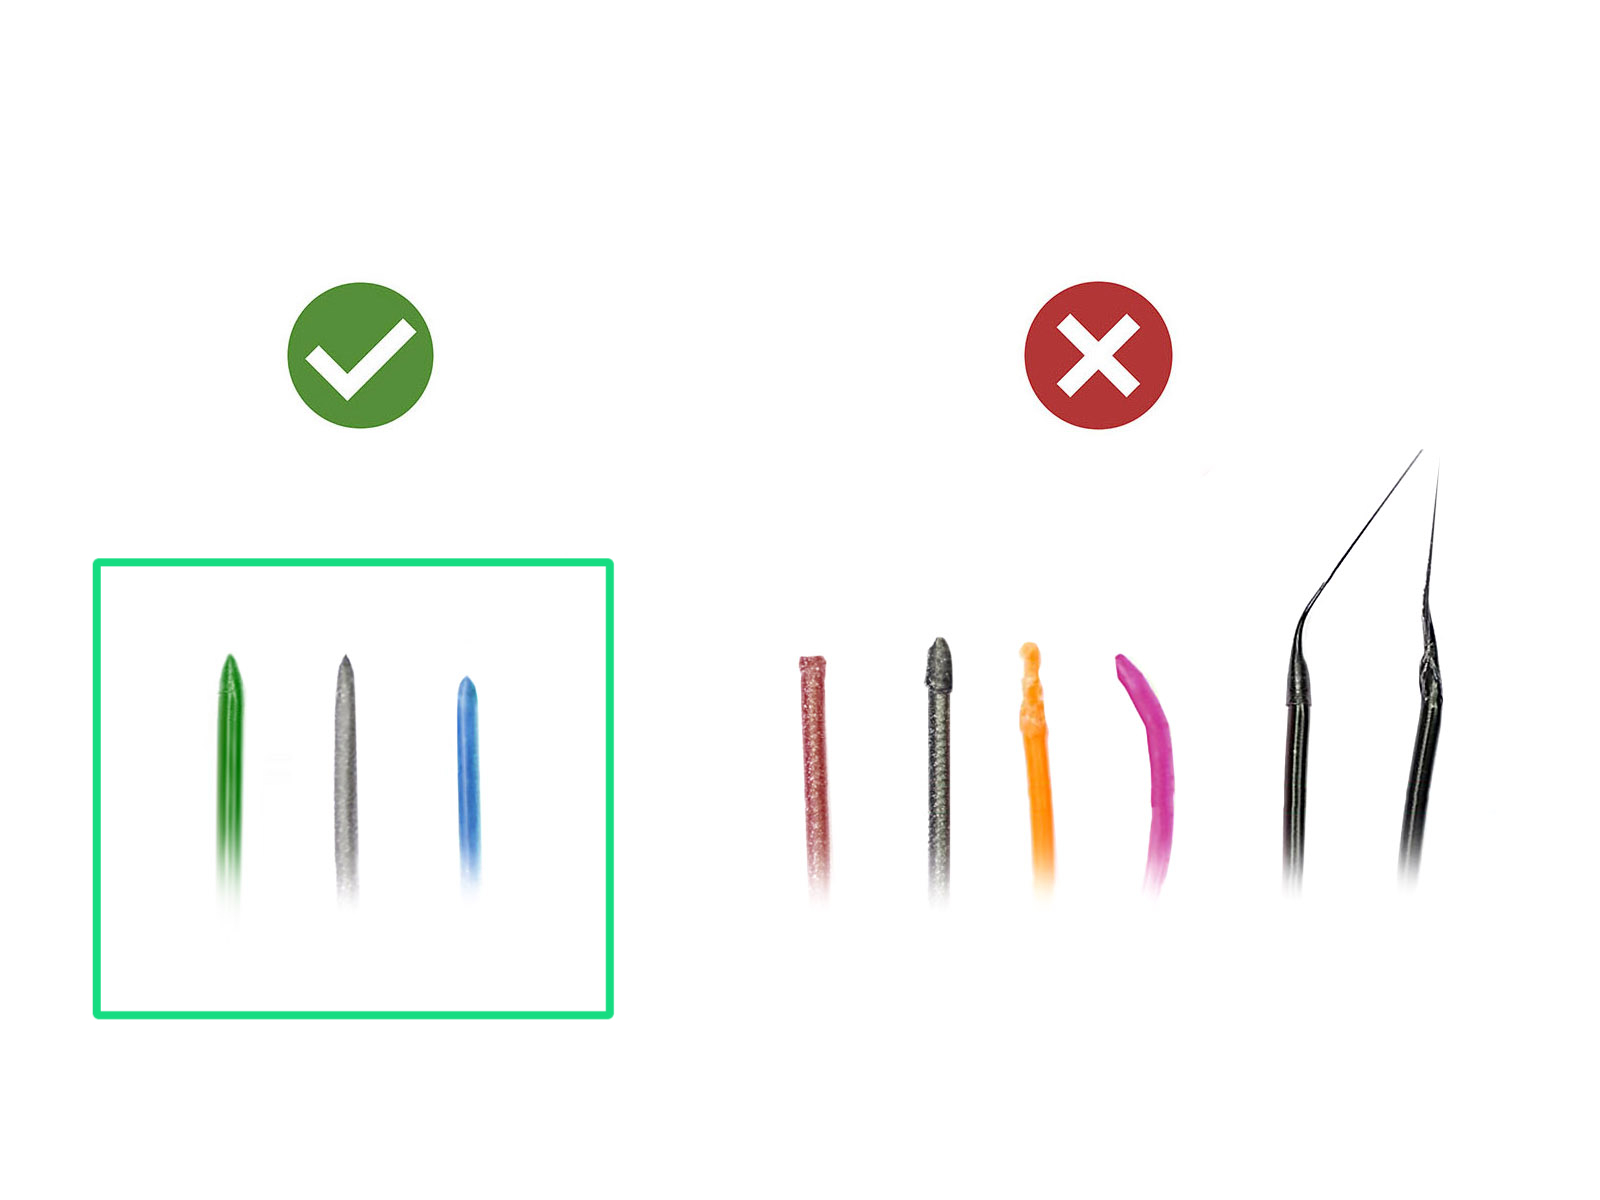
Please prepare at least five different PLA filaments and cut off the ends to form a round sharp tip on each - as seen in the picture.
The filaments must have a sharp tip in order to load properly into the MMU as well as into the printer. If the tip is deformed, bent or larger in diameter, it won't load properly.
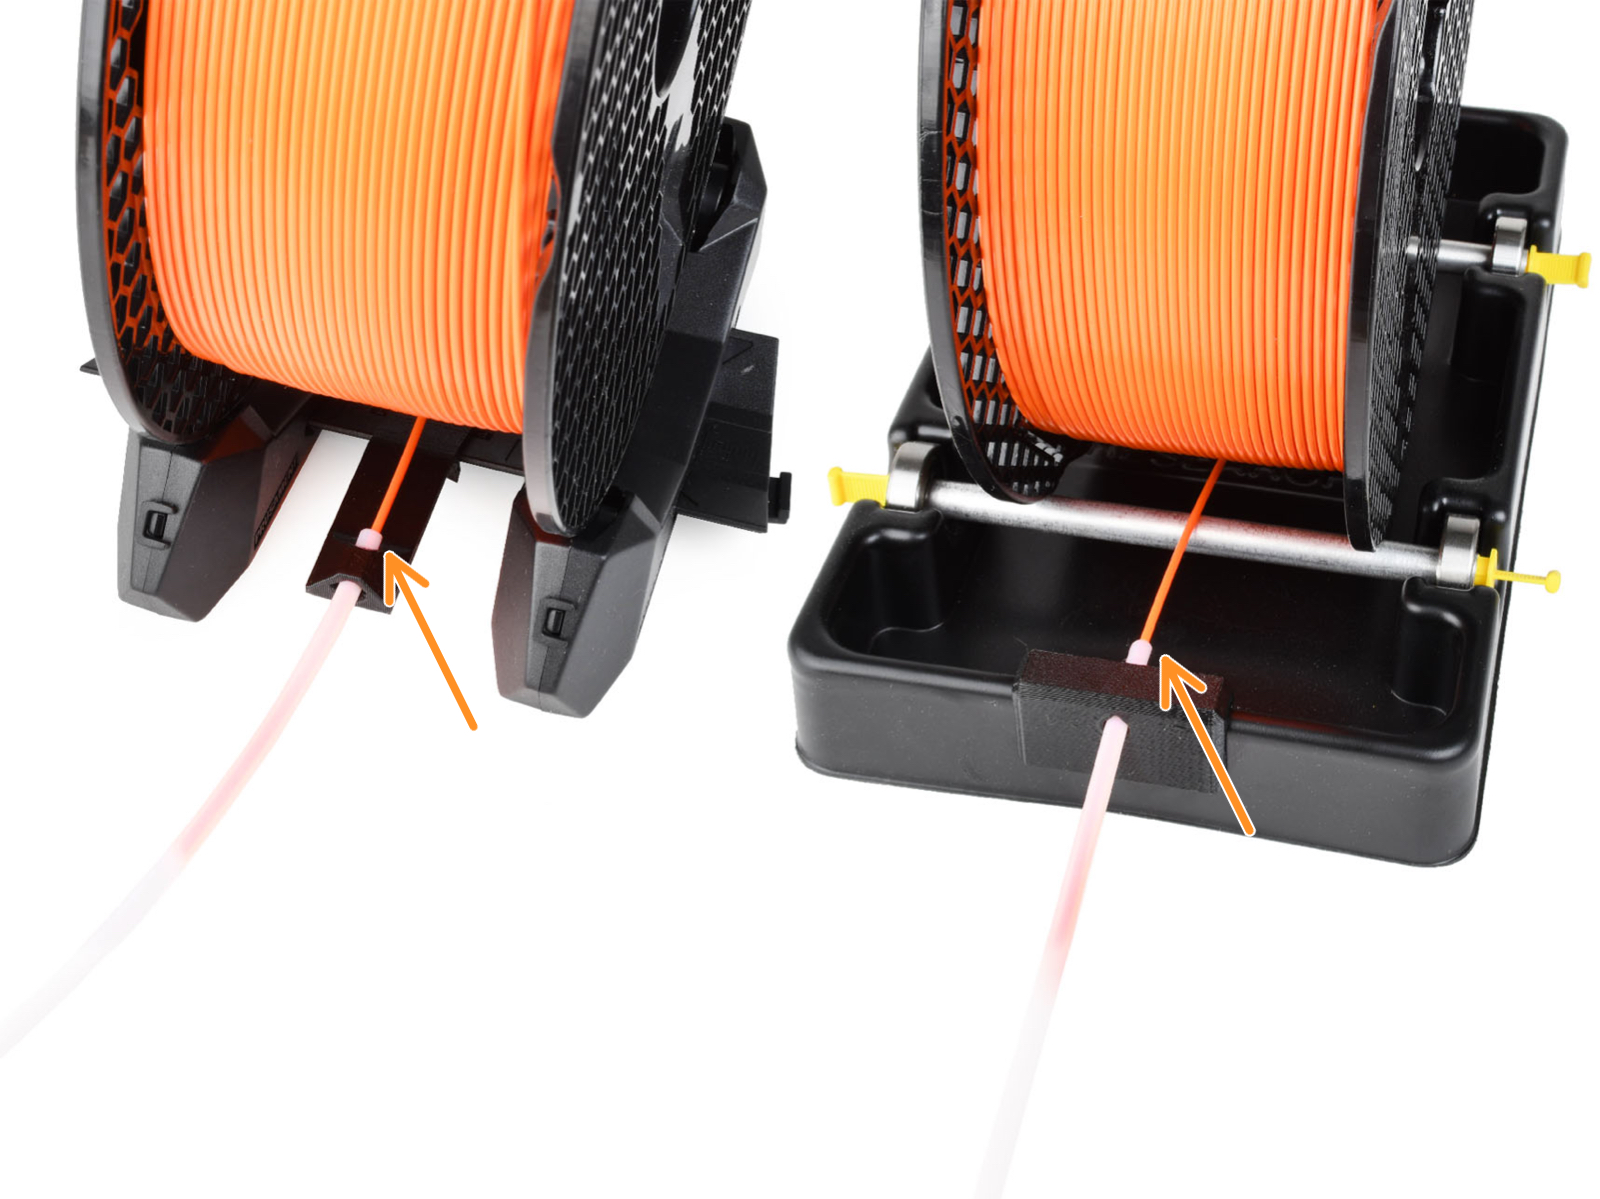
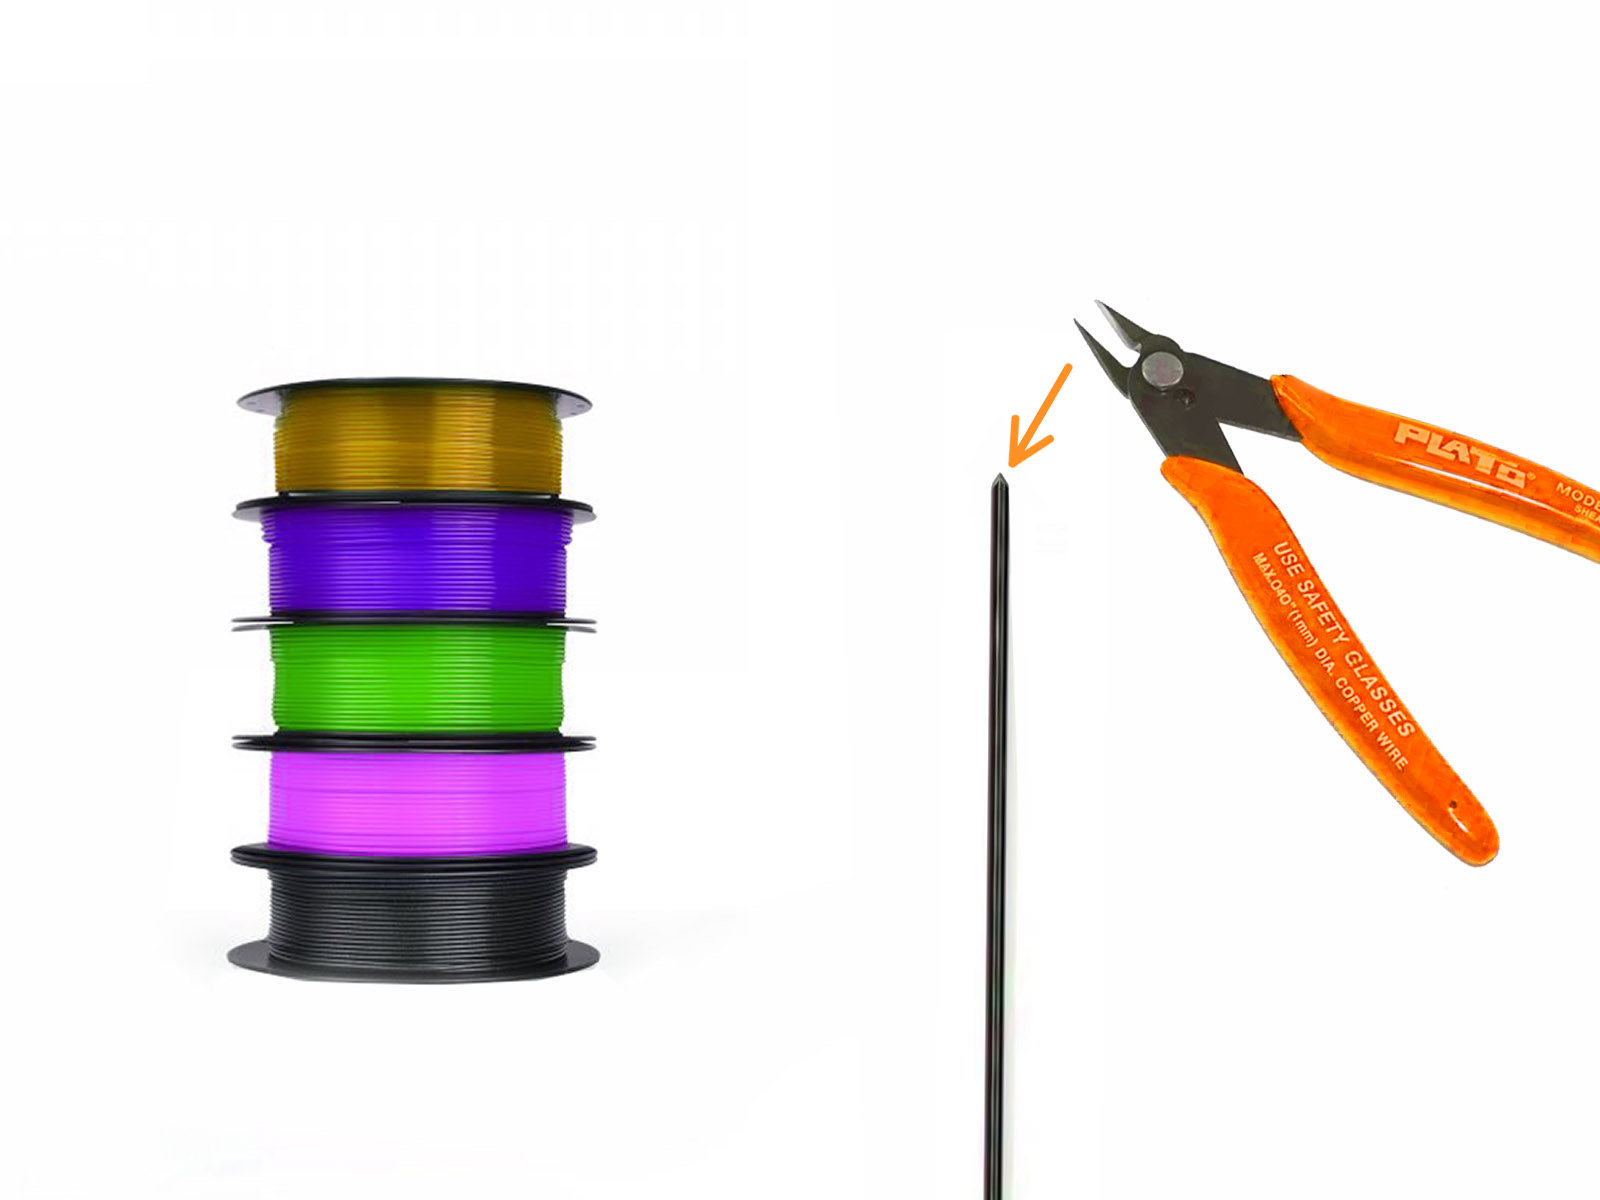
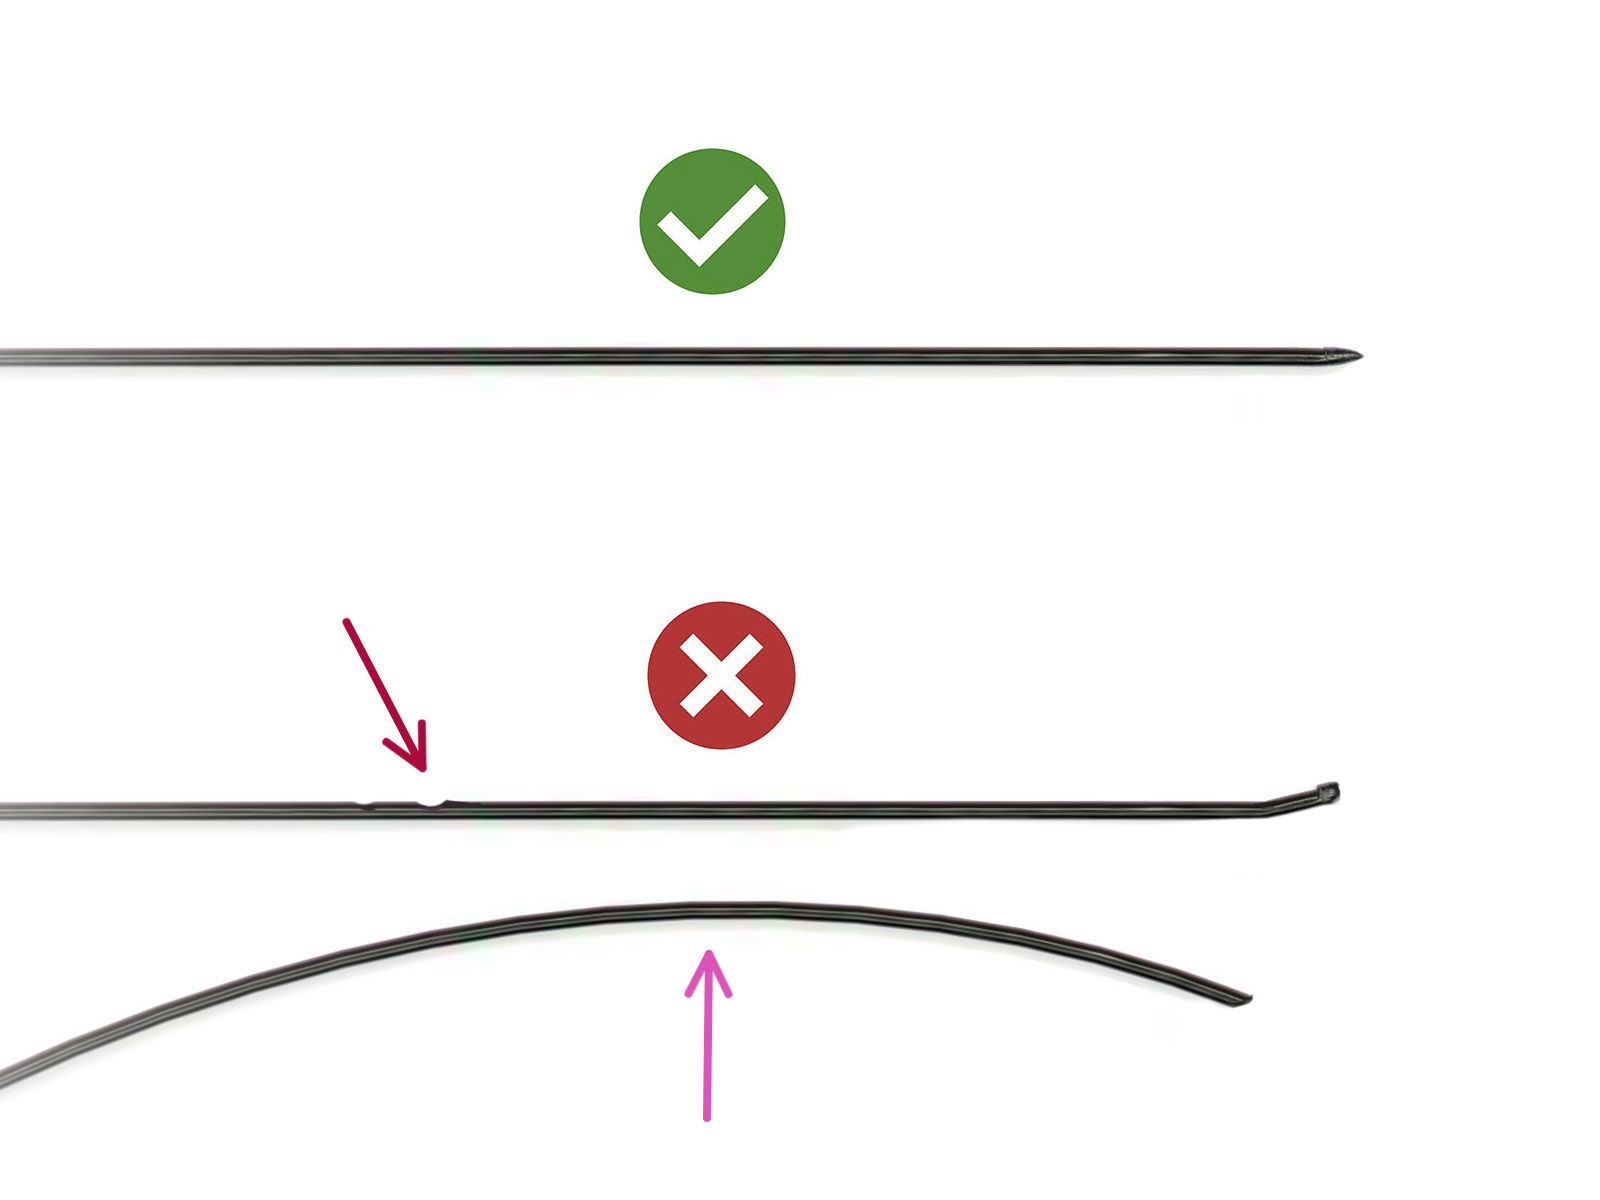
Inspect the last 40cm (15") of each filament. Make sure there are no dents in it. Sometimes, if filament got jammed before, the pulley wheel makes an indent in it. This part of the filament can no longer be grabbed and moved by the MMU unit and must be cut off.
フィラメントの端が曲がっていたら、まっすぐにします。完全にまっすぐでなければなりません。
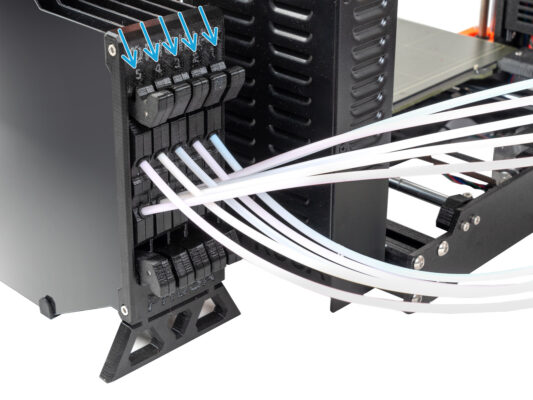
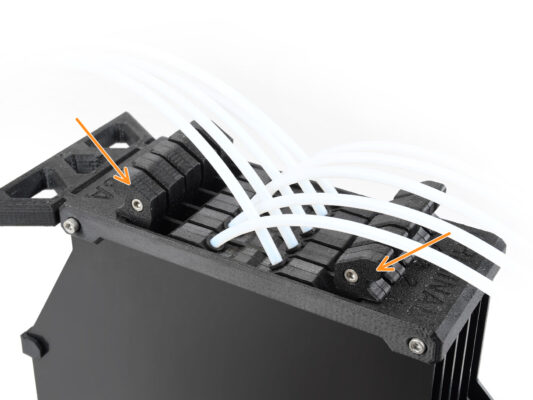
Use only high-quality filament with guaranteed low diameter deviation. In case you have filament loading / unloading issues in the future, re-visit this step as well. Make sure the filament is dried up. Moisture-sensitive filaments can be problematic during the MMU operation.
推奨フィラメントレイアウト
推奨フィラメントレイアウト
推奨フィラメントレイアウト
Lay down the five filaments onto the spool holders. Make sure the spools do not interfere one with another.
Filament positions are labeled 1,2,3,4,5 from the left to right, from the user's point of view.
スプールがローラーに正しくフィットするように、各スプールホルダーを調整します。
スプールが自由に回転でき、邪魔になるものがないことを確認します。
バッファーを通してフィラメントをロードする
Take the cassette for filament 1 out of the buffer.
Insert the tip of the filament into the bottom PTFE tube attached to the spoolholder.
フィラメントが対応するバッファーカセットに現れるまで、PTFEチューブにフィラメントを押し込み続けます。
Take the tip and insert it through the cassette into the other PTFE tube, which goes into the MMU unit. Don’t push it all the way into the MMU yet.
MMUユニットへ、フィラメントをプリロード

On the printer, go to the Menu -> Preload to MMU

(Filament -> Preload to MMU on MK3.5/MK4)

Select Filament slot 1. The MMU unit will engage the idler into the first position and start rotating the pulley until the filament is loaded in.
Keep pushing the corresponding filament end into the PTFE tube from the buffer into the MMU, until you feel the filament being pulled in.
フィラメントを正しくロードするためには、フィラメントの先端がまっすぐで鋭利でなければならないことを忘れないでください。
バッファーを閉じる
バッファーを閉じる
バッファーを閉じる
所定のフィラメントがMMUに正常にロードされたら、そのカセットをバッファに戻します。
Repeat the same process for the other filament positions, until you successfully load all five filaments into the MMU.
上級者のヒント:ボタンを使ったローディングを試してみてください。
You can also load a filament into the MMU using the buttons on the unit. Next time you load a filament, use the method you prefer. Either from the LCD menu, or using the physical buttons.

MMUが待機状態(すべてのLEDが消灯している状態)

中央のボタンは、MMUへのフィラメントロードを開始または中止します。
サイドボタンでセレクターを左右に動かし、フィラメントの位置を切り替えます。
Use the side buttons to move the selector onto the desired filament position indicated by the selector being aligned with one of the lines on the label-plate.
The ongoing loading process is indicated by a blinking green LED light for the respective filament position.
安定した緑のLEDライトは、所定のフィラメントがエクストルーダーにロードされていることを意味します。
Note, after you issue a command to the MMU unit, wait and let it finish the operation. Don't rush. Don't play around with the printer in the meanwhile. Let it finish first if the MMU unit does something (homing, loading, unloading).
ロードテスト(パート1)
ロードテスト(パート1)
ロードテスト(パート1)

Go to the Menu > Settings > Loading Test

or Control > Loading test (on MK3.5/MK4)

プリヒートするフィラメントの種類を選択します(PLA)

Select Load all / Test All

Or test all the filaments from 1 to 5 manually, if "Test All" item is unavailable on your firmware version.

The MMU unit will now load and then unload all five filaments to see if all work correctly.

ロードテスト(パート2)
ロードテスト(パート2)
ロードテスト(パート2)
On the MK3.5 / MK4 printer, you can check the filament sensor's status in the "footer" area of the LCD screen to see if it's detecting the filament correctly.
While your MK3S+ loads a filament into the extruder, it performs the loading check: Solid blocks should be generated on the bottom of the LCD representing the IR filament sensor detecting a filament during the process.
If there are lines instead of some of the solid blocks, it means the Filament sensor in the extruder is providing an intermittent reading and might require some aditional tuning.
ロードの再試行が複数回失敗した場合、対応するエラー画面が表示されます。
Z軸とファーストレイヤーキャリブレーション(オプション)
IMPORTANT: This step is necessary for the MK3S+ / MK3.5 if you worked on the extruder head previously. If you only upgraded the old chimney to the new one, you can skip to the next step and use the Live Adjust Z function as usual to fine-tune the first layer.
LCD Menu - Calibration - Calibrate Zに進みます。
ファーストレイヤーキャリブレーションの記事を参照して、手順に従ってください。
テストオブジェクトのプリント
テストオブジェクトのプリント
テストオブジェクトのプリント
テストオブジェクトのプリント
We need to print a test object to verify that everything works correctly. Don’t worry, it will be a quick print.
Printables.comのMMU3テストオブジェクトをご覧ください。
プリントファイルセクションで、お使いのプリンタモデル用にあらかじめスライスされたGコードファイルをダウンロードします。
Save the .gcode or .bgcode file onto a storage media and print the test object.
ツールマッピング(MK3.5 / MK4)

When you start a print on the MK3.5 or MK4, the Tools Mapping screen appears. This allows you to reassign the extruders with the specified color to another one as needed.

On the left side, you'll see a list of the required materials and their colors, as specified in the G-code file.

On the right side, you'll find a list of materials currently available on the printer, that will be used to print the object. 

For example, if the G-code requires orange filament in the first position, but you have orange loaded in the fifth position, select the first position on the left menu and then assign it to the fifth position on the right.
フィラメントの位置をダブルタップするか、エンコーダーを使用してフィラメント番号を選択します。
ハンドブックに従ってください。
ハンドブックに従ってください。
Start the print and wait until it finishes. In the meantime you can take a look at the printed Handbook.

All the information regarding calibration, how to organise the printer, buffer, spools, or troubleshooting tips are all in the printed or online Handbook.

To download the Handbook or if you encounter any issues, please visit our knowledge base at: http://help.prusa3d.com/en/tag/mmu3/

If you are having any issues while printing, follow the on-screen instructions or visit the link from the LCD screen.
G-コードの準備 / カスタムモデルの準備
Already printed all the bundled multi-material models from us as well as those seen at http://Printables.com? Time to print your own designs!
単体のオブジェクトをカラフルにする最もシンプルな方法は、PrusaSlicerのMMU Painting functionです。
マニュアル法の基本的な手順は、マルチマテリアルプリント用Gコード準備のセクションで説明しています。

For printing logos or text labels, you might also find the  automatic color change at a given layer height useful. Simply, slice an object, select a certain layer height, click the small orange "+" icon next to the height marker and select the desired MMU filament position (Extruder number).

自分でマルチマテリアルモデルを作る
自分でマルチマテリアルモデルを作る
自分でマルチマテリアルモデルを作る
自分でマルチマテリアルモデルを作る
If you have designed a model with multiple bodies, you may find the Exporting model from Fusion 360 guide useful.
If you are designing a single-body model, part of which should be MMU-Painted, make sure there is a sharp line surrounding each distinct part so that you can use the MMU Painting's Smart-fill function later on in PrusaSlicer.

If you have an intricate STL file that can't be MMU-Painted easily, you can try the more sophisticated way of Splitting STL with single compact part or Splitting STL into multiple parts using MeshMixer.

MMU シングル材料での操作
MMU シングル材料での操作
MMU シングル材料での操作
MMU シングル材料での操作
Did you know that MMU3 unit can also be used to make single-material printing more convenient too?
You can keep up to five of your favorite materials loaded into the MMU unit.
On the MK3.5/MK3.9/MK4, use the regular MK3.5/MK3.9/MK4 profile, when slicing. The printer will allow you to choose which filament to use.
On the MK3S+, Slice an object with the MMU3 Single profile and start the print. Then, choose which filament to use from the LCD.
If you know which of the five materials to use already while slicing, you can use the MMU3 profile and assign a single color (Extruder number) to the object.

If a filament runs out, your print can continue automatically using the SpoolJoin function. For more information, refer to the SpoolJoin article.

自分へのご褒美
自分へのご褒美
ここまで無事にたどり着くことができたなら、自分へのご褒美を用意しましょう。
プリンタがスタートするのを見ながら、ハリボーを食べよう。
Was this guide helpful?

Comments

Still have questions?

Still have questions?

If you have a question about something that isn't covered here, check out our additional resources.
And if that doesn't do the trick, you can send an inquiry to [email protected] or through the button below.

Contact us