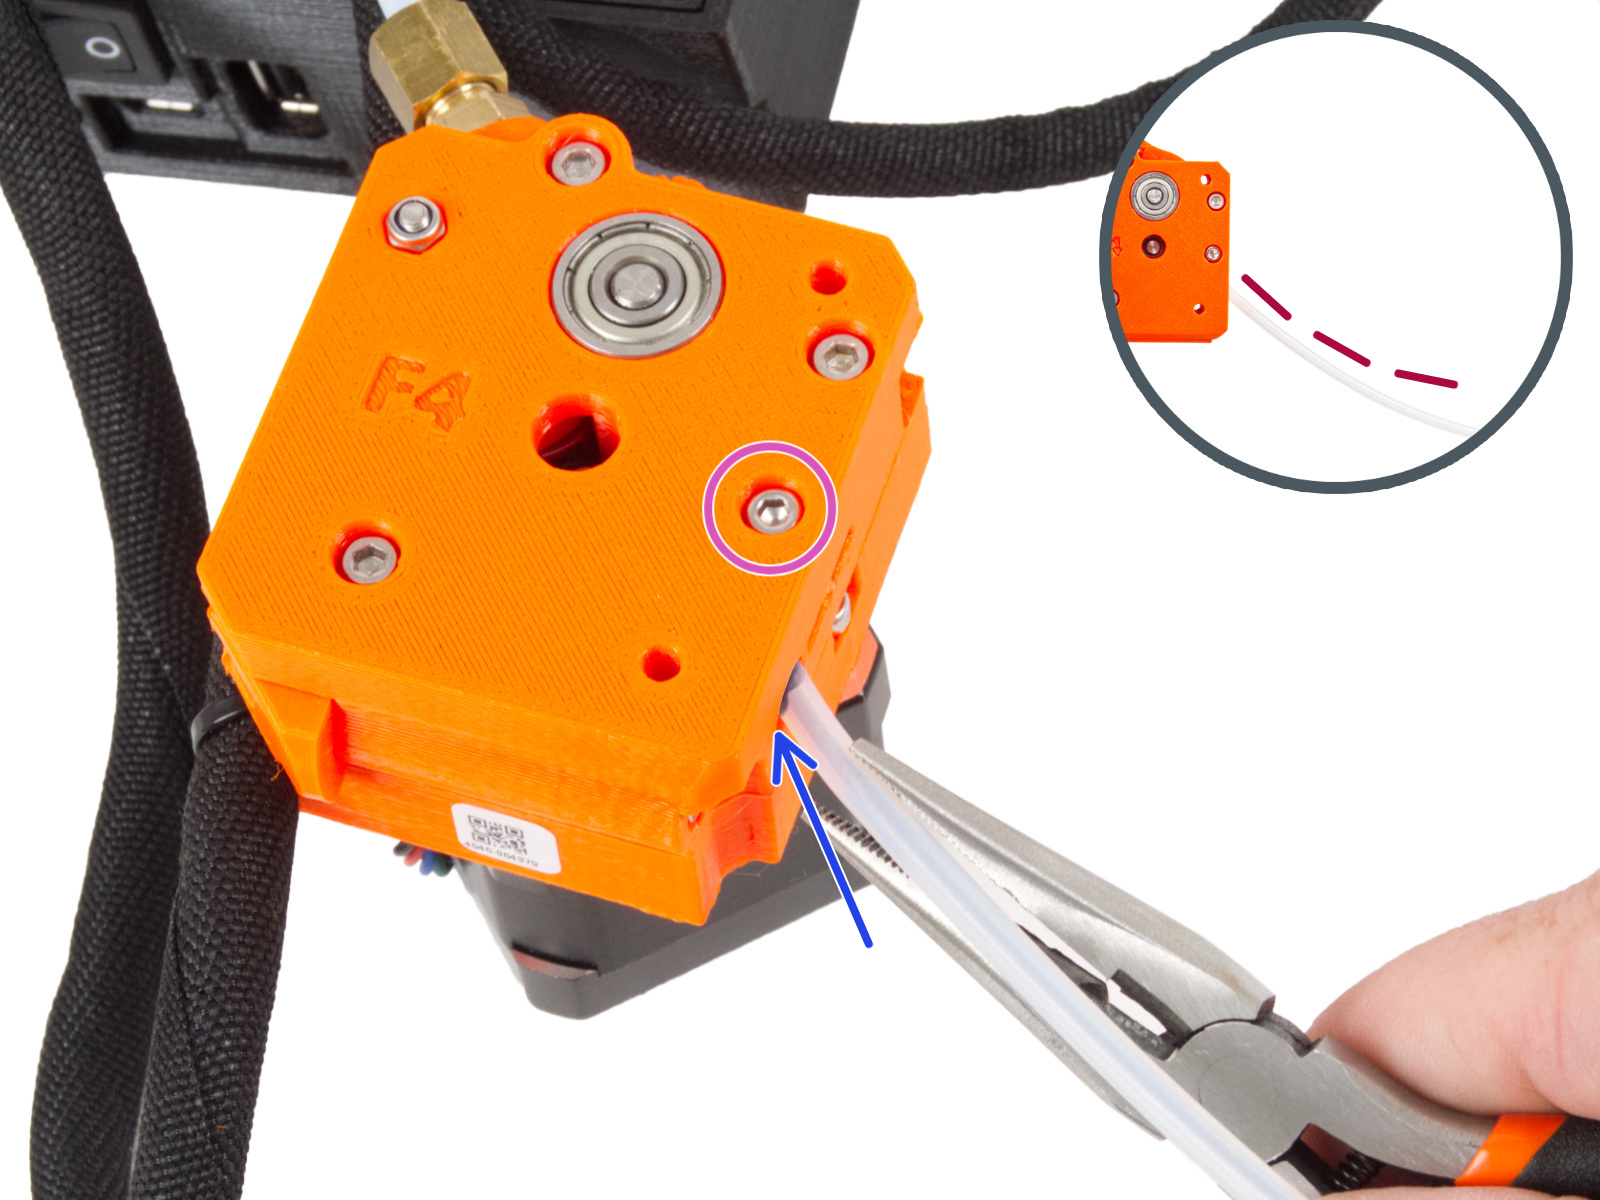
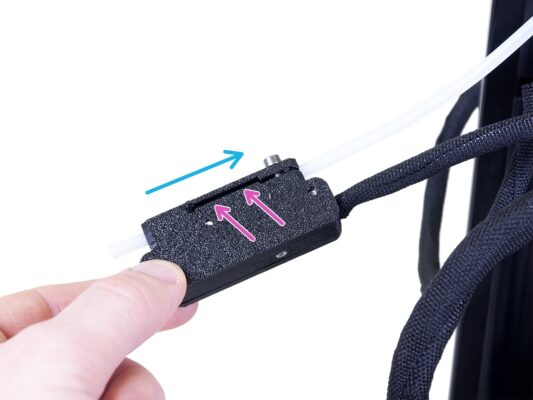
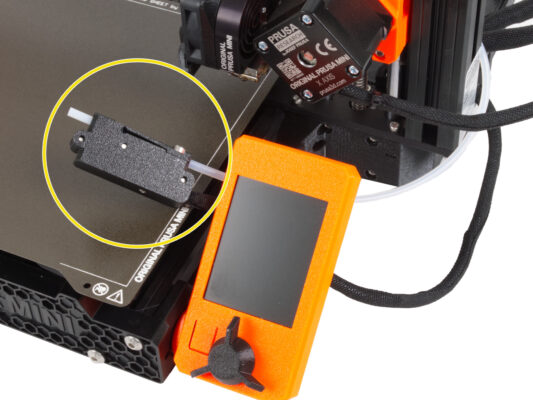
FR
  • English
  • Čeština
  • Italiano
  • Deutsch
  • Polski
Se Connecter

3. Installing the printer

3. Installing the printer

3. Installing the printer
Pertinent pour:
Dernière mise à jour 4 days ago
3. Installing the printer
 Difficulté
Modéré
 Étapes
21
 Langues disponibles
ENCSPLDEIT
Configuration de l'imprimante
Branchez l'imprimante et allumez-la.
Completely unload the filament from the printer.
To make handling the printer easier, lower the Z-axis to its lowest possible point.
Firmware 4.0.0 and newer: using the LCD knob navigate to Control -> Autohome.
Up to firmware 4.0.0: using the LCD knob navigate to Calibration -> Autohome.
Where can you find the firmware version? On the printer screen, navigate from the main screen to Info -> Version info.
Make sure the printer has cooled down to room temperature. Check the values on the printer's screen.
Turn the printer OFF and disconnect it from the outlet.
Removing the input PTFE tube (optional)
The following steps will show how to replace the original input PTFE tube with a longer tube. Replacing the input PTFE tube for a longer one is optional, but recommended for easier filament insertion. If you don't want to replace the PTFE, skip to USB cable: parts preparation.
Hold the extruder with one hand.
Using your second hand, release two screws securing the extruder to the Z-carriage.
Carefully take the extruder off the printer a place it next to it.
Loosen the screw on the plastic part of the extruder. The screw does not need to be removed, just a few turns are sufficient.
Pull out the input PTFE tube from the extruder.
If it is difficult to remove, use pliers to pull it out.
Retrait du capteur de filament (optionnel)
This step is intended for printers with the filament sensor. If your printer does not have the filament sensor, skip this step.
Slightly loosen the top screw on the filament sensor.
Pull out the longer PTFE tube.
If it is difficult to remove, use pliers to pull it out.
Insertion du tube PTFE
Il est recommandé de marquer la distance de 2,5 cm (0,98 pouces) à partir de l'extrémité du tube PTFE avant l'insertion dans l'extrudeur. Les deux extrémités sont symétriques.
Localisez le trou pour le tube en PTFE sur le côté de l'assemblage de l'extrudeur et insérez l'extrémité marquée du tube dans l'extrudeur. Vérifiez la bonne insertion grâce au marquage sur le tube.
You can use pliers for insertion. However, ensure a piece of filament is inserted in the PTFE tube to prevent deformation.
Check that the PTFE tube is bent in the correct direction (see the detail).
Secure the tube by tightening the M3x12 screw.
Attach the extruder back to the Z-carriage.
Hold the extruder with one hand and using your second hand secure the extruder by tightening two M3x25 screws. Tighten firmly.
Installation du capteur de filament (optionnel)
Faites glisser le capteur de filament sur le tube PTFE. Voir l'image pour la bonne orientation du capteur.
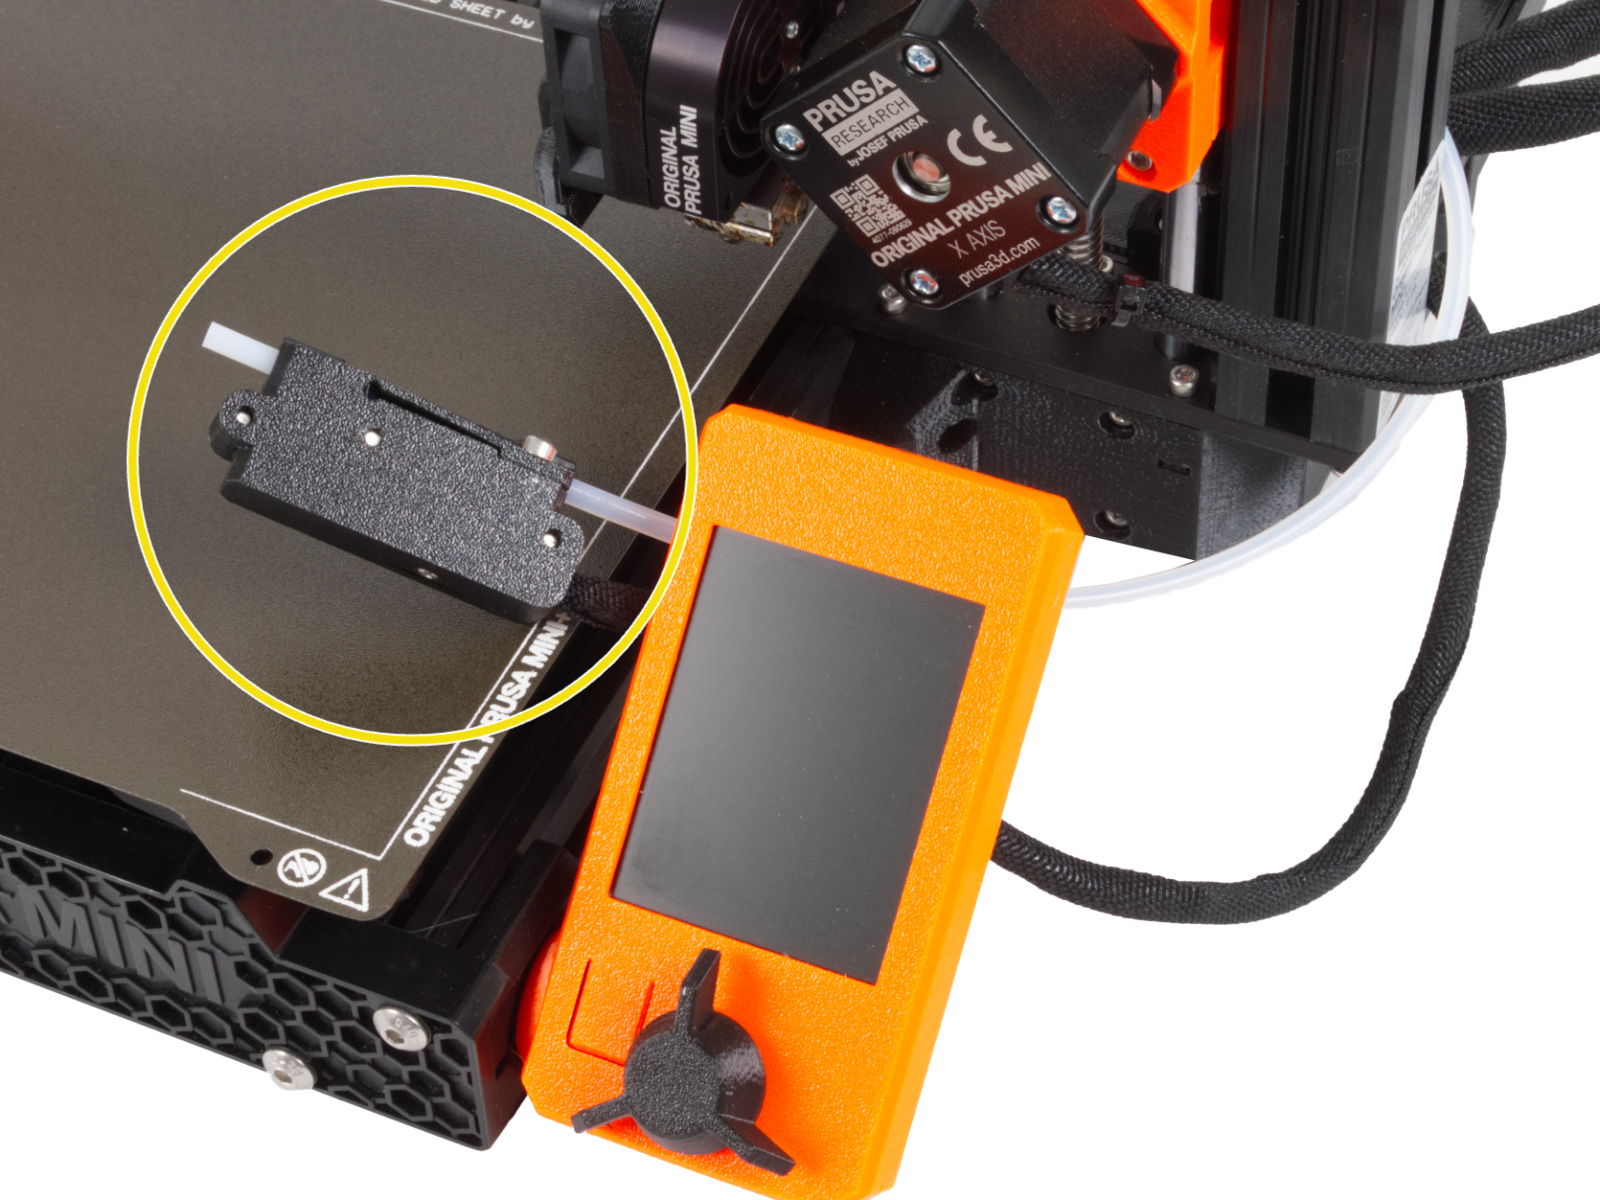
Vérifiez la position du tube PTFE à travers la rainure :
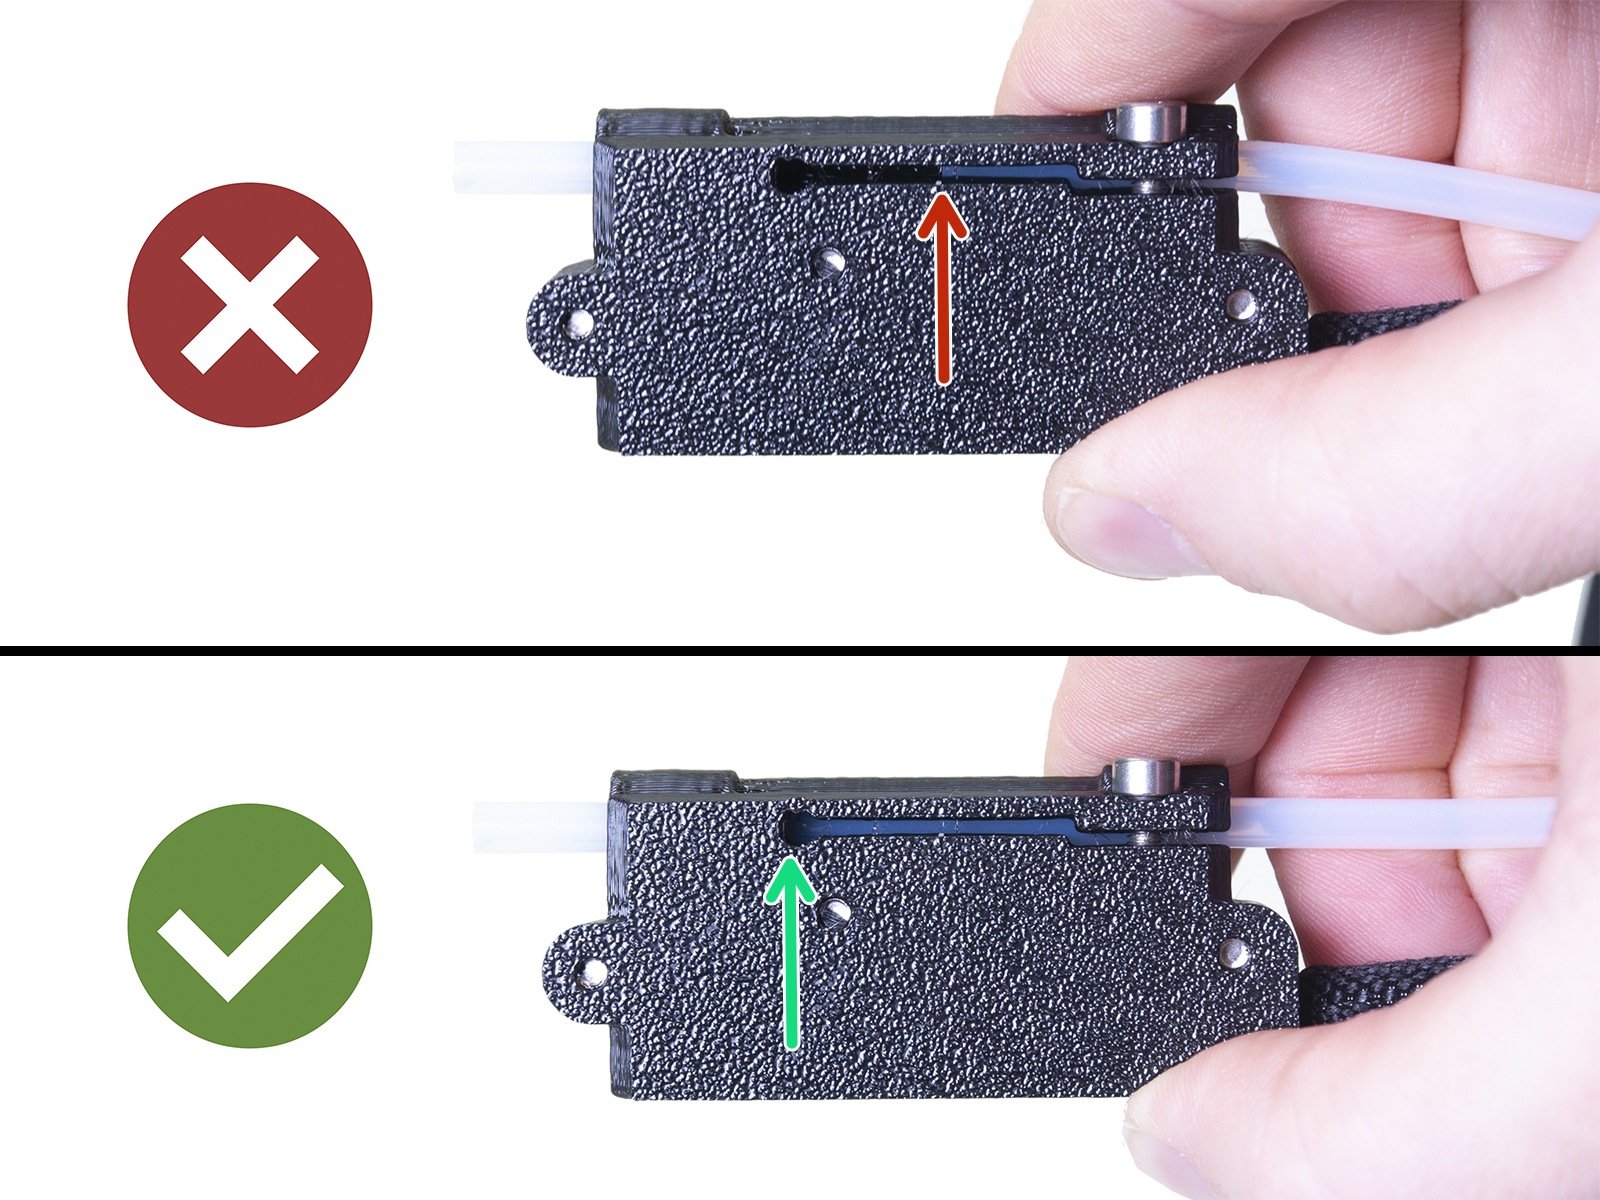
Mauvaise installation. Le capteur de filament n'est pas complètement enfoncé sur le tube PTFE. Le capteur de filament ne fonctionnera pas correctement.
Bonne installation. Le capteur de filament est complètement enfoncé sur le tube PTFE.
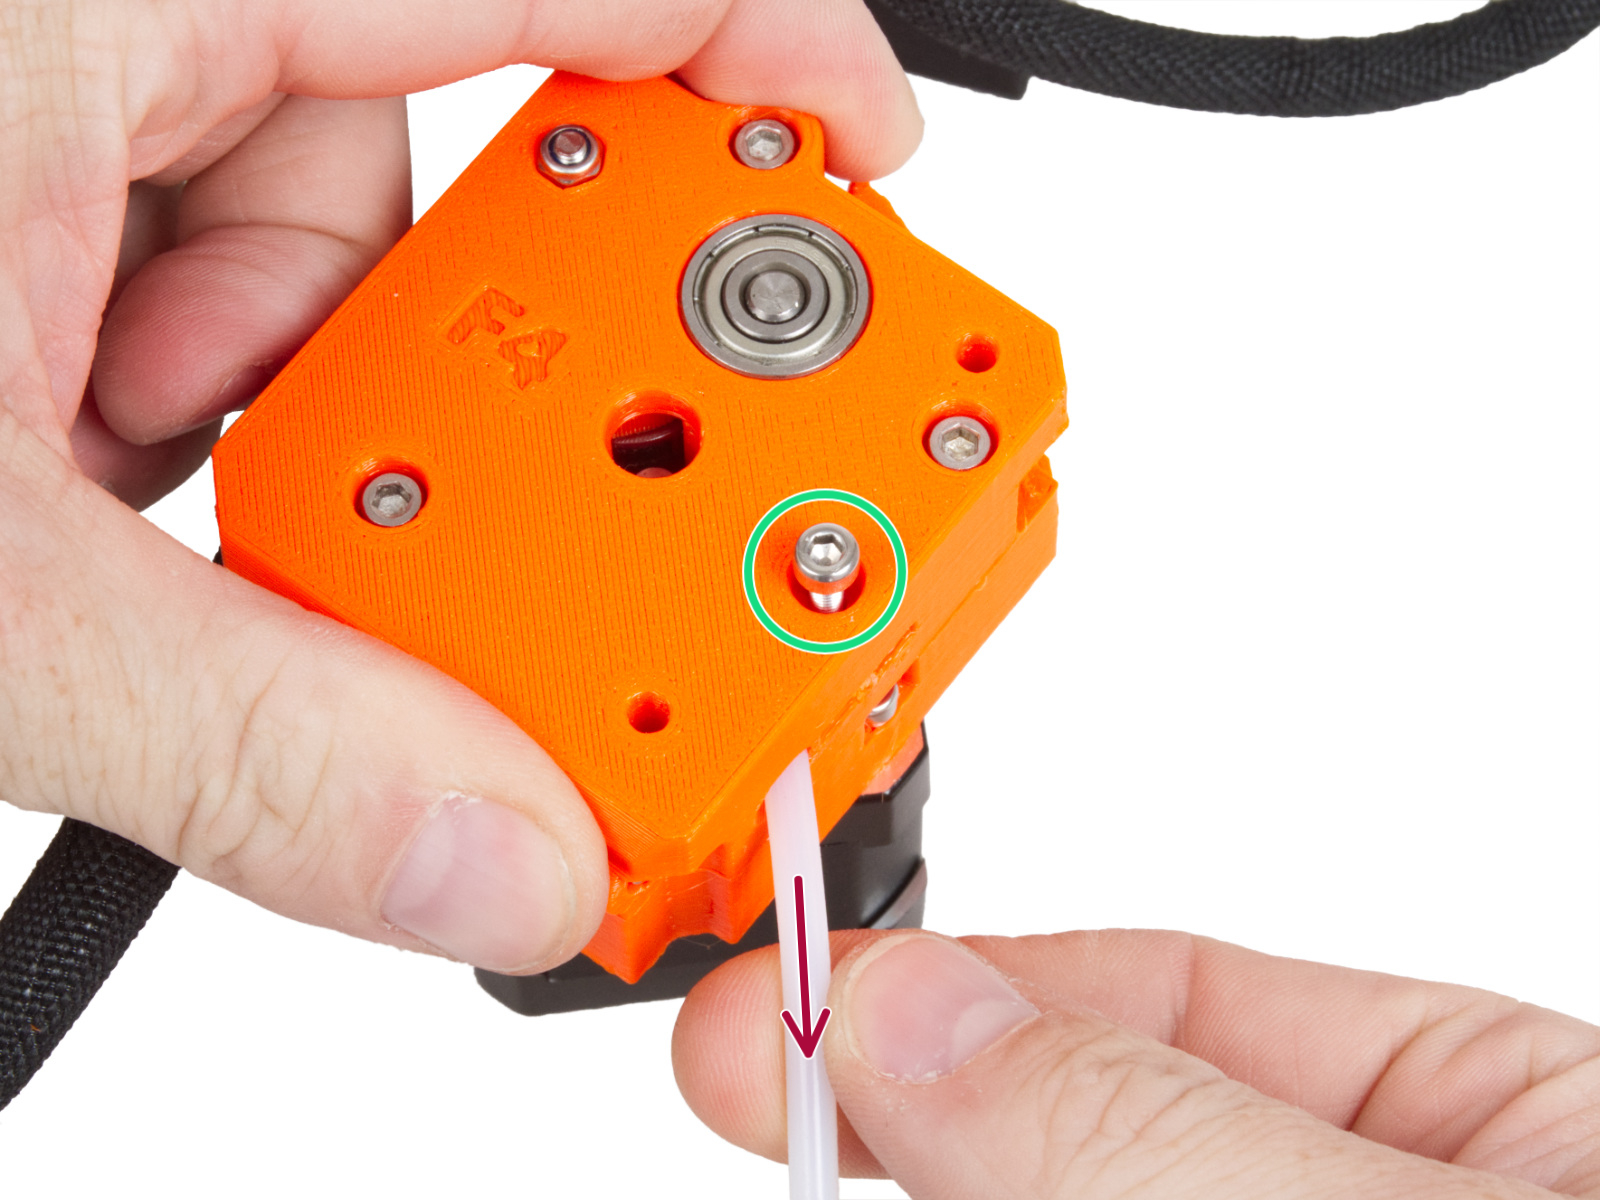
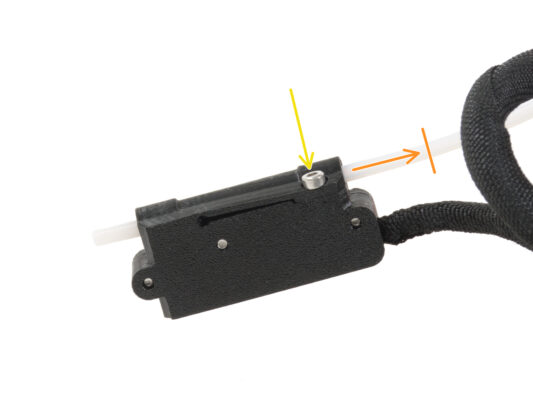
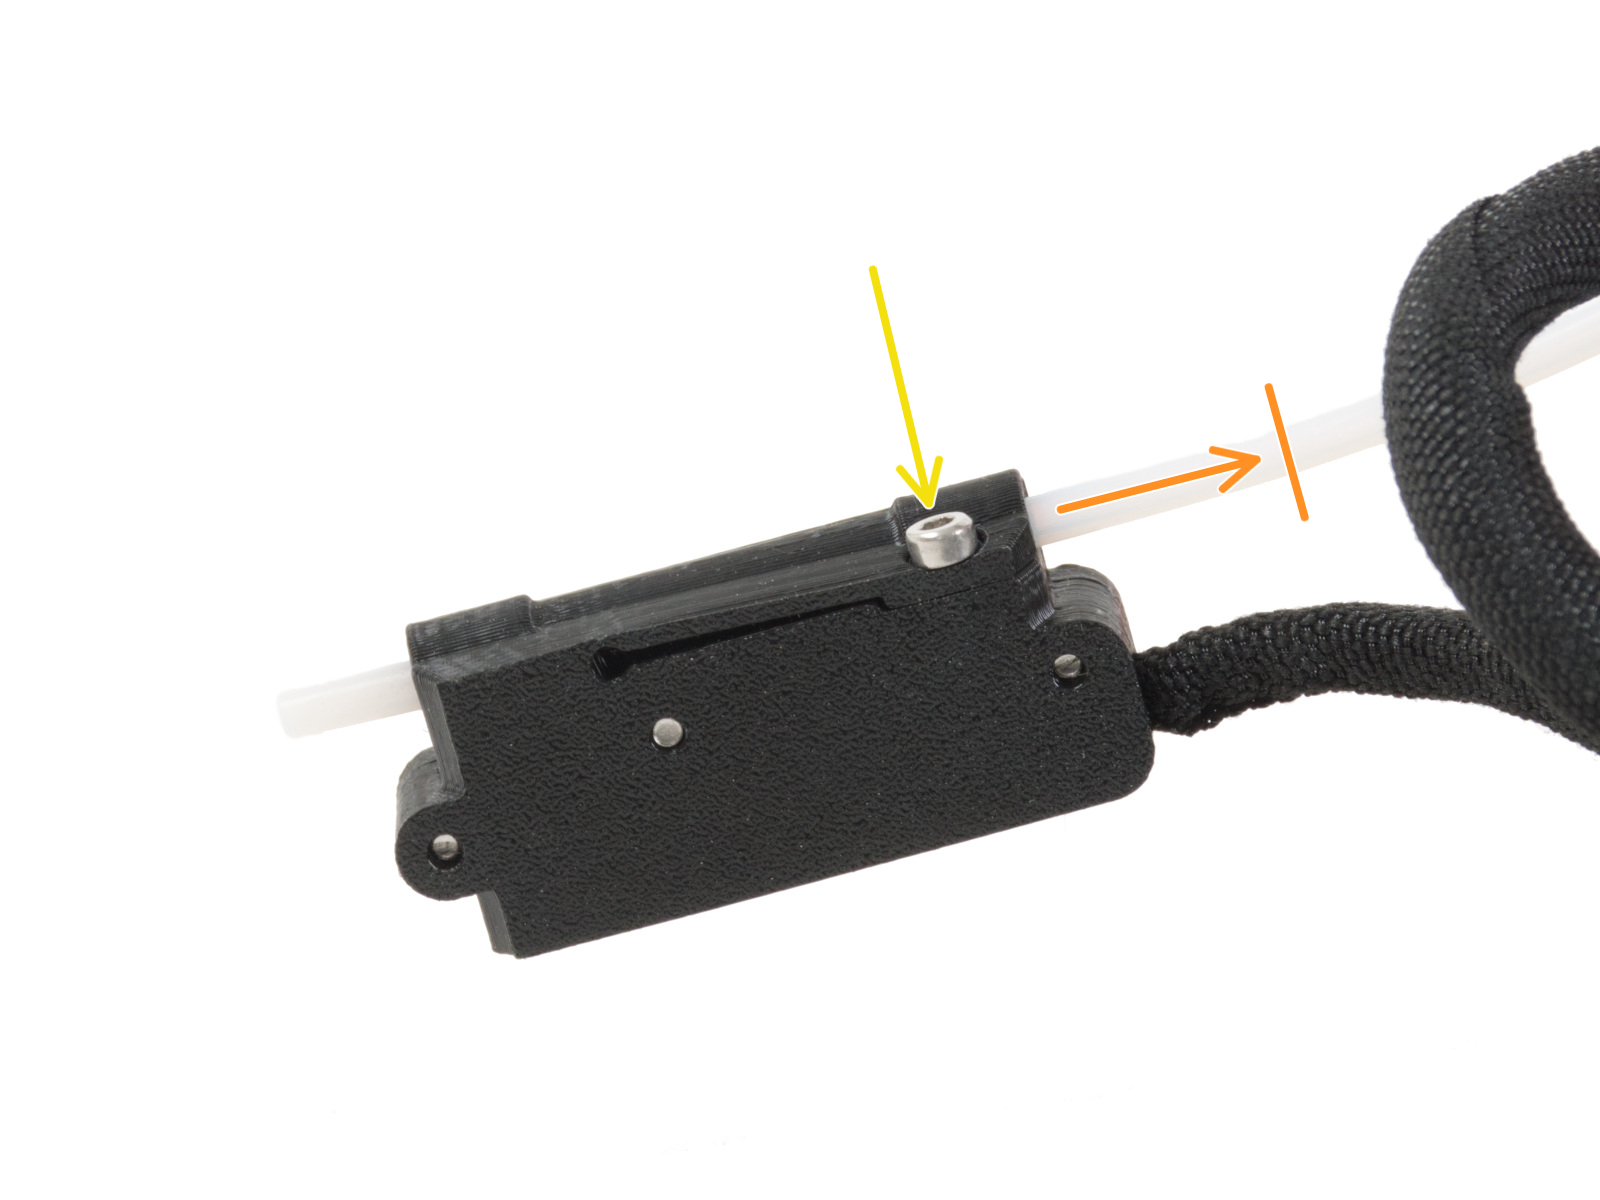
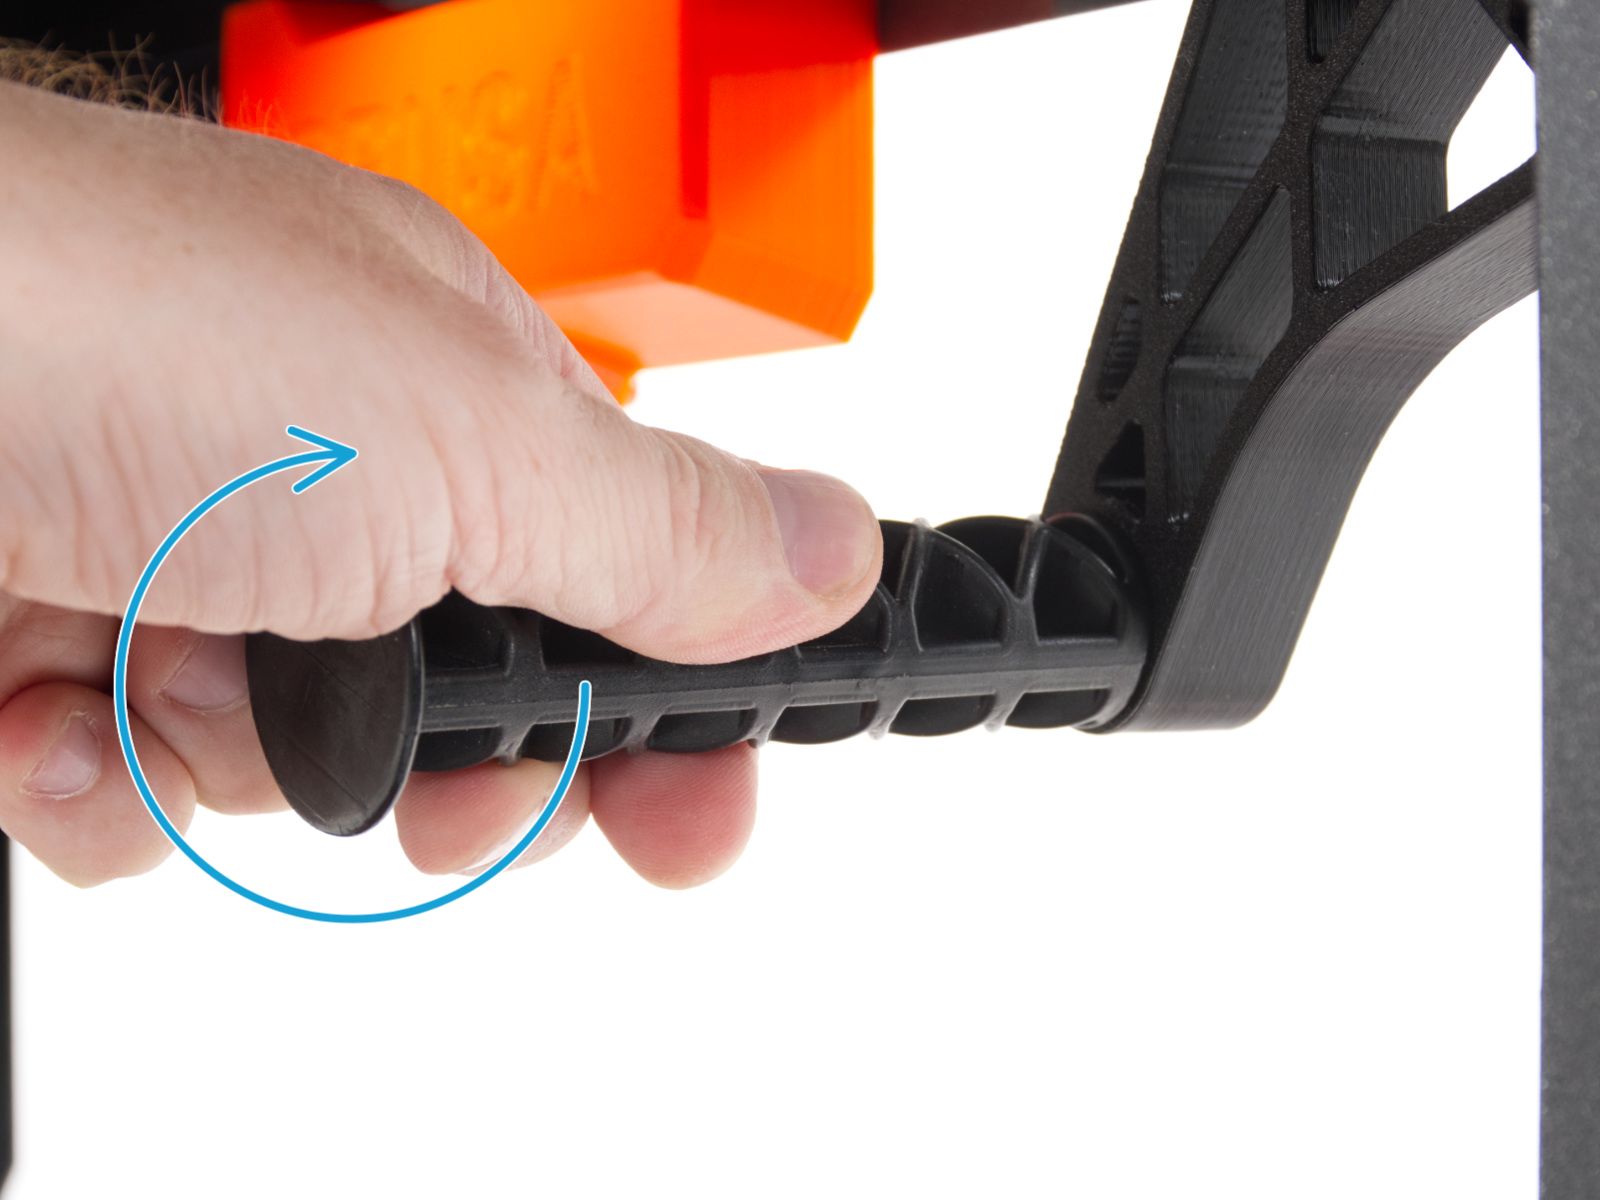
Maintenant, serrez doucement la vis pour vous assurer que le capteur ne glissera pas du tube PTFE.
Utilisez un morceau de filament et faites-le glisser à travers le capteur de filament pour vérifier le bon fonctionnement du tube. En cas de résistance, relâchez légèrement la vis.
Inserting the USB cable
Push the USB cable from the outside in through the rectangular hole in the bottom panel.
Ensure the USB symbol on the connector is facing upwards.
Press the connector fully into the hole with your thumbs. You should feel a slight click.
Guide the cable along the right side of the Enclosure.
Secure it with two zip ties. Do not overtighten the zip ties.
Preparing the printer
In the following steps, we will insert the printer into the enclosure. Before that, we need to check the following:
Z-axis is in the lower position.
Ensure that the nozzle does not touch the printing surface!
Ensure the print head is in the rightmost position.
If you have the filament sensor, you can temporarily hook it to the LCD. This will prevent it from getting in the way during insertion.
Remove the USB stick from the printer.
Installing the printer
Carefully insert the printer inside the enclosure with its base facing forward. When doing so, be EXTRA CAREFUL to:
Ensure the X-end and aluminum Z-axis profile pass through the right and left cutouts of the front opening. Use EXTRA CAUTION to avoid damaging the printer or enclosure.
Hold the heatbed with your left hand to prevent it from sliding down and getting damaged on the bottom plate.
During insertion, carefully watch all sides of the printer to ensure nothing is in the way (e.g., cables, motors, etc.).
Carefully place the printer on its feet. We will adjust the exact position later on.
Ensure that no parts of the printer touch the side panels to avoid scratches.
Connecting the cables
From the back of the printer, connect the PSU power cable. See the correct orientation of the cable.
If the space is difficult to access, move the printer closer to the front, avoiding scratches on the panels.
If necessary, connect an ethernet cable, which is optional.
Connect the USB extension cable from the right side of the printer.
Adjusting printer position
Rearrange position of the printer like in the picture. The printer must be placed between all three anti-slip dampers.
Thermometer: parts preparation
Pour les étapes suivantes, merci de préparer :
Temperature sensor (1x)
Thermometer-bracket (1x)
M3x8 screw (2x)
M3n nut (2x)
Assembling the thermometer
Insérez deux écrous M3n dans le Thermometer-bracket.
Retirez la languette en plastique du capteur de température.
Insérez le capteur de température dans le Thermometer-bracket. Poussez dessus avec vos pouces jusqu'à ce que vous sentiez un léger "clic". Évitez d'appuyer sur l'écran, vous pouvez l'endommager.
De l'intérieur, montez le thermomètre dans le coin supérieur gauche. Fixez-le avec deux vis M3x8.
Installing spool holder
Insérez complètement deux écrous M3n dans les trous du Spool-holder-r.
From the inside, align the holes of the Spool-holder-r with the corner on the right side of the enclosure. Ensure the orientation is correct.
Secure the Spool-holder-r with two M3x12 screws.
Mounting the side arm
Insérez le bras latéral dans le Spool-holder-r et tournez dans le sens antihoraire pour le verrouiller.
Sticking the label
Sticking the label
And the very last thing, stick the silver label including the serial number on the rear side of the Enclosure.
Locate the silver label with the serial number in your package.
Place it on near the left bottom corner.
Haribo time!
Haribo time!
You have successfully installed the printer into the enclosure. This requires a certain reward!
Eat the remaining gummy bears from the third row.
That's it
That's it
That's all! Great job. You have successfully assembled the Original Prusa MINI Enclosure. Now, let's try it out.
On the right side of the printer, turn the power switch ON.
You can now hang the filament spool on the spool holder and load the filament into the printer and start printing.
Ce guide vous a-t-il été utile ?

Commentaires

Vous avez encore des questions ?

Vous avez encore des questions ?

Si vous avez une question sur un sujet qui n'est pas traité ici, consultez nos ressources supplémentaires.
Et si cela ne suffit pas, vous pouvez envoyer une demande à [email protected] ou via le bouton ci-dessous.

Nous contacter