Čeština
Login
3D tiskárny
Materiály
Díly & příslušenství
Software
3D modely
Aplikace
Komunita
Podpora
Akademie
Blog
O nás
Podpora
Original Prusa XL
Original Prusa XL Enclosure (1.0)
4. Nextruder upgrade (Multi-Tool) | Nářadí potřebné k této kapitole
1. Nářadí potřebné k této kapitole
Step 1 of 24 (Chapter 4 of 7)
Režim celé obrazovky
Obsah
Komentáře
⬢
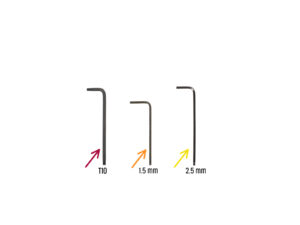
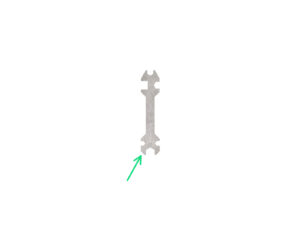
Pro tuto kapitolu si prosím připravte:
⬢
T10 Torx klíč (šroubovák)
⬢
1,5mm inbusový klíč
⬢
2,5mm inbusový klíč
⬢
Univerzální klíč
Loading...
Další
Obsah
Original Prusa XL Enclosure (1.0)
1. Úvod
2. Sestavení Enclosure
3. Upgrade tiskárny
4. Upgrade Nextruderu (Multi-Tool)
Nářadí potřebné k této kapitole
Uvolnění svazku kabelů Nextruderu
Oddokování Nextruderu
Uvolnění dílu Idler-swivel
Odšroubování dílu PG-case: čtyři šrouby
Odšroubování dílu PG-case: tři šrouby
Uvolnění idleru
Rozebrání přítlačné kladky (idler)
Idler Nextruderu: příprava dílů
Sestavení Extruder-idleru
Rozebrání dílu Idler-swivel
Rozebrání dílu Idler-swivel
Idler-swivel: parts preparation
Sestavení přítlačné záklopky Idleru (Idler-swivel)
Montáž dílu Idler-nut
Uchycení Idleru: čtyři šrouby
Uchycení Idleru: tři šrouby
Uchycení dílu Idler-swivel
Odstranění dílu fan shroud
Fan shroud: příprava dílů
Zajištění dílu fan shroud
Dokování Nextruderu
Připojení Nextruderu
Dobrá práce
5. Upgrade Nextruderu (Single-tool)
6. Zajištění Enclosure
Manual changelog XL Enclosure kit
Komentáře
Pro přidání kometáře se prosím
přihlaste
Zatím žádné komentáře