Čeština
Login
3D tiskárny
Materiály
Díly & příslušenství
Software
3D modely
Aplikace
Komunita
Podpora
Akademie
Blog
O nás
Podpora
Original Prusa XL
Original Prusa XL Enclosure (1.0)
3. Printer upgrade | Nářadí potřebné k této kapitole
1. Nářadí potřebné k této kapitole
Step 1 of 62 (Chapter 3 of 7)
Režim celé obrazovky
Obsah
Komentáře
⬢
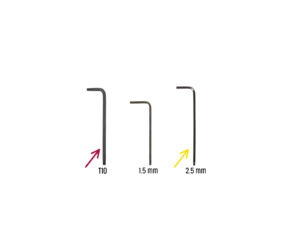
Pro tuto kapitolu si prosím připravte:
⬢
T10 Torx klíč (šroubovák)
⬢
2,5mm inbusový klíč
Loading...
Další
Obsah
Original Prusa XL Enclosure (1.0)
1. Úvod
2. Sestavení Enclosure
3. Upgrade tiskárny
Nářadí potřebné k této kapitole
Odstranění krytů základny XL (XY base)
XL Base nuts: parts preparation
Jak vložit matky
Vložení matek do základny XL (XL base)
Lower bellows holder: parts preparation
Několik tipů, než začneme
Right bellows magnet spacer
Left bellows magnet spacer
Spodní magnety
Lower bellows holder securing: left side
Lower bellows holder securing: right side
Vložky CoreXY (inserts): příprava dílů
Vložky CoreXY
Kryt horního magnetu: příprava dílů
Několik tipů, než začneme
Sestavení horního krytu magnetu
Připevnění horních magnetů
Zajištění horního krytu magnetu: pravá strana
Zajištění horního krytu magnetu: levá strana
Připojovací krabička: příprava dílů
Montáž připojovací krabičky (connection box)
Zajišťovací držáky (fixing brackets): příprava dílů
Upevnění upevňovacího držáku vepředu vlevo
Zajištění upevňovacího držáku vepředu vlevo
Zajištění upevňovacího držáku vepředu vpravo
Zajištění upevňovacího držáku vzadu vlevo
Zajištění připojovací krabičky (connection box)
Zajištění upevňovacího držáku vzadu vpravo
Odstranění zadní Wi-Fi antény
XL buddy box
Boční anténa: odstranění krytu
Zadní anténa: vyjmutí konektoru
Odpojení Nextruderu
Odstranění zadního krytu
Uvolnění zadních kabelů
Kabel ventilátoru & PE: příprava dílů
Zajištění kabelu PE
Připojení kabelu PE
Připojení kabelu ventilátoru
Instalace LED kabelu
Instalace LED kabelu
Zajištění kabelů Enclosure
Zajištění kabelů
Zadní kryt: příprava dílů
Připevnění zadního krytu
Uchycení krytu antény
Připojení antény & Nextruderu
Zakrytí krabičky XL Buddy
UPOZORNĚNÍ: Manipulace s mazivem
Uvolnění spodního řemene
Uvolnění horního řemene
Svorka řemene: příprava dílů
Výměna spodní svorky řemene
Zajištění spodního řemene
Výměna horní svorky řemene
Zajištění horního řemene
Utažení řemene
Napnutí řemene: video
Krycí měch: příprava dílů:
Instalace krycího měchu
Dobrá práce
4. Upgrade Nextruderu (Multi-Tool)
5. Upgrade Nextruderu (Single-tool)
6. Zajištění Enclosure
Manual changelog XL Enclosure kit
Komentáře
Pro přidání kometáře se prosím
přihlaste
Zatím žádné komentáře