日本語
Login
3Dプリンター
マテリアル
部品 & アクセサリー
ソフトウェア
3Dモデル
応用事例
コミュニティ
ヘルプ
アカデミー
ブログ
会社概要
サポート
Prusa CORE One
Prusa CORE One (組み立て済) (1.00)
4. Calibration & First run | プリントシートの取り付け
1. プリントシートの取り付け
Step 1 of 13 (Chapter 4 of 5)
フルスクリーンモード
内容
コメント
This chapter will guide you through calibrating and preparing the printer for its first run.
ヒートベッドに何もついていないことを確認します。
ヒートベッドは清潔でなければなりません。汚れが付着していると、ヒートベッドとプリントシートの表面が損傷します。
⬢
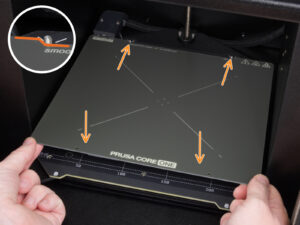
Attach the sheet by first aligning the rear cutout with the locking pins on the back of the heated bed.
Hold the sheet by the front two corners and slowly lay it down onto the heated bed -
watch your fingers!
⬢
プリントシート
は常に清潔に保ち、最高のパフォーマンスを発揮できるようにしてください。
⬢
プリントオブジェクトがプリントシートから剥がれてしまう原因の第1位は、油の汚れです。
IPA(イソプロピルアルコール)を使って脱脂してください
。
Loading...
次
内容
Prusa CORE One (組み立て済) (1.00)
1. はじめに
2.プリンタの開梱
3.xLCDの取り付け
4. Calibration & First run [進行中の翻訳]
プリントシートの取り付け
Turning it ON
Setting up the printer: Intro
Setting up the printer: Network setup
Wizard: Intro
Wizard: Loadcell Test
Wizard: Gearbox Alignment
ウィザード - フィラメントセンサーのキャリブレーション
Wizard complete
Handbook
Firmware update
Prusa knowledge base
Join Printables!
Manual changelog
コメント
ログイン
してコメントを投稿する
コメントなし